Advertisement
Table of Contents
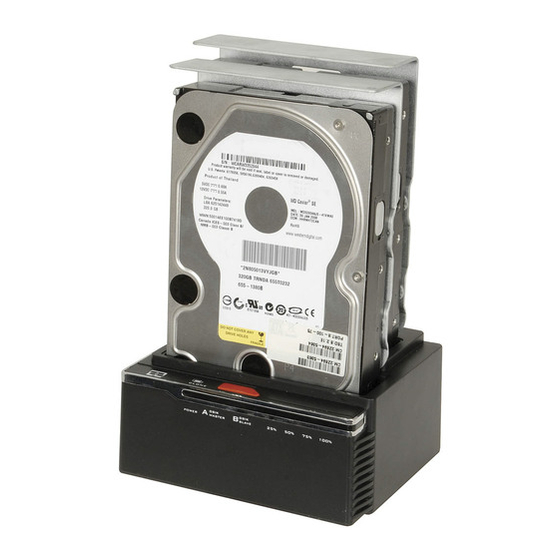
Introduction: : : :
XC4695 is an USB2.0/E-SATA dual HDD docking station
that allows direct data exchanging between SATA II 3.0G and
High-speed USB. It supports Offline Clone, which is able to
copy data and system files from Source HDD to Target HDD
completely via finger touch.
Function Chart:
1、Power switch (ON/OFF)
4、E-SATA interface
6、Bay 'A' indicator
8、Clone processing indicator
Caution:
1. Once using E-SATA interface, it can only recognize one HDD
in PC. If 2 HDDs are inserted in the dock, it can only recognize
Bay 'A' HDD. If only insert one HDD in the dock, both Bay'A' and
Bay 'B' can be recognized.
XC4695 Manual
2、DC input
5、Power indicator
7、Bay 'B' indicator
- 1 -
3、USB interface
9、Clone button
Advertisement
Table of Contents

Summary of Contents for DigiTech XC4695
- Page 1 XC4695 Manual Introduction: : : : XC4695 is an USB2.0/E-SATA dual HDD docking station that allows direct data exchanging between SATA II 3.0G and High-speed USB. It supports Offline Clone, which is able to copy data and system files from Source HDD to Target HDD completely via finger touch.
- Page 2 Function: : : : * Complies with Serial ATA International Organization: Serial ATA Revision 2.6 * Supports SATA 1.5G/3.0G Speed * Supports SATA Hot swap * Supports SATA Host/Device controller configuration * Complies with USB 2.0 electrical specification * Supports USB 2.0 High-Speed and Full-Speed * Complies with USB Mass Storage Class, Bulk-Only Transport Specification * Supports clone function...
- Page 3 1, 1, 1, 1, Offline clone a、 Insert source HDD to Bay ‘A’; target HDD to Bay ‘B’, and then turn on the power b、Once the Bays indicators are on, that means XC4695 is ready for clone. - 3 -...
- Page 4 c、Press and hold the clone button for 3 seconds until the indicator light is on, press the button once more for Clone confirmation. Offline clone is starting to process. d、Clone progress indicator flashes and shows the progress (25%, 50%, 75%, 100%). - 4 -...
- Page 5 e、Once clone is finished, all progress indicators will light up. f、Turn off power and take out the HDD carefully 2, USB Clone Drive Installation a、Please insert the CD drive and click “setup.exe”. Choose your language and click “ Next” - 5 -...
- Page 6 b、Fill in the S/N # accordingly (you can find the S/N# on the cover of CD drive) c、Click “Install” for installation - 6 -...
- Page 7 d、Installation progress is showed e、please click “Done” once installation is finished. - 7 -...
- Page 8 3, 3, 3, 3, Clone from Source HDD to Target HDD a、Please insert Source HDD and Target HDD well to the docking, connect XC4695 to PC via USB cable. Turn on the power, you can find the clone icon on the right bottom of window, then double click the CLONE Icon to start the program.
- Page 9 c、Press start to proceed with Clone. d、Clone progress is showed - 9 -...
- Page 10 e、Click “OK” once clone is finished f、You should find the same contents of Source HDD in Target - 10 -...
- Page 11 g、If your target HDD has extra space, the system will allocate it to “unallocated” area automatically, please refer to the below picture. (Windows system only allows a maximum of four primary partitions, if the original disc already exist four primary partitions, then it can not distinguish the extra space but logical drives can have more than one )...
- Page 12 b、Right click 〝New partition〞for further action c、“Next” - 12 -...
- Page 13 d、Base on your need and click “Next” e、Please enter the new partition capacity and click “Next” for further action - 13 -...
- Page 14 f、Assign the drive letter and “Next” g、Select “quick format” to format the new partition - 14 -...
- Page 15 h、Click “finish” i、Partition completed, the new partition can be found. - 15 -...
Need help?
Do you have a question about the XC4695 and is the answer not in the manual?
Questions and answers