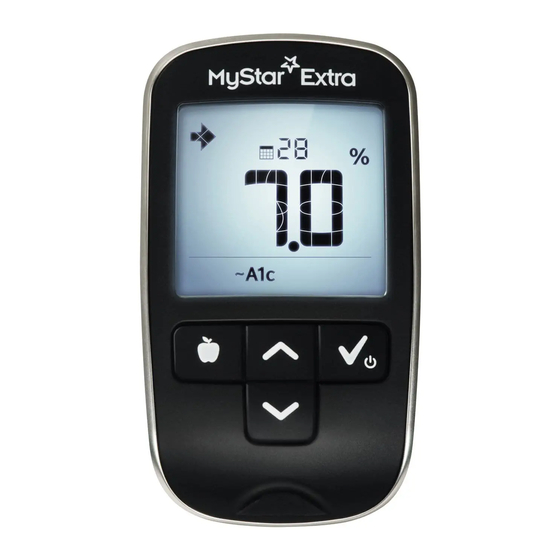
MyStar Extra Overview
Hide thumbs
Also See for Extra:
- Owner's manual (95 pages) ,
- Owner's manual (5 pages) ,
- Quick operating manual (2 pages)
Advertisement
Table of Contents
Meter & Test Strip Overview
Display
Mealtime Button
– use to select or
change a meal tag or to
logbook
Test Strip Port
Front of the Test Strip
(black-coloured side)
Sample Area
Blood should be applied here.
Mini-USB-Port
UP Arrow Button
– use to scroll to a more
recent result in logbook
or to increase a value
(e.g. in settings)
CHECK Button
– use to accept and/or
move to next step
DOWN Arrow
Button
– use to scroll
to a past result in
logbook or to decrease a
value (e.g. in settings)
Contact Bars
– insert strip with
bars facing up
Visual Fill
Window
Turns red when enough
blood has been applied.
Advertisement
Table of Contents

Summary of Contents for MyStar Extra
- Page 1 Meter & Test Strip Overview Mini-USB-Port Display UP Arrow Button – use to scroll to a more recent result in logbook or to increase a value Mealtime Button (e.g. in settings) – use to select or change a meal tag or to CHECK Button –...
-
Page 2: Setting Time And Date
Setting Time & Date Meter Buttons: UP Arrow DOWN Arrow CHECK [1] When your meter is deactivated, Example of setting hour ( ashing): press and hold the CHECK button to enter settings mode. Select the time format (12 hr vs. 24 hr) and press the CHECK button to select. - Page 3 Symbols & Messages Refer to the MyStar Extra® Owner’s Guide for complete instructions for use. Meter Modes Mealtime Tags Logbook No Tag Averages Fasting Estimated A1c Pre Meal Settings Post Meal Trending Arrows Viewing Averages (in Logbook Mode (in Averages Mode...
- Page 4 Symbole und Meldungen Symbols & Messages Für eine vollständige Information lesen Sie bitte die Bedienungsanleitung Refer to the MyStar Extra® Owner’s Guide for complete instructions for use. des MyStar Extra™. Viewing a Time Blood Glucose Date Test Result Mealtime Tag...
-
Page 5: Blood Glucose Test
Blood Glucose Test Refer to the MyStar Extra® Owner’s Guide for complete instructions for use. IMPORTANT: See your MyStar Extra® Owner’s Guide for a more detailed step-by-step guide on how to perform the test. [1] Insert the test strip into the... - Page 6 Blood Glucose Test Refer to the MyStar Extra® Owner’s Guide for complete instructions for use. Mealtime button CHECK button [5] View Test Result and [4] Remove test strip from Set Mealtime Tag Blood sample when the test Blood glucose test...
- Page 7 Viewing the Logbook (Past Results) Refer to the MyStar Extra® Owner’s Guide for complete instructions for use. Meter Buttons: DOWN Mealtime CHECK Arrow Arrow Viewing the Logbook: [1] When your meter is deactivated, press the CHECK button to enter the logbook.
-
Page 8: Viewing Averages
Viewing Averages Refer to the MyStar Extra® Owner’s Guide for complete instructions for use. Meter Buttons: DOWN Mealtime CHECK Arrow Arrow Viewing Averages: [1] When your meter is deactivated, press the CHECK button to activate the meter. The most recent result is displayed. - Page 9 Viewing Estimated A1c (~A1c) Refer to the MyStar Extra® Owner’s Guide for complete instructions for use. Obtaining an ~A1c result To obtain an ~A1c result, perform the following steps in order: [1] Create [3] Take “Fasting” blood glucose tests every day for the next 6 days after your 7 blood glucose tests taken in one day.
- Page 10 Viewing Estimated A1c (~A1c) Refer to the MyStar Extra® Owner’s Guide for complete instructions for use. [3] Take “Fasting” Blood Glucose Tests every day for the next 6 days. Take a “Fasting” blood glucose test when you have not had any food or drink (except water) for at least 6-8 hours (usually immediately upon waking up).


Need help?
Do you have a question about the Extra and is the answer not in the manual?
Questions and answers