Summary of Contents for Impromat Klima UTI-IQCP
-
Page 1: User Guide
User Guide UTI-IQCP Control panel for setting and monitoring of UTI-INV internal temperature regulator v. 1.06 EN... -
Page 2: Main Display Screen
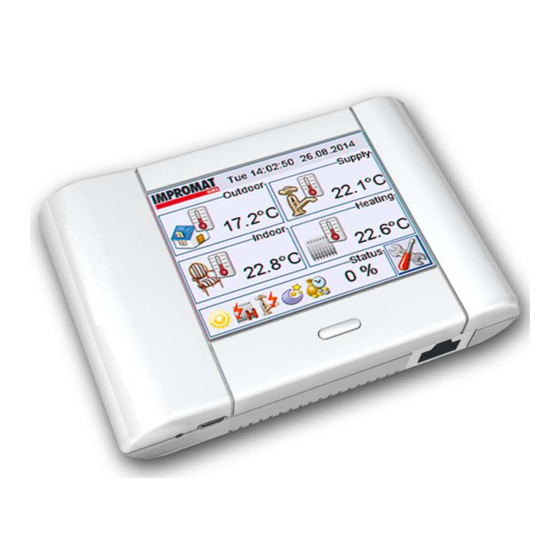
1. MAIN DISPLAY SCREEN The main display screen is divided into five basic monitoring windows and buttons serving to enter the device’s setting menu. Current time and date Outdoor temperature HDW tank temperature Output water temperature Indoor temperature Settings Current status of the device Status of the device: Error - call the service! The device operates in heating mode... - Page 3 The Settings menu is divided into two rows of icons. The top row icons are used for the control of the UTI-INV module (mode, equitherm regulation, HDW etc.), the bottom row icons are used to set the UTI-IQCP control panel (language, time, network connection etc.). UTI-INV module...
- Page 4 2.1 Basic control The control screen allows the setting of the device’s main modes. The icons on the left show the current status. There are three basic parameters: On / Off - Turns the device on or off. In the ON state, all set programmes are running. In the OFF state, the divice does not perform any action.
- Page 5 2.2 Parameters settings The menu with a number of parameters that can be viewed, and modified, if necessary. The current value of the parameter is displayed. If the parameter is user-editable, a box labelled „New” is displayed. Parameters in view mode: Moving up and down Current value between parameters...
- Page 6 Editable parameters: - Time limit - supply water - time during which the HDW tank will be heated. - Temperature reduction - cooling - how many degrees will the temperature increase in the cooling mode. - Temperature reduction - heating - how many degrees will the temperature decrease in the heating mode.
- Page 7 2.4 Reduction timer For each day of the week, you can select up to four time intervals during which the reductution timer is active. Move between the days of the week using the arrow buttons. To set the time, click on the corresponding box and insert the value using the arrow buttons.
- Page 8 - AOYG-mmcc (model, capacity) 2.6 Language setting The UTI-IQCP control panel offers three language versions. When you select the language, the user interface will switch to that language. By pressing the Back button, the setting will be saved and the screen will return to the Settings menu.
- Page 9 2.7 Current date and time To set the current date or time, highlight the item you want to edit. The value can then be changed using the up and down arrows. By pressing the Back button, the setting will be saved and the screen will return to the Settings menu.
- Page 10 2.8 Network setting It is possible to set the IP address, subnet mask and gateway of the network so that the devices can be connected to the network. If the installation permits, it is possible to activate the DHCP server. DHCP deactivated: DHCP activated: Note: If you don’t know what value to set, do not make any changes, or connect the panel to the...
- Page 11 2.9 Backlight setting To adjust the backlight of the display, highlight the item you want to edit. The value can be changed using the up and down arrows. By pressing the Back button, the setting will be saved and the screen will return to the Settings menu.
- Page 12 2.10 Sound setting It is possible to swich the sound on or off. If the sound is on, the panel will emit beep sounds when making settings. Sound ON/OFF Save and return to the Settings menu 2.11 Factory settings If the panel is not responding, or you have made a setting that led to a non-standard function, it is possible revert the panel to its factory settings: 1.
- Page 13 3. WEB INTERFACE OF THE PANEL If the panel network interface is set correctly, it is possible to monitor and control the device from any web browser by entering the relevant IP address. Default login: User: admin Password: 1937 After login, the main screen is displayed. It is divided into five basic monitoring windows and buttons serving to enter the device settings.
- Page 14 The settings menu is divided into two rows of icons. The top row icons are used for the control of the UTI-INV module (mode, equitherm regulation, HDW etc.), the bottom row icons are used to set the UTI-IQCP control panel (language, time, network connection etc.). UTI-INV module...
- Page 15 Password setting You can change your password through the web interface. If you forget your password, it is possible to revert the panel to the factory settings, which will also reset your password. Username cannot be changed. Printscreen If you for some reason need to create a screenshot of the touch panel (to send to your service organization, for example), you can access it from: http:// your IP address /screen.bmp...
- Page 16 Data The data from the SD card can be saved to your computer - you can analyze them or send to your service organization. Months, in which the data was stored: Days, in which the data was stored: By clicking on a specific day, you can open or save the particular record. To open the *.ICH file, it is necessary to have the IMPROMAT service kit installed.


Need help?
Do you have a question about the UTI-IQCP and is the answer not in the manual?
Questions and answers