Sony MZ-R910 Operating Instructions Manual
Hide thumbs
Also See for MZ-R910:
- Operating instructions manual (37 pages) ,
- Service manual (76 pages)
Table of Contents
Advertisement
Quick Links
Advertisement
Table of Contents

Related Manuals for Sony MZ-R910


Summary of Contents for Sony MZ-R910
- Page 1 3-243-699-01(1) ポータブルミニディスク レコーダー 取扱説明書 /Operating Instructions お買い上げいただきありがとうございます。 電気製品は安全のための注意事項を守らないと、 火災や人身事故になることがあります。 この取扱説明書には、事故を防ぐための重要な注意事項と製品の 取り扱いかたを示しています。この取扱説明書をよくお読みのうえ、 製品を安全にお使いください。 お読みになったあとは、いつでも見られるところに必ず保管して ください。 “WALKMAN” は、ソニー株式会社の登録商標です。 MZ-R910 ©2002 Sony Corporation...
- Page 2 安全のために ソニー製品は安全に十分配慮して設計されています。しか 警告表示の意味 し、電気製品はすべて、まちがった使いかたをすると、火 取扱説明書および製品で は、次のような表示をして 災や感電などにより人身事故になることがあり危険です。 います。表示の内容をよく 事故を防ぐために次のことを必ずお守りください。 理解してから本文をお読み ください。 安全のための注意事項を守る この表示の注意事項を守ら ないと、火災・感電などに ∼ ページの注意事項をよくお読みください。製品全般 より死亡や大けがなど人身 事故の原因となります。 の注意事項が記載されています。 定期的に点検する この表示の注意事項を守ら 年に 度は、 パワーアダプターのプラグ部とコンセ ないと、感電やその他の事 故によりけがをしたり周辺 ントの間にほこりがたまっていないか、故障したまま使 の家財に損害を与えたりす 用していないか、などを点検してください。 ることがあります。 故障したら使わない 注意を促す記号 動作がおかしくなったり、 パワーアダプターや充電ス タンドなどが破損しているのに気づいたら、すぐにお買 い上げ店またはソニーサービス窓口に修理をご依頼くだ さい。 行為を禁止する記号 万一、異常が起きたら 行為を指示する記号 変な音・においがした...
- Page 3 • 録り直しのきかない録音の場合は、必ず事前にためし録りをしてください。 • ポータブルミニディスクレコーダーの不具合により、録音されなかった場合の録音内容の補償 についてはご容赦ください。 • あなたが録音したものは、個人として楽しむなどのほかは、著作権法上、権利者に無断で使用 できません。なお、この商品の価格には、著作権法の定めにより、私的録音補償金が含まれて おります。 Tel.03-5353-0336 (お問い合わせ先 (社)私的録音補償金管理協会 )...
-
Page 4: Table Of Contents
目次 準備 ・ ............付属品を確かめる ..............各部のなまえ ................準備する 基本的な 使いかた 録音する (シンクロ録音) 再生する いろいろな録 デジタル録音とアナログ録音について 音のしかた (光デジタル入力とアナログ入力)........アナログで録音する (アナログ録音) ........MDLP 長時間録音する ( ) ............「グループ機能」 を使って録音する .......... 上書きをせずに録音する ............マイクで録音する ..............頭出しマークを自動でつける (オートタイムトラックマーク) .. 手動で録音レベルを調節する (マニュアル録音) ....... 録音可能な時間を調べる ............録音日時を記録する... - Page 5 編集する 編集する前に ................名前をつける・変える .............. よく使う言葉を登録する (ネームバンク機能)......曲やグループを つのグループにまとめる (グループ設定)..グループを解除する ..............曲順を変える (ムーブ) ............. 別のグループに曲を移動する ............ グループの順番を並べかえる (グループムーブ) ....... 頭出しマーク (曲番) をつける ..........頭出しマーク (曲番) を消す ............. 曲を消す ................... その他の機能 タイマーを使う (メロディタイマー) ........ディスクごとに設定を記憶する (パーソナルディスクメモリー) .......... 音もれを抑え耳にやさしい音にする — AVLS (音量リミット...
- Page 6 火災・感電 下記の注意事項を守らないと 大けが により の原因となります。 運転中は使用しない • 自動車、オートバイなどの運転をしながらヘッドホンやイ ヤホンなどを使用したり、細かい操作をしたり、表示画面 を見ることは絶対におやめください。交通事故の原因とな ります。 • また、歩きながら使用するときも、事故を防ぐため、周囲 の交通や路面状況に十分にご注意ください。 内部に水や異物を入れない 水や異物が入ると火災や感電の原因になります。 万一、水や異物が入ったときは、すぐにスイッチを切り、 パワーアダプターをコンセントから抜いて、お買い上げ 店またはソニーのサービス窓口にご相談ください。 国内専用機は海外で使用しない ワールドモデル以外の パワーアダプターは、日本国内専 用です。 100V 交流 の電源でお使いください。海外などで、異なる電 源電圧で使用すると、火災や感電の原因となります。 雷が鳴りだしたら、電源プラグに触れない 感電の原因となります。 指定以外の充電スタンド、 パワーアダプター、 カーバッテリーコードなどを使わない 破裂・液漏れや過熱などにより、火災、けがや周囲の汚損の 原因となります。...
- Page 7 けが 家財 下記の注意事項を守らないと をしたり周辺の に 損害 を与えたりすることがあります。 ぬれた手で パワーアダプターや充電スタンド をさわらない 感電の原因となることがあります。 本体や パワーアダプター、充電スタンドを布 団などでおおった状態で使わない 熱がこもってケースが変形したり、火災の原因となることがあ ります。 大音量で長時間続けて聞きすぎない 耳を刺激するような大きな音量で長時間つづけて聞くと、聴力 に悪い影響を与えることがあります。とくにヘッドホンで聞く ときにご注意ください。呼びかけられて返事ができるぐらいの 音量で聞きましょう。 はじめからボリュームを上げすぎない 突然大きな音が出て耳をいためることがあります。ボリューム は徐々に上げましょう。とくに、 、 や など、雑音 の少ないデジタル機器をヘッドホンで聞くときにはご注意くだ さい。 通電中の パワーアダプターや充電スタンド、 充電中の電池や製品に長時間ふれない 長時間皮膚がふれたままになっていると、低温やけどの原因に なることがあります。...
- Page 8 電池についての安全上のご注意 液漏れ・破裂・発熱・発火・誤飲による大けがや失明を避けるため、下記のことを必 ずお守りください。 電池の種類については、 充電式電池について 電池本体上の表示をご確 • 機器の表示に合わせて+と−を正しく入れる。 認ください。種類によっ • 指定された充電スタンド、 パワーアダプター以外 ては該当しない注意事項 で充電しない。 もあります。 • 充電式電池用キャリングケースが付属されている場 合は、必ずキャリングケースに入れて携帯・保管す 充電式電池 る。 ニッケル水素 • 火の中に入れない。分解、加熱しない。 (Ni-MH) • 火のそばや直射日光のあたるところ・炎天下の車中 など、高温の場所で使用・保管・放置しない。 乾電池 • コイン、キー、ネックレスなどの金属類と一緒に携 アルカリ 帯・保管しない。ショートさせない。 • 外装のビニールチューブをはがしたり傷つけたりし ない。 • 液漏れした電池は使わない。 • 指定された種類以外の充電式電池は使用しない。 • 使い切った電池は取りはずす。長時間使用しないと...
- Page 9 充電式電池、乾電池が液漏れしたとき 充電式電池、乾電池の液が漏れたときは素手で液を さわらない 液が本体内部に残ることがあるため、テクニカルイ ンフォメーションセンターまたはソニーサービス窓 口にご相談下さい。 液が目に入ったときは、失明の原因になることがあ るので目をこすらず、すぐに水道水などのきれいな 水で充分洗い、ただちに医師の治療を受けて下さ い。 液が身体や衣服についたときも、やけどやけがの原 因になるので、すぐにきれいな水で洗い流し、皮膚 に炎症やけがの症状があるときには医師に相談して 下さい。 そのときに異常がなくても、液の化学変化により、 時間がたってから症状が出てくることもあります。 全ての電池について • 使い切った電池は取りはずす。長時間使用しないと きや交流電源で使用するときも取りはずす。 • 新しい電池と使用した電池、種類の違う電池を混ぜ て使わない。 お願い 使用済み充電式電池は貴重な資源です。端子 (金属部 分)にテープを貼るなどの処理をして、充電式電池リサ イクル協力店にご持参ください。...
-
Page 10: 付属品を確かめる
付属品を確かめる ● パワーアダプター ●充電スタンド ●リモコン付きヘッドホン (組み立て後) Battery ●キャリングポーチ ●充電式ニッケル水素 ●充電池ケース ( NH-14WM(A) carrying case 電池 ) ●乾電池ケース ● プラグアダプター (ワールドモデル * のみ) DC IN ( ジャックなし) ●光デジタルケーブル (ワールドモデルのみ) ●取扱説明書 Q&A ● 知っ得 ( ) ●保証書 ●ソニーご相談窓口のご案内 * ワールドモデルとは 日本でも海外でも使用できるように海外、国内の電気事情 AC100 240V (電源電圧... -
Page 11: 各部のなまえ
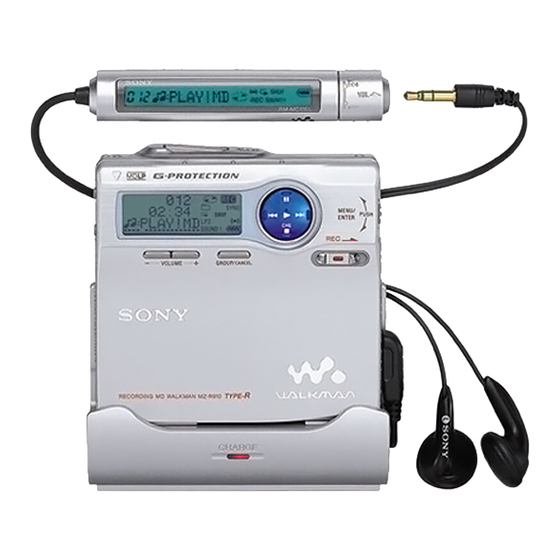
各部のなまえ 本体 • 1 表示窓 各種設定時カーソル移動・決定 T MARK ボタン 上 3 電池入れ END SEARCH ボタン 左 右 VOLUME + * −ボタン GROUP/CANCEL ボタン 下 決定 7 乾電池ケース取り付け端子 ジョグダイヤル DC IN 3V 8 ジャック (MENU /ENTER (メニュー) (決定) OPEN 9 ボタン q; 集中コントロールキー •... - Page 12 表示窓(本体) 1 文字情報表示部 6 再生モード表示 ディスク名や曲名、日付、エラー シャッフル再生、プログラム再 表示、曲番などが文字で表示され 生、リピート再生などの再生状態 を表示します。 ます。 7 レベル表示 2 グループ表示 /LP4 ステレオ ステレオ、モノ 3 ディスク表示 ラル表示 録音、再生、編集のとき、ディス 9 サウンド表示 クが回転していることを示しま デジタルサウンドプリセットが選 す。 ばれていることを示します。 4 録音表示 q; 電池残量表示 録音時に表示されます。録音一時 充電池や乾電池の残量の目安を表 停止のときは点滅します。 示します。 5 シンクロ録音表示 qa メロディータイマー表示...
- Page 13 リモコン A B C DE DISPLAY ボタン 再生音を聞かずに高速で早送りや PLAY MODE ボタン 早戻しもできます。 RPT/ENT repeat ( (リピート) 8 回転つまみ ( (音量)+ −) enter (決定) )ボタン 引いて回すと音量を調節できます。 SOUND ボタン 9 表示窓 HOLD 5 クリップ スイッチ qa x(停止) ボタン 6 X(一時停止)ボタン 7 回転つまみ (./N>) 機能によっては決定ボタンとして...
-
Page 14: 基本的な 準備する
基本的な 準備する 使いかた お買い上げ時には、まず充電式電池を充電してください。ただし、 パワーアダプ ターを本体につなげば、充電しなくても使用できます。 充電式電池を入れる NH-14WM #側を奥にして入れてくだ さい。 アルカリ乾電池で使うときは 乾電池ケースを本体に取り付ける 図のように必ず#側から入れる ソニーアルカリ乾電池 (単 形) を 本入れます。 充電式電池と一緒に使うと長時間使用できます。... - Page 15 充電式電池を充電する 充電スタンドの組み立てかた 奥までしっかり差し込んでください。 コンセントへ パワー アダプター CHARGE ランプが点灯したことを確 DC IN 3V へ 認してください。 NH-14WM 充電式電池 を入れた後、 充電スタンドに置くだけで簡単に充電をすることができます。 CHARGE 約 時間で充電が完了し、 (充電) ランプが消えます。 充電スタンドにのせるとき、 または充電中は操作しないでください。 誤動作や充電されない原 因となります。 ワールドモデルをお買い上げのお客さまへ パワーアダプターがコンセントの形状と合わない場合は、 プラグアダプターをお使いくだ さい。 リモコンをつなぎ、ホールドを解除する しっかりつなぐ /LINE OUT へ しっかりつなぐ HOLD...
- Page 16 * 電池の持続時間 録音 パワーアダプターを直接つないで充電す ることもできます。 使用電池 ステレオ DC IN 3V 本体の ジャックに パワーアダ ステレオ ステレオ プターをつなぎ、停止中に xボタンを 充電式ニッケ 約 時間 約 時間 約 時間 Charging 押します。 「 」が点滅し充電が始ま ル水素電池 ります。放電しきった状態から充電が完了す アルカリ 約 時間 約 時間 約 時間 るまで約 時間半かかります。 表示が消え 乾電池...
-
Page 17: 使いかた 録音する (シンクロ録音
基本的な 録音する (シンクロ録音) 使いかた 光デジタルケーブルを使って、 プレーヤーや チューナーなどとつないでデジタ ル録音する方法を説明します( 「デジタル録音の制限について」 ( ページ)もあわせ てご覧ください) 。シンクロ録音すると、再生側の機器に合わせて録音を始めたり止め たりします。再生側と同じ位置に頭出しマーク(曲番) がつきます。 録音の際は、 パワーアダプターを家庭用電源 (コンセント) につないでご使用にな ることをおすすめします。 カセットデッキやラジオなどとつないで録音する場合→「アナログで録音する」 ( ページ) グループ機能を使って録音する場合→「 「グループ機能」を使って録音する」 ( ページ) ミニディスクを入れる 誤消去防止つまみが閉じ ていることを確認 OPEN を押す。 ディスクのラベル面を ふた側にして矢印の向 ふたが開きます。 きに奥まで押し入れ、 ふ たを閉める。 つなぐ (奥までしっかりと差し込んでください) プレーヤー、... - Page 18 録音する ジョグダイヤルを押す。 集中コント メニューが表示されます。 SEARCH ロールキー SYNC REC ジョグダイヤルを回して 「 」 を点滅さ (N せ、 押して決定する。 > x) SYNC ON ジョグダイヤルを回して 「 」 を点滅させ、 ジョグ 押して決定する。 ダイヤル SYNC 「 」 が表示されます。 停止中に つまみの中央のボタンを押しながら、 右にずらす。 「 」 表示と つまみ中央部の ランプが点 灯し、 録音が始まります。 録音したい...
- Page 19 • シンクロ録音中に録音もとで無音 ( ペー 録音が始められないときは ジ)状態が続いても、録音もとの雑音が原 • ホールド(誤動作防止)スイッチを確認して 因で、自動的に録音一時停止にならない場 ください。 ( 、 ページ) 。 合があります。 • ディスクの誤消去防止つまみを確認してく • CD や 以外からのシンクロ録音中に、録 ださい。 ( ページ) 。 音もとの同一曲内で約 秒の無音 ( ペー • 再生専用のミニディスクは録音できません。 ジ) が続くと、再び音が出たところで頭出 しマーク (曲番)が つ増えます。 録音状態を確認する • MIC PLUG IN POWER (...
- Page 20 • シンクロ録音中に録音もとで約 秒の無音 ( ページ)が続くと、本機は自動的に録音 一時停止になります。再び音を検知する と、シンクロ録音に戻ります。録音一時停 止状態が 分以上続くと、自動的に録音が 止まります。 • MDLP 録音する場合は、 「長時間録音する」 ( ページ)の手順 、 を行ってから、シ ンクロ録音の手順を行ってください。 • LINE IN (OPT) 本機の ジャックはデジタ ル・アナログ両用です。つなぐケーブルの 種類により、光デジタル入力またはアナロ LINE IN グ入力 ( )に自動的に切り変わりま す。 • 録音される音の大きさは自動的に調節され ます。音の大きさを変えたいときは、 「手動 で録音レベルを調節する」 ( ページ)をご 覧ください。...
-
Page 21: 再生する
基本的な 再生する 使いかた ミニディスクを入れる 録音済みのディスクを入れます。 OPEN を押す。 ディスクのラベル面 をふた側にして矢印 ふたが開きます。 の向きに奥まで押し 入れ、 ふたを閉める。 聞く Nを押す。 集中コントロー リモコンでは回転つまみをN>側に回 VOLUME ルキー (N す。 + − > x) 操作すると 「ピ」 と確認音がします。 VOLUME + −を押して、 音量を調節する。 ジョグ リモコンでは回転つまみを引いた状態で、 ダイヤル + −側に回して、 音量を調節する。 表示窓で音量を確認できます。 回転つまみ は音量調節後、... - Page 22 こんなときは 本体操作 リモコン操作 — 曲番や曲名を直接選ぶ ジョグダイヤルを回して聞きた い曲を表示させ、押す。 今聞いている曲、またはさ .を押す。またはさらに戻し 回転つまみを.側に回す。またはさ らに前の曲を頭出しする たい曲数だけ.を押す。 らに戻したい曲数だけ.側に回す。 次の曲を頭出しする 回転つまみをN>側に回す。 >を押す。 再生しながら早戻しする .を押したままにする。 回転つまみを.側に回したままに する。 再生しながら早送りする >を押したままにする。 回転つまみをN>側に回したまま にする。 一時停止する Xを押す。もう一度倒すと解除 Xを押す。もう一度押すと解除され されます。 ます。 OPEN OPEN ディスクを取り出す ■を押してから を押して を押し xを押してから本体の ふたを開ける 。 てふたを開ける 。 曲目を再生中に.を続けて...
-
Page 23: いろいろな録音のしかた
いろいろな録音のしかた デジタル録音とアナログ録音について (光デジタル入力とアナログ入力) 本機を プレーヤーやラジカセなど録音もとの機器とつなぐには、光デジタル入力を LINE IN 使うつなぎかたとアナログ入力 ( ) を使うつなぎかたの つの方法があります。 それぞれの録音のしかたは、光デジタル入力を使うときは 「録音する」 ( ページ) 、 LINE IN アナログ入力( ) を使うときは「アナログで録音する」 ( ページ) をご覧く ださい。 光デジタル入力とアナログ入力の比較 LINE IN 光デジタル入力 アナログ入力 ( ) 入力の種類 相違点 LINE OUT つなぐことができる機器 光デジタル出力ジャックのある機 出力( )ジャックのあ... -
Page 24: アナログで録音する (アナログ録音
つまみの中央のボタンを押しな アナログで録音する がら右にずらす。 (アナログ録音) 「 」が表示され、本体の ラン プが点灯し、録音が始まります。 つないだ機器の出力端子から録音する音 はアナログ信号で送られますが、ミニデ 録音したい やテープを再生する。 ィスクにはデジタル方式で記録されま その他の操作は 「録音する (シンクロ す。 録音) 」 ( ページ)を参照してくださ つなぐには別売りの接続コードが必要で い。 す。コード類をつなぐときは、奥までし っかりと差し込んでください。 LINE IN (OPT) 本機の ジャックはデジタル・ プレーヤー、 アナログ両用です。 ラジカセなど つなぐケーブルの種類により、光デジタル入 LINE IN 力またはアナログ入力( )に自動的 に切り換わります。 ご注意 LINE OUT 端子などへ... -
Page 25: 長時間録音する ( Mdlp
つまみの中央のボタンを押しな 長時間録音する MDLP ( ) がら右にずらす。 通常の ステレオ録音に加えて、録音 録音もとの機器の再生を始める。 (LP2) (LP4) 時間を 倍 または 倍 長くし てステレオ録音することができます 録音を止めるには MDLP ( 録音) 。またモノラル録音でも xを押します。 通常の ステレオ録音よりも 倍長く録 次に録音するときまで、録音モードは記 音することができます。 憶されています。 MDLP MDLP 本機で 録音した内容は、 に対応していない他の機器では再生でき 曲名の最初に「 」 をつ ません。 けないようにする 本機で MDLP 録音をすると、すべての... -
Page 26: グループ機能」 を使って録音する
• 「グループ機能」 を使って または ロゴのある機器が 「 ステレオ」 、 「 ステレオ」 に対応してい 録音する ます。 • ステレオ録音 (またはモノラル録音)をする グループ機能とは ATRAC DSP TYPE-R と、新開発 用 ( 枚のディスクに録音された複数の曲を ページ) により、高音質で豊かな音質を再 現することができます。 いくつかのグループにまとめて録音、再 生、編集する機能です。 ご注意 グループモード 時 • MDLP 録音するときは パワーアダプ ディスク ターを DC IN 3V ジャックにつないでお使... - Page 27 そのため、グループ機能を使って録音し グループモードを にす た をグループ機能未対応機器で読み る (グループモード録音) 込むときや、グループ機能を働かせてい ないときに本機で編集しようとすると、 グループ機能を使って録音するには、ま ずグループモードを にします。 上の文字列がそのまま「ディスク名」 と して表示されます。 本体で操作する GROUP を 秒以上押す。 ご注意 GROUP ON 「 」 と 「 」 が点灯し、グ • ON/OFF グループモード の設定は、 を取 ループモードが になります。もう り出したり本機の電源を切っても記憶されて います。 一度 秒以上押すと になります。 •...
-
Page 28: 上書きをせずに録音する
既存のグループ内に曲を 上書きをせずに録音する 録音する 録音開始位置を、上書きをせずに常に録 • グループ設定されたディスクを入れて 音済み部分の後ろから録音する設定に変 ください。 更することができます。お買い上げ時は • グループモードを にしてくださ 上書きで録音する設定になっています。 い。 ジョグダイヤル GROUP を短く押す。 「 」が点滅し、グループを選べる状 態になります(グループスキップモー ド) ( ページ) 。 停止中にジョグダイヤルを押す。 秒以内に.または>を繰り返し OPTION 押して、録音を追加したいグループを ジョグダイヤルを回して 「 」 表示させる。 を点滅させ、押して決定する。 しばらくすると 「 」 の点滅が点灯に REC-Posi ジョグダイヤルを回して 「 」... -
Page 29: マイクで録音する
ご注意 マイクで録音する • 光デジタル入力、マイク入力、アナログ入力 の順に優先して自動的に選択します。光デジ ステレオ LINE IN (OPT) タルケーブルが ジャックに * マイク つながっていると、マイク入力になりませ ん。 • 本体の動作音を収音することがあります。 そのときは、マイクを本体から遠ざけて録 音してください。ダイレクト接続タイプの ジョグダイヤル マイクは、ノイズを拾うことがあるのでご 注意ください。 • モノラルマイクで録音すると、左チャンネル しか録音できません。 MIC (PLUG IN POWER) へ 頭出しマークを自動でつ * 詳しくは「別売りアクセサリー」 ( ペー ける (オートタイムトラック ジ)を参照してください。 マーク) 別売りのステレオマイクの電源を にし、本体につなぐ。... -
Page 30: 手動で録音レベルを調節する (マニュアル録音
ご注意 ジョグダイヤルを回してお好みの時間 • T MARK 録音の途中に ボタンやXボタンを押 を点滅させ、押して決定する。 して、頭出しマークがついてしまったとき ジョグダイヤルを回すと表示は次のよ は、その時点から設定した時間ごとにオート うに変わります。 タイムトラックマークがつきます。 • 録音を止めると、設定は解除されます。 表示 時間 — 5min. ON 約 分 手動で録音レベルを調節 10min. ON 約 分 する (マニュアル録音) 15min. ON 約 分 録音するときは、録音レベルは最適な値 設定を解除するには になるように自動的に調整されますが、 必要に応じて手動で調整できます。アナ 手順 で 「 」... -
Page 31: 録音可能な時間を調べる
録音したい音を出す。 録音可能な時間を調べる 表示窓を見ながらジョグダイヤルを回 録音または停止中、表示窓で残り時間や して録音レベルを調節する。 曲番などの情報を確認できます。グルー 録音レベルは、AからBの間を目安 にレベル表示のバーが点灯するように プ機能に関係する表示は、グループ設定 調整します。Bより右が点灯すると された曲を再生し、停止したときに表示 きは、録音レベルを下げてください。 されます。 ジョグダイヤル 画面に表示されるレベル表示のバーは 次のように分かれています。 上段: (左)のレベル 下段: (右)のレベル DISPLAY REC 23/30 録音レベル (最大 : ) Xを押して録音を始める。 他の機器とつないで録音するときは、 本体で操作する 本機が録音を始めた後で、録音元の音 を最初から出し直してください。 ジョグダイヤルを押す。 自動調節にするには DISPLAY ジョグダイヤルを回して 「 」 Auto REC 手順... - Page 32 リモコンで操作する ご注意 ON/OFF グループモード の状態や動作状態に DISPLAY を押す。 より、表示が選択できないことがあります。 押すたびに、表示は次のように変わり ジョグダイヤルを押して決定する。 ます。 で選んだ情報が表示されま Aに手順 リモコンの表示窓 LapTime す。ただし、手順 で「 」 を 選んだときは、何も表示されません。 本体の表示窓 表示D 録音中 曲番 経過時間 < 選んだ情報 (A) B 曲番 録音できる残り時間 — * (LapTime) 曲番 経過時間 RecRemain 曲番 録音できる残り —/ 現在時刻...
-
Page 33: 録音日時を記録する (時計合わせ
現在の日時を表示するには 録音日時を記録する 本体で操作する (時計合わせ) 停止中または録音中にジョグダイヤル を押す。 時計を合わせておくと、録音の際に録音 日時が自動で記録されます。録音日時 DISPLAY ジョグダイヤルを回して 「 」 は、一度時計を合わせると常に記録され を点滅させ、押して決定する。 るようになります。 Clock ジョグダイヤルを回して 「 」 を ジョグダイヤル 点滅させ、押して決定する。 リモコンで操作する DISPLAY 停止中または録音中にに を くり返し押す。 停止中にジョグダイヤルを押す。 OPTION ジョグダイヤルを回して 「 」 : 午前 : 午後 を点滅させ、押して決定する。 時計を 時間表示に変えるには CLOCK ジョグダイヤルを回して... -
Page 34: いろいろな再生のしかた
いろいろな再生のしかた Index 回転つまみを回して「 」 (イン 聞きたい曲や場所を高速 Time デックスサーチ)または「 」 (タ で探す (高速サーチ) イムサーチ)を表示させ、xを押して 決定する。 集中コントロールキー (. > 曲番や曲名を見ながら聞 きたい曲を探す (インデック スサーチ) ジョグダイヤル インデックスサーチを行うには、あらか DISPLAY Index じめサーチモードを「 」にしてく ださい。 本体で操作する(ダイレクト選曲) ジョグダイヤルを回し、聞きたい曲が 回転つまみ 表示されたらジョグダイヤルを押す。 ジョグダイヤルを回すと本体の表示窓 高速サーチは 種類あります。リモコン に曲番と曲名が表示され、押すと選ん を使っていずれかの高速サーチを選ぶこ だ曲の再生が始まります。曲名がつい とができます。 ていないときは曲番のみが表示されま •... -
Page 35: グループ機能」 を使う
経過時間を見ながら聞きた 「グループ機能」 を使う い場所を探す (タイムサーチ) グループ設定されたディスクでは「グル タイムサーチを行うには、あらかじめ ープ機能」を使っていろいろな再生を行 Time サーチモードを 「 」にしてくださ うことができます。グループ機能につい い。 て、詳しくは 「 「グループ機能」 を使って 録音する」 ( ページ) をご覧ください。 本体で操作する GROUP 再生中にXを押す。 再生が一時停止します。 .または>を押したままにして、 聞きたい場所を表示させる。 ジョグダイヤル DISPLAY X押して一時停止を解除する。 PLAYMODE 選んだ場所から再生が始まります。 リモコンで操作する 再生中にXを押す。 回転つまみ 再生が一時停止します。 回転つまみを回したままにして、聞き たい場所を表示させる。 グループ機能を使って聞 く... - Page 36 リモコンで操作する ご注意 グループモードが のとき、ディスク中で 再生を始める。 グループに設定されていない曲は一時的に つのグループとしてまとめられ、一番最後の DISPLAY を 秒以上押す。 グループとして扱われます。このとき Group – – 「 」と表示されます。曲番はグル GROUP 回転つまみを回して 「 」を点 ープごとの番号ではなく、ディスクの通し番 滅させ、xを押して決定する。 号で表示されます。 GROUP ON 回転つまみを回して 「 」 グループを選んで聞く を点滅させ、xを押してグループモー ドを にする。 (グループスキップモード) 再生中の曲が入っているグループの最 再生中に聞きたいグループを選ぶことが 後の曲まで再生して停止します。 できます。 別のグループを聞きたいときは「グ ON/OFF グループ に関係なく操作でき...
-
Page 37: 再生モードを選ぶ
ここでは、グループモード 時の操作 再生モードを選ぶ の説明をします。 • グループ設定されたディスクを入れて 1 Track 通常の再生のほか、 曲再生 ( ) 、 ください。 Shuffle シャッフル再生( ) 、プログラム 再生 ( ) ができ、さらに各再生状態 本体で操作する (ダイレクトグルー のままくり返すことができます。 プ選択) ジョグダイヤル GROUP 再生中に、 を短く押す。 「 」 が点滅し、グループスキップ モードが になります。 秒以内にジョグダイヤルを回して、 再生したい曲があるグループを表示さ PLAYMODE せ、押して決定する。 RPT/ENT 選択されたグループの... - Page 38 リモコンで操作する ジョグダイヤルを回して選択したい再 生モードを点滅させ、押して決定す PLAYMODE 再生中に ボタンを押す。 る。 押すたびに表示は次のように変わり、 選んだ表示の状態で再生します。 表示窓 ジョグダイヤルを回すとAが変わる リモコンの表示窓 再生状態表示 Shuffle Shuf.Rep 表示 (再生状態) — (通常の再生) < ジョグダイヤルを押すとBが点灯する。 (再生中の 曲を再生) SHUF (全曲を順不同に並べかえて再生) 20:51 (聞きたい曲を好きな順に並べ 表示A (再生状態) 変えて再生) Normal /— (通常の再生) < さらにくり返し聞きたい場合は、 RPT/ENT を押す。 ALLRepeat/ (全曲をくり返し再 が表示され、選択されている再生 生)...
-
Page 39: 高音や低音を強調する (デジタルサウンドプリセット
ご注意 手順 をくり返して、好きな順に曲を • ふたを開けると設定は解除されます。 選ぶ。 • 停止状態での設定の途中、 分間何も操作 されなかったときは、そこまでの設定でプ ジョグダイヤルを 秒以上押す。 ログラムが確定します。 プログラムが設定され、 曲目から再 • プログラム設定中にグループモードを 生が始まります。 すると、プログラム設定は解除されま すが、それまでの設定は保持されます。 リモコンで操作する • プログラム再生中、グループモードを にすると、プログラム再生の設定は解除さ 再生中に 「 」 が表示されるまで れます。 PLAYMODE をくり返し押す。 回転つまみを回して曲番を選び、 高音や低音を強調する RPT/ENT を押して決定する。 (デジタルサウンドプリセット) 高音、低音を強調し、お好みの音質に設 曲番 プログラムの順番 定できます。設定は 種類記憶させるこ... - Page 40 本体で操作する ジョグダイヤルを回して 「 」または 「 」 の強弱を設定する。 ジョグダイヤルを押す。 カーソルが動きます。 ( の位置) SOUND ジョグダイヤルを回して 「 」 を点滅させ、押して決定する。 SOUND 1 T-===== + SOUND ジョグダイヤルを回して 「 B-== ===+ SOUND 2 」 または「 」 を選び、押 ±0 して決定する。 左から− 、 − …± …+ 、 + の...
-
Page 41: 再生速度を変える (スピードコントロール
ご注意 回転つまみを回し、 「 」 または「 」 • /LINE OUT AUDIO OUT 出力 ( 「 」 )の設 の強弱を設定する。 LINE OUT 定が、 「 」 になっていると、デジ Bass 例) のとき タルサウンドプリセットで設定した音質の カーソルが動きます。 ( − の位置) 選択ができなくなります。そのときは、 /LINE OUT HeadPhone の設定を「 」 に してください ( ページ)... -
Page 42: 残り時間や再生位置を調べる
回転つまみを回して再生速度を選ぶ。 残り時間や再生位置を調 音を聞きながら選んでください。 べる カーソルは現在の再生速度、+は再生 100% 速度が (標準速度) を表します。 再生中に、表示窓で曲名・ディスク名な どの情報を確認できます。グループ機能 例) 再生速度が元の速度の のとき −とカーソルが交互に点滅します。 に関係する表示は、グループ設定された 曲を再生中の表示です。 ジョグダイヤル 80% 100% 110% xを押して決定する。 再生速度が設定されます。 リモコンの表示窓 DISPLAY 100% 以外を選んでいると 「 」 が点灯します。 本体の表示窓 100% 以外を選んでいると 「 」 が点灯します。 本体で操作する 再生中にジョグダイヤルを押す。 S 01:20 DISPLAY ジョグダイヤルを回して... - Page 43 リモコンで操作する ご注意 ON/OFF グループモード の状態や動作状態に DISPLAY 再生中に を押す。 より、表示が選択できないことがあります。 押すたびに、表示は次のように変わり ジョグダイヤルを押して決定する。 ます。 で選んだ情報が表示されま Aに手順 リモコンの表示窓 LapTime す。ただし、手順 で 「 」を 選んだときは、何も表示されません。 本体の表示窓 表示D 曲番 経過時間 < 曲番 曲名 選んだ情報 — (LapTime) 曲番 経過時間 グループ内の全曲数 グループ名 1 Remain 曲番 曲中の残り時 間 全曲数...
-
Page 44: お手持ちのシステムで聞く ( Line Out
/LINE OUT 本機のi ジャックに別売り お手持ちのシステムで聞 の接続コードをつないでから次の操作を /LINE OUT AUDIO 行って、i 出力 ( 「 く LINE OUT ( ) 」 ) の設定をする必要があります。 本機の再生音を、他のオーディオ機器で ジョグダイヤルを押す。 聞いたり録音したりすることができま /LINE す。別売りの接続コードをi AUDIO ジョグダイヤルを回して 「 ジャックにつなぎます。出力はア 」 を点滅させ、押して決定す ナログです。本機はデジタル方式で再生 る。 しますが、つないだ機器にはアナログ信 LINE ジョグダイヤルを回して、 「 号で送られます。 」 を点滅させ、押して決定す る。... -
Page 45: 編集する 編集する前に
編集する 枚のディスクに入力できる文字数 • 英数字/記号のみの場合 編集する前に 文字程度で約 タイトル(最大約 ミニディスクに頭出しマーク(曲番) を 1700 文字) つけたり、曲名やディスク名をつけたり • カタカナのみの場合(日本国内向けモ することができます。ただし、再生専用 デルのみ) ミニディスクの編集はできません。次の 文字程度で約 タイトル (最大約 点にご注意ください。 文字) 文字数によって登録できるタイトル数は • 誤消去防止つまみが開いているディスクで 異なります。 は、編集ができません。つまみを閉めてく ださい( ページ) 。 文字パレットについて • 再生中に編集を行った場合は、停止して、 本体では表示窓に出てくる文字パレット TOC Edit 「 」表示が消えるまで編集内容は TOC Edit 記録されません。... - Page 46 ご注意 名前をつける • 文字数が入力できる文字数の限界をこえる 本体で操作する NAME FULL と「 」と表示されます。その 場合、曲名、グループ名、ディスク名を短 ディスクを入れ、次の操作を行う。 く入力しなおしてください ( ページ) 。ま MDLP たは、 録音のときに、曲名の最初に • 曲名をつけるとき: 「 」 をつけない設定にしてください ( 名前をつけたい曲の再生または録 ページ) 。 音を開始し、曲の再生・録音中に • グループ機能を使って録音したディスクに 名前をつける。 名前をつけるときは、グループ設定情報を • グループ名をつけるとき: 誤って書き換えてしまわないように、グル ープ機能を働かせた状態でディスク名をつ グループモードを にし( ペー けてください。 ジ)...
- Page 47 VOLUME + カーソルの前に 文 を押す。 xを押す。 字分の空白を入れ カーソルが移動し、 文字と交互に点滅する。 る。 カーソル上の文字 VOLUME – を押す。 を削除する。 BCDEFGHI abcdefghi T MARK カナ入力時、カー を押す。 ソル上の文字に濁 点、半濁点をつけ 集中コントロールキーで文字を選び、 る 。 Nを押して決定する。 – T MARK 記号:、 、/を表 を押す。 文字パレットで選んだ文字が入力エリ 示させる。 アに表示され、次の文字位置でカーソ 文字入力をやめる。 カーソルが入力エリアの ルが点滅します。 CANCEL とき、...
- Page 48 途中でやめるときは 回転つまみを回して次の表示を点滅させ、 押して決定する。 • 本体では • Name 曲名をつけるとき: 「 : 」 CANCEL を押します。 • Name グループ名をつけるとき: 「 : 」 CANCEL? PushENTER 「 」 、 「 」 が表 • ディスク名をつけるとき: 示されたらジョグダイヤルまたはN Name 「 : 」 を押します。 カーソルが点滅し、文字の入力状態になり • リモコンでは ます。 DISPLAY を...
- Page 49 「名前をつける」の 「リモコンで操作する」 名前を変更する ( 、 ページ)の手順 ∼ を行って、変 更したい名前を表示させる。 本体で操作する 「名前をつける」の 「リモコンで操作する」 ( ページ)の手順 ∼ を行って、変更し ディスクを入れ、次の操作を行う。 たい名前を入力する。 • 曲名を変更するとき: 名前を変更したい曲を再生し、曲 途中でやめるときは の再生中に名前を変更する。 • 本体では • グループ名を変更するとき: CANCEL を押します グループモードを にし( ペー CANCEL? PushENTER 「 」 と 「 」 が表 ジ)...
-
Page 50: よく使う言葉を登録する (ネームバンク機能
• あらかじめ登録しておく: よく使う言葉を登録する よく使う言葉を登録しておきます。曲 名などをつけるときに登録した言葉 (ネームバンク機能) を呼び出して利用できます。 曲名・グループ名・ディスク名によく使 ◆曲名など入力中に登録する う言葉を登録できます。登録した言葉 本体で操作する は、その一部または全部を使って、曲名 などをつけるときに利用します( 「登録 「名前をつける」 ( 、 ページ) の手 した言葉を呼び出して使う」 ( ペー 順 ∼ を行って、文字を入力する。 ジ) ) 。 文字程度の文字数の言葉の場 合、約 種類登録できます (最大約 CANCEL を押す。 文字) 。文字数によって、登録できる言 カーソルが入力エリアに戻ります。 葉の種類の数は異なります。 END SAECH を約... - Page 51 途中でやめるときは > を押して登録したい言葉の • 本体では 直後にカーソルを移動する。 CANCEL を押します。 CANCEL? PushENTER 「 」 、 「 」 が表 END SEARCH を約 秒間押したま 示されたらジョグダイヤルを押しま まにする。 す。 • リモコンでは リモコンで操作する DISPLAY を 秒以上押したままにし 「名前を変更する」の 「リモコンで操作する」 ます。 ( ページ)の手順 、 を行って登録した い言葉を表示する。 ご注意 回転つまみを引き、動かして登録したい言 この方法で文字を入力中は、ネームバンクに 葉の直後にカーソルを移動する。...
- Page 52 ジョグダイヤルを回して目的の言葉を xを押してカーソルを文字パレットに 探す。 移す。 回すたび、登録済みの言葉が順に つ ジョグダイヤルを回して選びたい言葉 づつ表示されます。 を点滅させ、押して決定する。 選んだ言葉が入力エリアに移動し、点 目的の言葉が表示されたら、ジョグダ 灯します。 イヤルを押して決定する。 選んだ言葉が入力エリアに移動し、点 ジョグダイヤルを約 秒以上押したま 灯します。 まにする。 選んだ言葉が登録されます。 ジョグダイヤルを 秒以上押したまま にする。 名前の入力を続けるときは、 「名前をつ ける」 ( ページ) の手順 ∼ を行う。 名前の入力を続けるときは、 「名前をつ ける」 ( ページ) の手順 ∼ を行う。 リモコンで操作する 「名前をつける」の「リモコンで操作する」 リモコンで操作する...
-
Page 53: 曲やグループを 1 つのグループにまとめる (グループ設定
登録した言葉を削除する 曲やグループを つのグ 本体で操作する ループにまとめる 停止中にジョグダイヤルを押す。 (グループ設定) EDIT ジョグダイヤルを回して「 」を すでに録音してある曲をグループにまと 点滅させ、押して決定する。 めたり、複数のグループを1つのグルー プにまとめることができます。 ジョグダイヤルを回して ただし、まとめることができるのは連続 BankErase 「 」を点滅させ、押して決 している曲 (またはグループ) のみです。 定する。 連続していない曲 (またはグループ) をま とめたい場合は、曲順またはグループの ジョグダイヤルを回して削除したい言 順番を並べかえて( 、 ページ) 、ま 葉を点滅させ、押して決定する。 とめたい曲やグループを連続させてから Erase! 「 」 と表示され、言葉が削除さ 行ってください。 れます。 グループモード... - Page 54 ご注意 ジョグダイヤルを回してグループの先 枚のディスク内の曲名、ディスク名の合計が 頭にしたい曲を選んで点滅させ、押し 本機の最大入力文字数を超えている場合は、グ て決定する。 ループ設定はできません( ページ) 。 まとめたいグループの先頭曲が選ばれ GROUP ます。 グループモードが になっていて も、曲番はグループごとの番号ではな く、ディスクの通し番号で表示されま す。 ジョグダイヤル ジョグダイヤルを回してグループの最 DISPLAY 後にしたい曲を点滅させ、押して決定 する。 まとめたいグループの最終曲が選ば れ、グループ名を入力できるようにな ります。 回転つまみ グループ名をつける ( 「名前をつける」 ( 、 ページ)の手順 ∼ 参照) 。 本体で操作する GROUP を 秒以上押して、グループ リモコンで操作する モードを...
-
Page 55: グループを解除する
ご注意 ジョグダイヤルを回して • 手順 では、すでにあるグループの先頭曲 :Release 「 」を点滅させ、押して かグループ設定されていない曲しか選べま 決定する。 せん。 Release? PushENTER 「 」 、 「 」 が表 • 手順 で最後の曲を選ぶときは、手順 で選 示されます。 んだ曲より後の曲しか選ぶことができませ ん。また、まとめたいグループの最後の曲 ジョグダイヤルを押して決定する。 は、すでにあるグループの最後の曲かグルー グループが解除されます。 プ設定されていない曲しか選べません。 リモコンで操作する グループを解除する DISPLAY を 秒以上押す。 GROUP 回転つまみを回して「 」を点滅さ • グループ設定されたディスクを入れて せ、xを押して決定する。... -
Page 56: 曲順を変える (ムーブ
ジョグダイヤルを回して、移動先の曲 曲順を変える (ムーブ) 番を点滅させる。 例では 曲を 曲目に移動したいの 曲を移動して、曲順を変更できます。 で、ジョグダイヤルを上方向に回し 例 曲目( 曲)を 曲目に移動するとき て、表示窓の中段に「 」が点滅す るようにします。 ジョグダイヤルを押して決定する。 指定した位置に移動したい曲が移りま す。 リモコンで操作する ジョグダイヤル DISPLAY 移動したい曲の再生中に、 を 秒 以上押す。 EDIT 回転つまみを回して「 」を点滅させ、 xを押して決定する。 曲リピート再生になります。 DISPLAY Move 回転つまみを回して、 「 : 」を点 滅させ、xを押して決定する。 例では表示窓に「 → 」と表示され... -
Page 57: 別のグループに曲を移動する
ジョグダイヤルを回して移動先のグ 別のグループに曲を移動 ループを点滅させ、押して決定する。 する 表示窓の中段に再生中の曲が入ってい るグループの番号が点滅します。グ • グループ設定されたディスクを入れて ループ名が入力されているときは、 ください。 >を押すと、グループ名を表示させ ることができます。.を押すと、 GROUP グループの番号に戻ります。 ジョグダイヤルを回して、グループ内 の移動先の曲番を点滅させ、押して決 定する。 ジョグダイヤル 表示窓の中段に曲番が点滅します。 DISPLAY 曲名が入力されているときは、>を 押すと、曲名を表示させることができ ます。.を押すと曲番に戻ります。 リモコンで操作する 回転つまみ DISPLAY 移動したい曲の再生中に、 を 秒 以上押す。 本体で操作する GROUP 回転つまみを回して 「 」を点滅さ せ、xを押して決定する。 GROUP を 秒以上押して、グループ GROUP ON 回転つまみを回して... -
Page 58: グループの順番を並べかえる (グループムーブ
ジョグダイヤルを回して移動したい場 グループの順番を並べか 所に移し、押して決定する。 える (グループムーブ) リモコンで操作する • グループ設定されたディスクを入れて DISPLAY を 秒以上押す。 ください。 GROUP 回転つまみを回して「 」を点滅さ GROUP せ、xを押して決定する。 回転つまみを回して「 GROUP ON 」を点 滅させ、xを押して決定する。 DISPLAY を 秒以上押す。 EDIT 回転つまみを回して「 」を点滅させ、 ジョグダイヤル xを押して決定する。 DISPLAY Move 回転つまみを回して「 : 」を点滅 させ、xを押して決定する。 回転つまみを回して移動したい場所に移 し、xを押して決定する。 途中でやめるときは 回転つまみ •... -
Page 59: 頭出しマーク (曲番) をつける
頭出しマーク (曲番) をつ 頭出しマーク (曲番) を消 ける す LINE IN 曲の途中に頭出しマークをつけて、そこ アナログ入力( ) やマイク入力 から後ろを次の曲にすることができま で録音したときは、静かな音が続く部分 す。曲番は次のようになります。 などに不要な頭出しマークがつくことが あります。その場合は、頭出しマークを 消すと、前後の曲を つの曲にまとめる ことができます。曲番は次のようになり マークをつける ます。 曲番が つ増える マークを消す 曲番が つ減る 集中コントロール T MARK キー (X .) 再生中または再生一時停止中に、マー クをつけたい位置で T MARK を押す。 MARK ON 「... -
Page 60: 曲を消す
ご注意 EDIT ジョグダイヤルを回して 「 」を • グループモード 時に別々のグループに 点滅させ、押して決定する。 属する連続した つの曲をつなぐと、前の 曲が属するグループに登録されます。ま ジョグダイヤルを回して た、連続した、グループ登録された曲とさ Erase 「 : 」 を点滅させ、押して決 れていない曲をつなぐと、後ろの曲の録音 定する。 日時や曲名は、つないだ 曲の 曲目のもの 表示窓に曲名(または曲番) と になります。 Erase OK? PushENTER 「 」 、 「 」が表 • システム上の制約により、頭出しマークが 消せない場合があります。その場合は 「シ 示されます。 ステム上の制約による症状と原因」... - Page 61 全曲を消す グループごと消す ディスク上の全ての曲を消します。 グループ名とグループ内の全ての曲を消 一度消したディスクは元に戻すことがで 去します。 きません。必ずディスクの内容を確認し 一度消したグループは元に戻すことがで てから行ってください。 きません。必ずグループの内容を確認し てから行ってください。 消したいディスクを再生し、ディスク GROUP の内容を確認する。 を 秒以上押し、グループ モードを にする。 xを押す。 削除したいグループを再生し ( 「グルー 停止中に、ジョグダイヤルを押す。 プを選んで聞く」 ( ページ) ) 、内容 EDIT ジョグダイヤルを回して「 」を を確認する。 点滅させ、押して決定する。 xを押す。 ジョグダイヤルを回して、 停止中にジョグダイヤルを押す。 Erase 「 : 」 を点滅させ、押して 決定する。...
-
Page 62: その他の機能 タイマーを使う (メロディタイマー
その他の機能 ジョグダイヤルを回して、音の種類を タイマーを使う 選び、押して決定する。 (メロディタイマー) TIMER 1 電車などで乗り越しを防いだりするのに TIME:05 便利です。 種類のタイマーを設定する ことができます。タイマーが鳴るまでの 音の種類は次の 種類から選ぶことが 時間は 分から 分の間で設定すること できます。 ができます。タイマーは停止中でも働き 表示 音の種類 ます。 TIMER 1 メロディ(ベートーベン第 ) ジョグダイヤル TIMER 2 Over the rainbow メロディ( ) TIMER 3 メロディ(きらきら星変奏曲) ジョグダイヤルを回して、音が鳴るま での時間を選ぶ。 DISPLAY TIMER 1 TIME:05 ジョグダイヤルを回すたび、... - Page 63 予約を解除するには 回転つまみを回して、音の種類を選 手順 で「 」を選びます。 び、xを押して決定する。 タイマーの音を止めるには いずれかのボタンを押します。ボタンを 音の種類については「本体で操作す 押すと、音は止まりますが、そのボタン る」の手順 をご覧ください。 本来の機能は働きません。 回転つまみを回して音が鳴るまでの時 間を選ぶ。 • 手順 で操作を終了すると前回と同じ設定 でタイマーが設定されます。 • タイマーの音は 分間鳴り、その後は設定が 解除されます。停止中に音が鳴り終わると、 TIME:01 回転つまみを回すたび、 「 」 約 秒で電源が切れます。再生中に音が鳴 TIME:99 から「 」 ( 分から 分)ま り終わると、そのまま再生が続きます。 でが表示され、 分刻みで設定するこ ご注意 とができます。回転つまみを回したま •...
-
Page 64: ディスクごとに設定を記憶する (パーソナルディスクメモリー
ジョグダイヤルを押して決定する。 ディスクごとに設定を記 Entry OK 「 」 と表示され、現在のディ 憶する (パーソナルディスクメ スクの設定情報が登録されます。 モリー) リモコンで操作する ディスクの設定情報を本体に登録しま 停止中、再生中、再生一時停止中に す。一度登録したディスクを再度入れな DISPLAY を 秒以上押す。 おすと、設定情報は自動的に呼び出され ます。次の設定情報が登録できます。 回転つまみを回して「 PERSONAL 」 • 音量 を点滅させ、xを押して決定する。 • 再生モード Entry? 「 」が点滅します。 • グループモード • プログラム再生 • 音質(デジタルサウンドプリセット) xを押して決定する。 • 再生速度 (スピードコントロール) Entry OK 「... -
Page 65: 音量リミット - Avls
ご注意 AVLS ジョグダイヤルを回して 「 • ディスク 枚分まで登録することができま 」を点滅させ、押して決定する。 すが、 枚を越えると再生した時期が古い 音量を一定のレベル以上に上げようと ものから、自動的に消去されます。 AVLS すると、表示窓に 「 」 が点滅し、 • 一度登録したディスクを編集 (名前の編集は それ以上音量が上がらなくなります。 除く) したり、録音したりすると、別のディ スクと認識され、登録されている情報は無効 になります。その場合は、もう一度登録し直 リモコンで操作する してください。 DISPLAY を 秒以上押す。 OPTION 回転つまみを回して「 」 を点 音もれを抑え耳にやさし 滅させ、xを押して決定する。 い音にする AVLS 回転つまみを回して「 」 を点滅 —... -
Page 66: 確認音を消す
リモコンで操作する 確認音を消す DISPLAY ボタンを 秒以上押す。 本体・リモコンの確認音をそれぞれ消す OPTION 回転つまみを回して「 」 を点 ことができます。本体では、本体とリモ 滅させ、xを押して決定する。 コンの確認音、リモコンではリモコンの みの確認音を消すことができます。 BEEP 回転つまみを回して「 」 を点滅 ジョグダイヤル させ、xを押して決定する。 BEEP OFF 回転つまみを回して「 」 を点滅させ、xを押して決定する。 確認音が鳴るようにするには DISPLAY 本体では手順 で、リモコンでは手順 BEEP ON で「 」 を選びます。 回転つまみ 本体で操作する ジョグダイヤルを押す。 OPTION ジョグダイヤルを回して「 」 を点滅させ、押して決定する。... -
Page 67: 表示窓の濃淡を調節する (コントラスト調整
表示窓の濃淡を調節する 誤操作を防ぐ (ホールド) (コントラスト調整) カバンに入れて使うときなどに、誤って ボタンが押されて動作するのを防ぎま 本体の液晶表示のコントラストを調節す す。 ることができます。 HOLD ジョグダイヤル 停止中に本体のジョグダイヤルを押 す。 ジョグダイヤルを回して 「 OPTION 」 を点滅させ、押して決定する。 HOLD ジョグダイヤルを回して CONTRAST 「 」 を点滅させ、押して HOLD スイッチを.方向にずら 決定する。 す。 HOLD 本体の スイッチは本体の操作 ジョグダイヤルを回して表示窓の濃淡 HOLD ボタンが、リモコンの スイッ を選び、押して決定する。 チはリモコンの操作ボタンが働かなく なります。 ご注意 リモコンで本体のコントラストは調節できま 設定を解除するには... -
Page 68: 電源について 電池の持続時間
電源について 再生 家庭用電源 (コンセント)以外に本機で 使用電池 ステレオ 使える電源は、以下の通りです。 ステレオ ステレオ • … 本体に入れて 充電式ニッ 約 時間 約 時間 約 時間 −充電式ニッケル水素電池 ケル水素電 池 NH-14WM • … バッテリーケースを使って アルカリ 約 時間 約 時間 約 時間 乾電池 −単 形アルカリ乾電池 充電式ニッ 約 時間 約 時間... -
Page 69: その他 使用上のご注意
その他 取り扱いについて • 落としたり、強いショックを与えたりしない 使用上のご注意 でください。故障の原因になります。 • リモコンやヘッドホンのコードを強く引っぱ 分解しないでください らないでください。 ミニディスクレコーダーに使われているレー • 次のような場所には置かないでください。 ザーが目にあたると危険です。 — 温度が非常に高いところ( ℃以上) 。 レンズに触れないでください — 直射日光のあたる場所や暖房器具の近 く。 レンズが汚れると音飛びが起きたり、再生で — 窓を閉めきった自動車内(特に夏期) 。 きなくなったりする場合があります。 — 風呂場など湿気の多いところ。 また、ほこりがつかないように、ディスクの — 磁石、スピーカー、テレビなど磁気を帯 出し入れ以外はふたを必ず閉じておいてくだ びたものの近く。 さい。 — ほこりの多いところ。 パワーアダプターについて • 温度が高いところ ( ℃以上)... - Page 70 ミニディスクの取り扱いについて リモコンについて • ミニディスク自体はカートリッジに収納さ 付属のリモコンは本機専用です。また、他機 れ、ゴミや指紋を気にせず手軽に扱えるよ 種に付属のリモコンで、本機の操作はできま うになっています。ただし、カートリッジ せん。 のよごれや反りなどが誤動作の原因になる 乾電池ケースについて こともあります。いつまでも美しい音で楽 付属の乾電池ケースは本機専用です。 しめるように次のことにご注意ください。 — ミニディスクに直接触れない お手入れについて シャッターを手で開けないでください。 表面が汚れたときは 無理に開けるとこわれます。 水気を少し含ませた柔らかい布で軽くふいた あと、からぶきします。シンナー、ベンジ ン、アルコールなどは表面をいためますので 使わないでください。 ヘッドホンおよびリモコンプラグのお手 シャッター カートリッジ — 入れ 持ち運ぶときや保管するときはケース に入れる プラグが汚れていると雑音や音切れの原因に — 置き場所について なることがあります。常によい音でお聞きい 直射日光があたるところなど温度の高い ただくために、プラグをときどき柔らかい布 ところや湿度の高いところには置かない でからぶきし、清潔に保ってください。 でください。また、砂浜など、ディスク 端子のお手入れ...
-
Page 71: システム上の制約による症状と原因
システム上の制約による症状と原因 ミニディスクシステムでは、従来のカセットや とは異なる方式で録音が行われま す。そのため、いくつかのシステム上の制約があり、次のような症状が出る場合があ ります。これらは、故障ではありませんので、あらかじめご了承ください。 症状 原因 最大録音可能時間 分、 曲録音されるとそれ以上の録音はできません。 分、 分 に達していなくて さらに曲を追加するには、不要な曲を消して録音してください。 TR FULL も、 「 」 表示が出て 録音が開始できない。 曲数も録音時間も余裕があ 同じディスクで録音、消去をくりかえすと、 曲のデータが連続して TR FULL るのに、 「 」表示 記録されず、空いているところに分割して記録されることがありま が出て、録音が止まる。 す。ミニディスクは、このような場合でも離れたデータをすばやく探 し出し、順に再生します。ただし、分割したそれぞれのデータは曲の 区切り ( 曲) と同じ扱いになり、データが全部で 個になると、録 音できなくなります。さらに曲を追加するには、不要な曲を消して録 音してください。 頭出しマーク... -
Page 72: 故障かな ? と思ったら
故障かな と思ったら サービス窓口にご相談になる前にもう一度チェックしてみてください。ご不明な点が あるときは裏表紙に記載されているテクニカルインフォメーションセンターへお問い 合わせください。メッセージ一覧 ( ページ) も合わせてご覧ください。 症状 原因 処置 ふたが開かない 録音・編集中に電源をはずしたり電池 電源を入れ直し、消耗した電池は新し が消耗している。 いものと交換する。 HOLD 操作を受けつけない、ま ホールド機能が働いている スイッチを矢印と逆の方向にし HOLD たは正しく動作しない (本体の操作ボタンを押すと 「 」 てホールド機能を解除する( 、 表示が出る) 。 ページ) 。 ふたがしっかりと閉まっていない。 カチッと音がするまでふたを閉めてか OPEN ら ボタンを押す。 結露(内部に水滴が付着) してい ディスクを取り出して、そのまま数時 る。 間おく。... - Page 73 症状 原因 処置 ディスクの 曲目から再生 前回再生したときディスクの途中で 一度停止させ、本体のNを 秒以上 しない 止めた。 押したままにする。またはリモコンの 回転つまみをN>側に 秒以上回し たままにする。 グループモードが になってい グループモードを にしてから一 る。 度停止させ、本体のNを 秒以上押 したままにする。またはリモコンの回 転つまみをN>側に 秒以上回した ままにする。 パーソナルディスクメモリーに登録 パーソナルディスクメモリーから削 した。 除する。 再生中に音がとぎれる 振動の多い場所に置いている。 振動の少ない場所で使う。 ナレーションやイントロなど 曲の 秒以下の短いトラック(曲) を作ら 録音時間が極端に短い。 ない。 雑音が多い テレビなど強い磁気を帯びたものの テレビなどから離して置く。...
-
Page 74: メッセージ一覧
症状 原因 処置 MDLP 本機、または他の MDLP 対応機器で 他機種で編集ができない に対応していない機器で編集 編集する。 しようとした。 録音時、瞬間的なノイズが ステレオ録音では、圧縮方式の特 ステレオ録音または ステレオ録 発生する 性上、録音元の音源によっては、ごく 音を行う。 まれに瞬間的なノイズが発生する。 早送りまたは早戻しをする グループスキップモードが働いてい 何も操作せずに 秒以上待つと、自 と何曲か先または前の曲に る。 動的にグループスキップモードが解 飛んでしまう。 除される( ページ) 。 グループ機能またはグルー プログラム設定中にグループモード プログラム設定する前に、グループ プスキップ機能が働かない を に切り換えようとした。 モードにする。 誤ってグループ情報が書き換えられ ディスク名内の不要な文字列を削除 た。 した後、グループ名をつけ直す... - Page 75 表示 意味 対策 MENU 本体でメニューの選択中にリモコンキー 本体で操作する。 のどれかを押した。 リモコンでメニューの選択中に本体キー リモコンで操作する。 のどれかを押した。 NAME FULL 曲名やグループ名、ディスク名を 文 ディスク名、グループ名、曲名を短く 字を越えて入力しようとした。 して入力する( ページ) 。または 1700 MDLP 曲名とディスク名を合計約 文字を越 録音時、曲名の最初に「 」 えて入力しようとした。 をつけない設定にする( ページ) 。 NO COPY LINE IN シリアルコピーマネージメントシステム アナログ入力( ) を使って録 SCMS ( )によりダビングは禁止されてい 音する(...
-
Page 76: メニュー一覧 (本体/リモコン
表示 意味 対策 SORRY /LINE OUT AUDIO OUT /LINE 出力( 「 」 )の ジョグダイヤルを使って、i LINE OUT AUDIO OUT 設定が 「 」になっている状態 出力( 「 」 )の設定 HeadPhone で、デジタルサウンドプリセットを設定 「 」 にする ( ページ) 。 しようとした。 — ディスクまたはグループの 曲目の頭で、頭 出しマークを消そうとした。 種類の異なる曲と曲の頭出しマークを消そ うとした (例えばステレオ録音された曲とモ ノラル録音された曲の間の頭出しマークを... - Page 77 PLAY MODE — シャッフル再生、リピート再生など、再生状態を選べます( ページ) 。 RecVolume — 録音レベルの自動調節/手動調節を選べます( ページ) 。 REC MODE — 録音モード ( ステレオ/ ステレオ/ ステレオ/モノラ ル) を選べます ( ページ) 。 M-TIMER M-TIMER メロディタイマーの設定ができます ( ページ) 。 AUDIO OUT — /LINE OUT 出力の設定を選べます( ページ) 。 SOUND — デジタルサウンドプリセットの設定を選べます...
- Page 78 本体(ジョグダイヤル)の動作条件別メニュー一覧 本体のジョグダイヤルで選べるメニューの一覧です。操作について詳しくは 、 ページの表中の参照ページをご覧ください。ジョグダイヤルをくり返し回すとメ ニューの項目はくり返し表示されます。 停止中のメニュー EDIT :Name :Set :Release Name Bank BankErase :Erase :Erase DISPLAY LapTime RecRemain GP Remain AllRemain Clock PLAY MODE Normal AllRepeat 1 Track 1 Repeat Shuffle PGMRepeat Shuf. Rep REC MODE MONO M-TIMER TIMER 1 TIMER 2 TIMER 3 AUDIO OUT...
- Page 79 PERSONAL Entry? Erase? SYNC REC : ジョグダイヤルを押す。 : ジョグダイヤルを回す。 SYNC OFF SYNC ON MIC SENS SENS HIGH SENS LOW OPTION AVLS BEEP REC-Posi LP Stamp CONTRAST CLOCK SET AVLS OFF AVLS ON From Here From End MAIN UNIT REMOTE Stamp ON Stamp OFF BEEP ON BEEP OFF...
- Page 80 再生中のメニュー EDIT :Name :Name Name Bank :Move :Move :Erase DISPLAY LapTime 1 Remain GP Remain AllRemain RecDate PLAY MODE Normal AllRepeat 1 Track 1 Repeat Shuffle PGMRepeat Shuf. Rep M-TIMER TIMER 1 TIMER 2 TIMER 3 AUDIO OUT LINE OUT HeadPhone SOUND SOUND OFF...
- Page 81 録音中のメニュー EDIT :Name :Name :Name Name Bank DISPLAY LapTime RecRemain Clock RecVolume Auto REC ManualREC REC MODE MONO AUDIO OUT HeadPhone LINE OUT SOUND SOUND OFF SOUND 1 SOUND 2 TIME MARK 5 min. ON 10 min. ON 15 min. ON SYNC REC SYNC OFF SYNC ON...
- Page 82 リモコンの動作条件別メニュー一覧 DISPLAY リモコンで選べるメニューの一覧です。メニューが表示されるまで ボタン を押したままにします。メニューの項目は回転つまみをくり返し回すとくり返し表示 されます。 停止中のメニュー EDIT GPRelease Name Bank BankErase :Name GP:Set M-TIMER TIMER 1 TIMER 2 TIMER 3 GROUP GROUP OFF GROUP ON PERSONAL Entry? Erase? SEARCH : xボタンを押す。 Index Time : 回転つまみを回す。 OPTION AVLS BEEP AVLS OFF AVLS ON BEEP ON BEEP OFF...
- Page 83 再生中のメニュー EDIT :Name GP:Name Name Bank :Move GP:Move M-TIMER :Erase TIMER 1 TIMER 2 TIMER 3 SPEED GROUP GROUP OFF GROUP ON PERSONAL Entry? Erase? SEARCH Index Time : xボタンを押す。 OPTION : 回転つまみを回す。 AVLS BEEP AVLS OFF AVLS ON BEEP ON BEEP OFF グループモードが...
-
Page 84: 主な仕様
出力端子 主な仕様 /LINE OUT :ステレオミニジャッ ク(専用リモコンジャック) 形式 194 mV (10 k Ω ミニディスクデジタルオーディオシス 実用最大出力 ( 時) テム 5 mW + 5 mW ヘッドホン: ( Ω) 録音方式 電源 磁界変調光学方式 • 充電式ニッケル水素電池 再生読み取り方式 NH-14WM(A) 1.2 V, 1350 mAh (MIN) Ni-MH 個 非接触光学読み取り... -
Page 85: 保証書とアフターサービス
別売りアクセサリー 保証書とアフターサービス 国内用 海外用 保証書 NH-14WM NH-14WM 充電式ニッケ ル水素電池 • この製品には保証書が添付されていますの で、お買い上げの際お買い上げ店でお受け BC-9HM BC-9HM ガム型充電式 ニッケル水素 取りください。 電池用充電器 • 所定事項の記入および記載内容をお確かめ のうえ、大切に保存してください。 光デジタル POC-5AB POC-15B POC-10AB ケーブル POC-15AB • 保証期間は、お買い上げ日より 年間です。 POC-15AB POC-5B アフターサービス POC-10B • 調子が悪いときはまずチェックを POC-15B この説明書をもう一度ご覧になってお調べ ステレオマイ ECM-717 ECM-717 ください。... - Page 86 サンプリングレートとは 解説 サンプリングレートとは、 秒間の音声 をどれだけの量のデジタル信号にするか ここでは、技術用語やミニディスクの特 を表す数値です。一般に数値が大きいほ 徴的な動作について解説します。 ど高音質になります。サンプリングレー トの異なる機器同士では、通常デジタル TOC EDIT 「 」 とは 信号によるダビングはできません。これ Table Of Contents とは の略で、 を可能にするのが、サンプリングレート 音声以外の情報を記録する、ミニディス コンバータです。コンバータは、デジタ ク上の領域です。どの曲が何曲目でディ ル信号を他のサンプリングレート用のデ スクのどこにあるかなどを記録していま ジタル信号に変換します。本機はこのコ す。ミニディスクが本だとすると、索引 ンバータを内蔵しています。光デジタル や目次にあたります。 入力端子に入ってきたサンプリングレー 録音やトラックマークの記録・削除、曲 トの異なる信号( チューナー の移動などのさい、ミニディスクレコー :32kHz, DAT:48kHz など)は、コン ダーは の書き換え作業を行います...
- Page 87 デジタル録音の制限について ご注意 本機は、音楽ソフトの著作権を保護する 著作権を保護するためのコピーコントロール ため、 「シリアルコピーマネジメントシ 信号を除去、改変してコピーを作成すること は、個人として楽しむ目的であっても法律で SCMS ステム( ) 」に準拠しています。 禁止されています。 や再生専用 などの市販ソフトか ら、光デジタル入力端子を使って録音し 誤消去防止つまみについて たミニディスクは、さらに他の機器でデ 録音したものを誤って消さないために、 ジタル録音することはできません。光デ 誤消去防止つまみをずらして穴が開いた ジタル入力で録音したミニディスクを別 状態にします。つまみをずらして穴があ のミニディスクに録音するには、アナロ いた状態にすると、録音・編集ができま LINE IN グ入力( ) を使ってください。 せん。録音・編集するときはつまみを閉 めます。 または再生専用 などの市販ソフト ディスク裏面 誤消去防止つまみ デジタル録音可 録音 ・ 編集できない デジタル...
- Page 88 な行 索引 名前をつける 名前を変える ネームバンク あ行 消す 頭出しマーク 登録する 消す 呼び出して使う つける お手入れ は行 オートタイムトラックマーク パーソナルディスクメモリー 付属品 か行 プログラム再生 確認音 別売りアクセサリー 曲を消す ホールド 、 曲 全曲 ま行 グループ マニュアル録音 移動 メニュー 解除 メロディータイマー 消す 再生 ら行 設定 録音 録音 アナログ 高速サーチ...
- Page 89 English 4 REC indication BOperating Instructions Lights up while recording. Flashes when standing by for recording. 5 SYNC (synchro-recording) indication Looking at the controls Lights up while synchro-recording. The numbers are keyed to the illustrations in 6 Play mode indication the Japanese text (pages 11 to 13).
- Page 90 TIME MARK/ Selecting the Auto Time List of menus — Stamp setting (page 98). MIC SENS/— Selecting the microphone Menu functions sensitivity (page 98). To use menu items on the recorder, press —/SEARCH Selecting the search mode the jog dial to enter the menu, turn the dial (Index search/Time search) to select the item, and then press the dial (page 100).
-
Page 91: Getting Started
BPreparing Notes • The supplied battery charging stand can be used only with this recorder. Any other Getting started! models cannot be charged. • Do not use the supplied battery charging See the illustrations in Japanese text (pages 14 stand to charge any other battery besides the and 15). -
Page 92: Recording An Md Right Away
BMD recording 3 Record an MD. 1 While the recorder is stopped, press the jog dial. Recording an MD right away! 2 Turn the jog dial until “SYNC REC” flashes in the display, and then press (Synchro-recording) to enter. See the illustrations in Japanese text (pages 17 3 Turn the jog dial until “SYNC ON”... - Page 93 About the DSP TYPE-R for ATRAC while “TOC Edit” appears in the display, “TYPE-R” is a high-level Sony specification then it will not be possible to open the lid used in the Digital Signal Processor (DSP), until power is restored.
- Page 94 BMD playing Go forward Keep pressing >. Turn while playing and hold the control towards > on the Playing an MD right away! remote control. See the illustrations in Japanese text (page 21). Pause Press X. Press X on the remote control.
- Page 95 BVarious ways of Recorded Same as the Adjusted recording sound source. automatically. level You can also You can also adjust it adjust it Connecting digital (optical) manually manually. (Digital REC and analog (line) inputs level control). The recorder selects digital or analog input You can erase unnecessary marks after according to how the sound source is recording (“Erasing a track mark”, page 113)
- Page 96 Notes • It is recommended that you use the AC Long-time recording (MDLP) power adaptor for MDLP recordings. See the illustration in Japanese text (page 25). • During monaural recording of a stereo Select each recording mode according to sound source connected through the digital the recording time that you want.
-
Page 97: Recording Without Overwriting Existing Material
Notes Recording a track into an • The group function setting is stored even if existing group you eject the MD or turn off the recorder. • In group mode, the recorder treats all tracks • Insert a disc with group settings. without group settings as belonging to the •... -
Page 98: Recording From A Microphone
Notes • The setting will remain even after the power Adding track marks is turned off. automatically at specified • If you start recording while the recorder is in intervals (Auto Time Stamp) play-paused, the recording will begin from the point at which it is paused even when See the illustration in Japanese text (page 29). -
Page 99: Setting The Clock To Stamp The Recorded Time
2 Press the jog dial. 3 Turn the jog dial until “RecVolume” Setting the clock to stamp the flashes in the display, and then press to recorded time enter. See the illustrations in Japanese text (page 33). 4 Turn the jog dial until “ManualREC” flashes in the display, and then press to To stamp the date and time on the MD enter. - Page 100 To maintain the correct time Searching for a specific track Once you set the clock, it will keep correct while monitoring track numbers time as long as the recorder is connected to a or track names (Index Search) power source, such as the rechargeable battery, alkaline dry battery, or AC power To do an index search, set the search mode adaptor.
- Page 101 Selecting and playing groups Using the group function (Group Skip Mode) (Group Mode) Operations are possible regardless of whether See the illustrations in Japanese text (pages 35 group mode is on or off. However, playback to 36 ). on the recorder will differ, depending on The recorder can operate various playback whether group mode is on or off.
- Page 102 On the remote control 1 Press PLAYMODE during playback. Changing a play mode Each time you press this button, the play See the illustrations in Japanese text (pages 37 mode changes as follows. to 39). “(none)” (All the tracks are played <...
-
Page 103: Selecting The Sound Quality
• If you turn group mode on during program 5 Turn the jog dial to adjust the sound level. play, the program play is canceled. To move the cursor between “T” to “B”: Press x or X. To switch between “SOUND 1” to Adjusting treble and bass “SOUND 2”: (Digital Sound Preset) -
Page 104: Connecting To A Stereo System
To change playback speed Connecting to a stereo system (Speed Control) (LINE OUT) See the illustrations in Japanese text (pages 41 See the illustration in Japanese text (page 44). and 42). Connect the i/LINE OUT jack of the The playback speed can be adjusted in 7 recorder to the LINE IN jacks of an steps (80%, 85%, ...100%, 105%, 110%). -
Page 105: Labeling Recordings
BEditing recorded tracks The number of titles that can be stored on a disc depends on the number of characters that You can edit your recordings by adding/ are input for track names, group names, and erasing track marks or labeling tracks and disc name. - Page 106 2 While the recorder is stopped, press the To display “:”, “–” and Press T MARK. jog dial. “/” repeatedly at the 3 Turn the jog dial until “EDIT” flashes in input position in the the display, and then press to enter. letter input area.
- Page 107 On the remote control To delete a letter and Press 1 Insert a disc and do the following. move back all following PLAYMODE. letters to the left. See step 1 of “On the recorder” to check the varieties of name you can relabel. If phrases are stored in the name bank, the 2 Follow steps 2 to 4 of “On the remote first phrase stored appears in the display...
- Page 108 On the remote control • Storing phrases from a previously labeled track, group, or disc: 1 Follow steps 1 and 2 of “On the remote You can store an existing track, group, control” in “Relabeling recordings” or disc name as a phrase. (page 107) and display the track, group, •...
- Page 109 Searching for a phrase by its first • Searching for a phrase by its first letter: letter You can retrieve a phrase by its first On the recorder letter, and then use the phrase in a new 1 Follow steps 1 to 5 of “Labeling label.
- Page 110 • When group mode is OFF: Erasing phrases Several tracks are registered as one group. The following section explains the On the recorder operation when group mode is on. 1 While the recorder is stopped, press the jog dial. On the recorder 2 Turn the dial until “EDIT”...
-
Page 111: Moving Recorded Tracks
Notes Moving recorded tracks • In step 5, the first track must be either the first track of an existing group or a track that See the illustrations in Japanese text (page 56). does not belong to a group. • When selecting the last track in step 4, make You can change the order of the recorded sure the track comes after the one selected in tracks. - Page 112 6 Turn the control repeatedly until the number of the destination track within Moving a track to a different the group flashes in the display, and group then press x to enter. See the illustration in Japanese text (page 57). To cancel moving On the recorder Press CANCEL on the recorder.
-
Page 113: Adding A Track Mark
3 Press T MARK to erase the mark. To cancel moving “MARK OFF” appears in the display. Press CANCEL on the recorder. Press DISPLAY for 2 seconds or more on the The track mark is erased and the two remote control. tracks are combined. -
Page 114: To Erase The Whole Disc
On the remote control 5 Turn the jog dial until “ : Erase” 1 While playing the track you want to flashes in the display, and then press the erase, press DISPLAY for 2 seconds or jog dial. more. The group name, “GP Erase?” and 2 Turn the control repeatedly until “EDIT”... - Page 115 6 Press the jog dial. To stop the alarm Melody timer is set. Press any button. The time remaining until the alarm is Notes shown in the display while the recorder • The settings will be lost when you start is stopped or play-paused.
-
Page 116: Turning Off The Beep Sound
When using a 100% fully charged sound on the remote control. rechargeable battery. When using a Sony LR6 (SG) “STAMINA” 5 Turn the jog dial until “BEEP OFF” alkaline dry battery (produced in Japan). flashes in the display, and then press to enter. - Page 117 BAdditional information When playing (JEITA) (Unit: approx. hours) Batteries Stereo Messages If the recorder cannot carry out an NH-14WM(A) operation, error messages may flash in the nickel metal display window as follows. hydride BANK FULL : rechargeable The phrase bank is almost full and battery cannot store the phrase you tried to LR6 alkaline...
- Page 118 In this case, TOC ERR : The recorder cannot read the disc consult your nearest Sony dealer. information correctly. Insert another P/B ONLY : disc. If it is no problem to erase all the You tried to record or edit on a contents of the disc, erase all (page 114).
- Page 120 ご案内 ソニーではお客様技術相談窓口として 「テクニカルインフォメーションセンター」 を開設しています。 お使いになってご不明な点、技術的なご質問、故障と思 われるときのご相談は下記までお問い合わせください。 テクニカルインフォメーションセンター 5194 電話: − − 受付時間:月∼金 午前 時から午後 時まで (祝日、年末、年始、弊社休日を除く) ご相談になるときは次のことをお知らせください。 ● 型名 ● ご相談内容:できるだけ詳しく ● お買い上げ年月日 Printed in Japan...