
Summary of Contents for MOTOmed viva2
- Page 1 Instruction manual MOTOmed viva2 englisch – valid for Software-Version 4.3 and subsequent versions: Oct. 2007 –...
- Page 2 Please use the MOTOmed only after you have read the instruction manual. If you should not understand the language of the present version, please request the instruction manual in your national language. Benutzen Sie das MOTOmed erst, nachdem Sie die Gebrauchsanweisung gelesen haben.
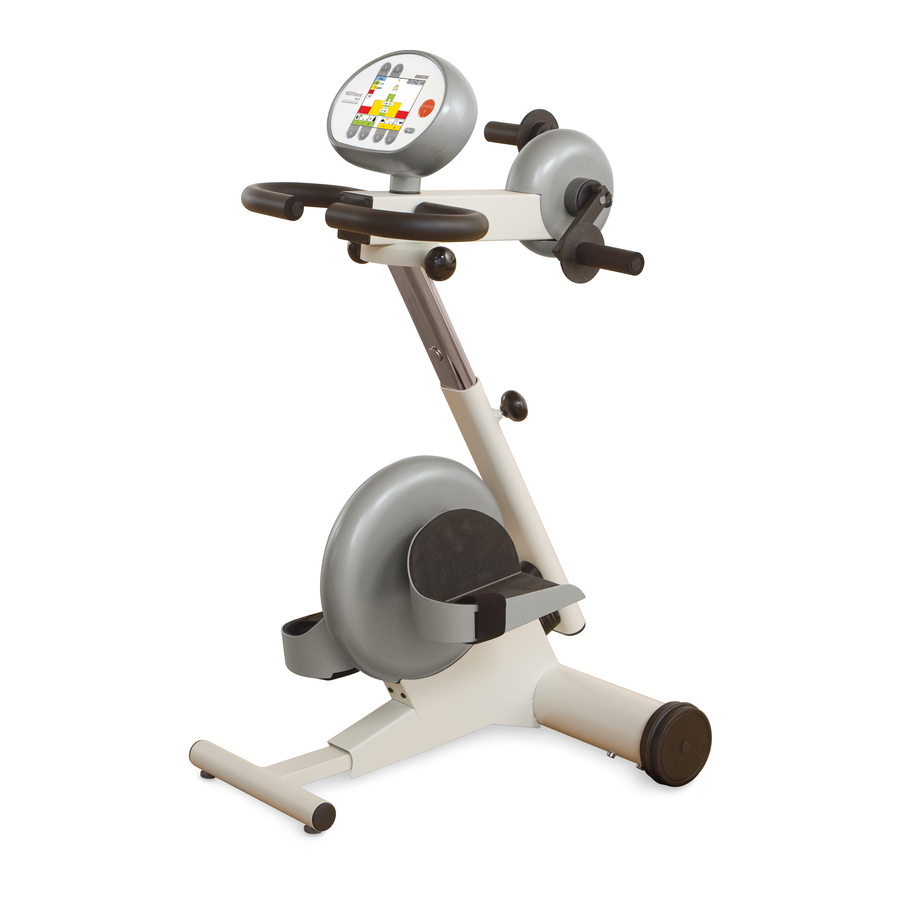
- Page 3 (blue, 6 buttons) operating panel arm/upper body trainer handlebar hand grip big screw knobs leg guide with calf shells height adjustment Velcro straps supporting module mains cable safety foot shell small front leg large tube transport rollers Fig. 2 MOTOmed viva2...
- Page 5 The MOTOmed viva2 is a motor assisted MovementTherapySystem that thinks with you. Enjoy the benefits every day. This instruction manual will help you to get to know the MOTOmed viva2. It will guide you through the functions and give some suggestions and tips on how to use your new movement therapy system so as to gain optimal benefit from the training.
-
Page 7: Table Of Contents
Introduction page 7 Therapy suggestions Set Up, Transport Operation Accessories Troubleshooting Cleaning and Care Technical Specifications, Symbols Warranty Service Safety Precautions EMC Information Index CONTENT... - Page 9 Introduction page Application Normal Use Restriction of Liability INTRODUCTION...
- Page 10 On special occasions the MOTOmed viva2 can also be used being in a lying position. You are only allowed to use the MOTOmed viva2 following the instructions and safety precautions in this manual and if no therapist or doctor states any contraindication.
- Page 11 Restriction of Liability The manufacturer doesn’t assume liability for consequences of - abuse and misuse - neglect of this instruction manual - wanton damage and reckless usage - over intensive training - use with an unsuitable wheelchair or chair - use without prior consultation of the responsible doctor and therapist - attachment of unapproved accessories - repair or other interference by any person non-approved by the...
-
Page 13: Therapy Suggestions
Therapy Suggestions page Training Hints How Do I Train Appropriately? Instructions in Case of Spasms In General THERAPY SUGGESTIONS... - Page 14 Regular training with the MOTOmed viva2 is important in order to achieve therapy benefits. At the beginning, you should not train for more than 10 to 15 minutes continuously.
- Page 15 Instructions in Case of Spasms If you are affected by spasticity, slow and regular movement with the MOTOmed viva2 is important. Just like in physiotherapy, it is recommended to train legs or arms in a way that no spasm will occur.
- Page 16 Pay attention to your seating position and posture when training – especially when using the arm/upper body trainer. The wheelchair or chair should be straight and in line with the MOTOmed viva2. You should be sitting upright, back straight, resting on the back support of the chair or wheelchair.
-
Page 17: Set Up, Transport
Set Up, Transport page Set Up Stand-by Mode Transport SET UP, TRANSPORT... - Page 18 MOTOmed. In order to adjust the front leg of the device you have to tilt the MOTOmed backwards carefully, open the two Allen screws at the bottom of the MOTOmed viva2 and pull out the front leg of the device. After adjustment, please tighten the Allen screws.
-
Page 19: Operation
Stand-by Mode Please plug the mains cable into the MOTOmed viva2 and the mains plug into a wall socket. green light Fig. 5 The green light next to the “start/stop” button on the display module is now blinking for 6 seconds. Then blinking changes to a continuous light, the MOTOmed viva2 is now in stand-by mode. - Page 20 To move the MOTOmed, please hold the handlebar or the arm trainer of the MOTOmed viva2 and tilt it backwards until you can easily pull or push the MOTOmed viva2 on its large transport rollers. The mains cable has to be detached completely prior to the transport.
- Page 21 Operation page Introduction What is ServoCycling? SymmetryTraining Short Instructions Leg Training Short Instructions Arm/Upper Body Training Settings Leg insertion aid (insertion and securing of legs) Start of training Arm/upper body trainer Adjustment of speed Change of direction Automatic direction change Active cycling (with one’s own strength) ServoCycling How to shift gears when you cycle yourself...
- Page 22 “leg training” and the “arm/upper body training”. Chapter “settings” offers a detailed explanation of the operation, step-by- step. What is ServoCycling? ServoCycling is a special function of the MOTOmed viva2 for users with very little residual muscle strength. The MOTOmed ServoCycling see page 29 function has an effect similar to a servo-assisted steering system, which could enable you to steer a truck by using one finger.
- Page 23 Short instructions leg training Set up: Place the MOTOmed viva2 on a non slip surface with the large tube against a wall if possible. Sit in a wheelchair or in a stable chair in front of the MOTOmed viva2 within a reasonable distance to the trainer –...
- Page 24 After a while speed [rpm] you can try cycling yourself again (but only if you feel able to) – the MOTOmed will recognize this input and switch automatically to active mode again. The bicycle icon appears on the Fig.11...
- Page 25 Removing the legs: To remove your legs after training press the button “removal aid” . Last, press again the red “start/stop” button (see para. 2) to switch off the MOTOmed. Otherwise the MOTOmed viva2 will automatically switch into stand-by after a while. Short instructions arm/upper body training...
- Page 26 Whenever you attach an arm/upper body trainer (item no. 250 or 218) to your MOTOmed viva2 you have to extend the front leg by approx. 15 cm/6 inches. However, please keep a minimum insertion of the front leg of 10 cm/4 inches for optimal stability of the MOTOmed.
- Page 27 Before you start the training, you have to place your feet into the foot shells and fix them with the Velcro straps. The leg insertion aid of the MOTOmed viva2 offers the possibility to bring the foot shells into a suitable position to help you inserting your legs more comfor- tably.
- Page 28 Start of training Press button “start/stop“. The MOTOmed viva2 starts with a short and gentle warm-up phase. 1:05 min duration extras warm-up speed [rpm] ServoCycling direction slow fast Fig. 17 The speed of the leg trainer automatically increases up to 20 rpm, arm/upper body trainer warms up to 5 rpm.
- Page 29 ServoCycling slow fast Fig. 18 Change of direction Upon pressing the button “direction“ the MOTOmed viva2 slowly reduces the speed until it stops, changes the direction of movement and finally accelerates back up to the previous speed. duration extras 5:36 min...
- Page 30 Automatic direction change With the back + forth program you can set a period of time after which the MOTOmed viva2 will change the direction automatically. For this press at first the button “extras” (1.), then the button “extras” (2.), once again the button “extras” (3.) and finally the button “back + forth program”...
- Page 31 Press the button “ServoCycling.” Now you may cycle yourself in the pre-set gear and try to accelerate the MOTOmed viva2. As soon as a bicycle icon appears on the display you are cycling with your own strength!
- Page 32 duration extras 5:49 min speed [rpm] ServoCycling ServoCycling direction slow fast Fig. 23 During active cycling, the operating sound might increase due to increasing speed or higher gears. How to shift gears when you cycle yourself Just like using a bicycle you can shift gears by pressing the buttons “light“ (small weight) or heavy (large weight).
- Page 33 SymmetryTraining SymmetryTraining is only available during active training. The right and left leg activity, is displayed in bars and percentage. This function helps to train your legs evenly. You can choose between two displays as SymmetryTraining feedback options. The pre-set bar graph shows the activity of your legs in two bars with the respective percentage (e.g.
- Page 34 ServoCycling. You can do this by simply starting to cycle with your own strength or by pressing the button “ServoCycling“. As soon as you cycle yourself, the MOTOmed viva2 will detect your see page 29 impulse and respond with the bicycle icon on the display. Then, various information appear on the display successively: SymmetryTraining, duration of training, distance covered, speed,….
- Page 35 Change of SymmetryTraining display To change the SymmetryTraining display press the following buttons: Button “extras“ (1.), button “extras“ (2.), again button “extras“ (3.) and finally the button “symmetry display“ (4.). extras extras extras extras extras extras duration extras 2:25 min 4:54 min 5:34 min 6:11 min...
- Page 36 You can use the leg removal aid to see page 36 remove your legs from the MOTOmed viva2. Also, you have the option to get interesting training suggestions or a short training analysis. Training analysis...
- Page 37 Upon pressing the arrow buttons you may switch between the different results: duration of training distance covered analysis analysis duration of training distance covered total: 7:37 min total: 0.70 km with motor: 5:23 min with motor: 0.42 km YOU cycled: 2:14 min YOU cycled: 0.28 km...
- Page 38 You just have to press any of the 6 blue buttons around the display in order to see the analysis of the last training. Training suggestions At the end of any training there are further MOTOmed viva2 training suggestions available. Just press the button “hints” to read them through.
- Page 39 (the motor power) automatically adapts to your muscle condition and is therefore optimally sensitive at any time. This means additional safety, especially if your muscle stiffness changes through the course of the training with the MOTOmed viva2. Suggestion: SpasmControl and thus also the MovementProtector are activated by the manufacturer.
- Page 40 Switch on/off SpasmControl with MovementProtector (Hint: SpasmControl with integrated MovementProtector is activated by the manufacturer). Press button "extras“ (1.) followed by the button “SpasmControl” (2.) extras duration extras 2:25 min extras 4:54 min duration of training [min] extras 1 2 3 2:25 Spasm motor...
- Page 41 Duration of training It is possible to pre-set the duration of your training period, similar to setting a timer. When the set training time is over, the MOTOmed viva2 stops automatically. The duration of training can be changed at all times.
- Page 42 The motor power should be reduced if you are at risk of easily injuring your bones, tendons, joints and ligaments due to high motor power applied by the MOTOmed viva2 (i.e. individuals suffering from see page 13 strong osteoporosis, muscle shortening etc.).
- Page 43 When should the motor power be increased? If your legs or arms are very stiff, they prevent the motor from performing a complete and round pedal movement. You should increase the motor power to avoid the SpasmControl changing the direction several times in a row.
- Page 44 If you want to save the parameters (SpasmControl, speed, duration, gear, rotation forward/backward, motor power) of the MOTOmed viva2 you set individually during training proceed as follows: Primarily set the values that you would like to save. Then press the button “extras” (1.), followed by the button “starting parameters”...
- Page 45 By confirming the set parameters with button “yes” they’re saved as your own starting parameters for the next training sessions. The MOTOmed viva2 will start all following training sessions automatically with the new parameters. If you wish to start your next training with the standard parameters set by the manufacturer, press button “extras”...
- Page 46 Adjust the contrast of the display Through this function you can adapt the contrast of the display to the lighting conditions. Your adjustment will be saved. Press the button “extras” (1.), followed by the buttons “extras” (2.) and “adjust contrast” (3.). more...
- Page 47 Adjust the volume Through this function you can adjust the acoustic feedback during pressing buttons, i.e. when choosing a gear. Press the button “extras“ (1.), then the buttons “extras” (2.) and “adjust volume”. more... extras 2:25 min extras extras duration extras 4:54 min 5:34 min...
- Page 48 Freeze/continue displayed information This function is only available when you cycle actively. It interrupts the automatic change of displayed information. That means you can hold the particular information on the display you like to work with. Press the button “hold display.” duration extras 3:35 min...
- Page 49 Duration of displayed information Displayed information during the MOTOmed training changes at certain intervals (the manufacturer’s setting is 15 seconds). You can change these intervals, i.e. you can make the displayed information change faster or slower. Please press button the “extras“ (1.), then “extras 2.) and “duration display”...
- Page 50 (insertion aid) again 3 times. If you wish to train with locked parameters you always have to activate the button lock at the start of your training. You always can switch off the MOTOmed viva2 with the red button “start/stop”, even if you train with locked parameters.
- Page 51 Maximum speed The maximum speed function allows you to limit the speed that should not be exceeded during active training. This can be necessary while using an ankle joint control or doing the SymmetryTraining. The standard setting is 120 rpm. To set the maximum speed press the “extras”...
- Page 52 Language option The language option allows the selection between a wide range of available languages. All functions and visual feedback are displayed in the selected language. Press the button ”extras” (1.), then the button ”extras…” (2.) and then the button ”language options” (3.). extras extras 2:25 min...
-
Page 53: Accessories
Accessories page Leg guides with calf shells Self-operating foot holders Pedal radius quick adjustment Arm/upper body trainer active/passive Arm/upper body trainer active Forearm shells with arm cuffs Hand fixation with wrist cuff Wheelchair stabilizer Chair fixation with stabilizer Height adjustment Ankle joint control with SlidingScale adjustment Accessories, included in basic model: Safety foot shells... - Page 54 Leg guides with calf shells Item no. 502 The leg guides (fig. 65a) at the safety foot shell are movable and spring mounted so that an ankle joint movement is possible. This is important as the calf muscle pump in the legs can increase the speed of the blood flowing back to the heart.
- Page 55 Please follow these steps when changing the pedal radius: 1. First stop the pedal movement of the MOTOmed viva2 by pressing the red “start/stop” button twice. 2. Remove legs from the foot shells.
- Page 56 Before using the arm/upper body trainer it is important to pull out the front leg about 15 cm/6 inches (ensure a minimum insertion of see page 16 10 cm /4 inches). This improves the stability of the MOTOmed viva2 necessary for the arm training. ACCESSORIES...
- Page 57 Please ensure that you do not place too much weight on one side of the handle i.e. when standing up: do not prop yourself up on one side of the handle since this could cause the MOTOmed viva2 to tip over.
- Page 58 Please ensure that you do not place too much weight on one side of the handle i.e. when standing up: do not prop yourself up on one side of the handle since this could cause the MOTOmed viva2 to tip over. handlebar...
- Page 59 1. Open the screw knob on the underside of the arm/upper body see page 23 trainer and turn it clockwise by 180 degrees. Tighten the screw knob again. 2. In order to adjust the arm/upper body trainer to suitable height, see page 23 please open the screw knob at the supporting module, adjust...
- Page 60 For retrofit of the forearm shells, please open the Allen screw at the ball bearing. You find an appropriate Allen screwdriver at the underside of the MOTOmed viva2. Don’t forget to tighten the Allen screw again after attaching on the forearm shells.
- Page 61 Fig. 74 Please make sure that the chair fixation with stabilizer is secured firmly to the MOTOmed viva2. Both front legs of the chair must be secured inside the chair fixation and the back legs must be positioned on the floor plate.
- Page 62 Velcro strap Fig. 76 Fig. 75 Put the large tube of the MOTOmed viva2 on top of the large part of the height adjustment unit, so that both rubber-knobs are inserted in the circular holders of the height adjustment. Now open the Allen screws of the front part of the height adjustment unit with the Allen screwdriver which comes with the MOTOmed viva2 and which is located underneath the device.
- Page 63 Now you can adjust the height you need. Tighten this Allen screw. Don’t forget to secure the MOTOmed viva2 with the 3 Velcro straps to the height adjustment. Put them around the left and right side of the large tube and the height adjustment and one strap around the front leg of the MOTOmed and the height adjustment unit.
- Page 64 With a special spanner you are able to remove the foot shell (or pedal) from the pedal crank and screw it into the second hole on the pedal crank increasing the pedal setting. You find the required spanner along with your MOTOmed viva2. large pedal radius 125 mm ( 4.9 inches) small pedal radius 70 mm (2.7 inches)
- Page 65 Please ensure that you do not place too much weight on one side of the handle i.e. when standing up: do not prop yourself up on one side of the handle since this could cause the MOTOmed viva2 to tip over.
- Page 66 General information: Additional accessories are described in the current product overview. Also individual adaptations can be carried out. Please contact your MOTOmed representative or the RECK company, see chapter “service.” see page 75 ACCESSORIES...
-
Page 67: Troubleshooting
Troubleshooting page Safety Instructions for Troubleshooting The MOTOmed viva2 is Jerky, Runs Unevenly or Makes Noises The MOTOmed viva2 Does Not Work at All or the Operating Panel Does Not React Error Messages Overheating The motor locks Neither arm-trainer nor leg-trainer is detected... - Page 68 Safety Instructions for Troubleshooting Only authorized qualified personnel is allowed to carry out repair works on the MOTOmed viva2. For safety reasons it is crucially important that the device is completely disconnected from the power supply. In case of a malfunction that is not listed below or if you have any...
- Page 69 Please check whether the operating panel is mounted correctly and whether the mains cable is plugged into the wall socket and into the MOTOmed viva2. Check also the function of your wall socket (by plugging in any other electric device).
- Page 70 Fig. 82 This error message appears if the pedals are moved before the MOTOmed viva2 is ready for starting up (the green small lamp at the operating panel must be permanently). Please pull the mains plug out of the plug socket, put it in again and wait until the green small see page 17 lamp at the operating panel lights permanently.
-
Page 71: Cleaning And Care
(electric outlet) so that the power supply is completely disconnected. Clean the surface of your MOTOmed viva2 only with a soft and dry cloth. It is absolutely crucial that no water enters the device. If several users use the MOTOmed viva2, please disinfect the handlebar and the operating panel with a suitable disinfectant. -
Page 73: Technical Specifications, Symbols
Technical Specifications, Symbols Measurements and weight (basic model) Height: 100 cm/40 inches Width: 60 cm/23.6 inches Depth: 56 cm/22 inches Operating panel: 11.3 x 8.5 cm/4.5 x 3.4 inches Weight: leg trainer 31 kg/68 lb leg and arm trainer 38 kg/84 lb Power requirements Europe: 220 - 240 V ~/50 - 60 Hz, 0,56 A... - Page 74 According to IEC 601-1, all-polo switch off of the MOTOmed viva2 is ensured by pulling the mains plug. Signs and symbols on the marking Applied part type B Applied parts which are in contact with the user during normal use and which are therefore subject to special safety criteria.
-
Page 75: Warranty
Warranty The RECK company offers a warranty on material and manufacturing faults of 12 months on the MOTOmed viva2 valid as of day of delivery or invoice date. During the 12 months warranty period the RECK Technik GmbH & Co.KG grants replacement of defective parts of the MOTOmed viva2... -
Page 77: Service
Service Should you have any questions please call us and we will gladly return your call. Please have the serial no. of your MOTOmed viva2 available, which you can find on the mar- king on the large tube. Manufacturer: Distributor: RECK-Technik GmbH &... -
Page 79: Safety Precautions
“speed” of the starting parameters has to be reduced after see page 42 the start. The use of the MOTOmed viva2 has to be adapted to individual health conditions. Training suggestions by the manufacturer or its distributors are given without guarantee. No exact instructions can be given for the use of the MOTOmed viva2 in different health situations. - Page 80 Please ensure that the MOTOmed is placed on an even, non-slip surface for best possible stability (if possible place it against a wall). Place the MOTOmed viva2 so that it cannot tilt over and cause injuries to somebody. Don’t put weight on only one side of the MOTOmed viva2.
- Page 81 The MOTOmed viva2 might slip on straight floors (tiles, laminate, parquet floors etc.). Therefore, anti-slip caps (item no. 591) are available. Please watch out, the rubber feet of the MOTOmed viva2 may leave pressure marks or spots on sensitive floor coverings like carpet or synthetic floors.
- Page 82 MOTOmed viva2 and that he is able to switch off the device through the operating panel during the training (particularly during the arm/upper body training with forearm shells).
- Page 83 In order to avoid fire hazard or electrical shock the MOTOmed viva2 must never be operated if the casing has been removed. In the same way the MOTOmed viva2 must never be operated in any wet or damp SAFETY PRECAUTIONS...
- Page 84 The MOTOmed viva2 must not come into contact with water or steam. If an object or liquid gets into the MOTOmed viva2 you have see page 75 to have it checked by qualified personnel before you can continue to use it.
- Page 85 If an object or liquid gets into the MOTOmed viva2 you have to have it checked by qualified personnel before you can continue to use it. Keep animals away from the MOTOmed viva2. Don’t leave the packaging material lying around. Plastic foils/ -bags, Styrofoam parts etc.
-
Page 87: Emc Information
EMC Information page Manufacturer’s Declaration – Electromagnetic Emissions Manufacturer’s Declaration – Electromagnetic Immunity Recommended Separation Distances EMC INFORMATION... - Page 88 The manufacturer states that the mains cable of the MOTOmed viva2 complies with the requirements of the EN 60601–1–2:2001. If the original mains cable coming with the MOTOmed viva2 is not taken into use the electromagnetic emission of the MOTOmed viva2 may increase and the immunity may decrease.
- Page 89 Manufacturer’s Declaration – Electromagnetic Immunity The MOTOmed viva2 is to be operated in the electromagnetic environment described below. The customer or user of the MOTOmed viva2 has to guarantee the use in the appropriate environment. Immunity test IEC 60601 – test level...
- Page 90 To assess the electromagnetic environment due to fixed RF transmitters, an electromagnetic site survey should be considered. If the measured field strength in the location in which the MOTOmed viva2 is used exceeds the applicable RF compliance level above, the MOTOmed viva2 should be observed to verify normal operation.
- Page 91 RF communications equipment and the MOTOmed viva 2. The MOTOmed viva2 is supposed to be operated in an electromagnetic environment where the RF interference is controlled. The customer or user of the MOTOmed viva2 can help avoid electromagnetic...
-
Page 93: Index
Index page accessories direction 21, 27 active cycling 22, 29 display - freeze active training duration of displayed information adjust contrast - change adjust volume duration of training adjustment of speed 21, 27 ambience conditions analysis of training 23, 35 ankle joint control application electromagnetic emissions... - Page 94 Index page handfixation normal use handlebar height adjustment operation immunity overheating insert/secure legs 21, 25 introduction 3, 7 pause language option pedal radius quick adjustment leg guides leg insertion aid 21, 25 leg removal aid 23, 36 recommended distances recycling restriction of liability maintenance marking...
- Page 95 Index page safety foot shells technical specifications safety precautions therapy benefits self-operating foot holders therapy suggestions serial number training hints separation distance transport service transport rollers ServoCycling troubleshooting 22, 29 set-up shift gears short instructions leg training short instructions arm/upper 23, 24 body training UL classification...
- Page 96 GB 713.3/W200n 06.08 binSt Technical modifications for the purpose of technical improvement are subject to change without notice. Reprint, even in parts, only by approval of the RECK company.
- Page 98 Instruction manual MOTOmed viva2 Reck-Technik GmbH & Co. KG Reckstrasse 1-4, D-88422 Betzenweiler, GERMANY Phone +49 (0)7374-1885 +49 (0)7374-18480 contact@motomed.com, www.motomed.com...
Need help?
Do you have a question about the viva2 and is the answer not in the manual?
Questions and answers