Table of Contents
Advertisement
Advertisement
Table of Contents

Related Manuals for iodd IODD2531


Summary of Contents for iodd IODD2531
- Page 1 User's MANUAL IODD2541 / IODD2531...
-
Page 3: Table Of Contents
..............29 13. Initializing iodd . - Page 4 ........... . . 45 19. S.M.A.R.T. / iODD Information .
-
Page 5: Part I. Basics
Part I. Basics... -
Page 7: Cautions
Cautions... - Page 8 IODD Inc. assumes no responsibility for the loss of data stored on the device. IODD Inc. assumes no responsibility for the loss of data due to the loss of the password, nor is Iodd responsible for any other issues caused by the loss of the password.
-
Page 9: Introduction
Introduction... - Page 10 USB external hard drive and it has been noted as a USB Bootable Windows The addition of the data encryption security to the original virtualization capabilities has transformed this device into an even greater tool for iODD users. IODD Inc. will strive to continually develop innovative and superior products.
-
Page 11: Components
Components components of 2541 Following accessories can be changed for your convenience. -
Page 12: Components Of 2531
8 | Components components of 2531 Following accessories can be changed for your convenience. -
Page 13: Check Defects
Check defects Are all the components listed on components chapter included? Is the protective film on the front of the device well attached? Are the product information and the bar code attached well on the inside of the product? Is there an issue placing the cover back onto the device after connecting the HDD? When the device is connected to a USB cable, does the connection appear to be strong? After the device has made a USB connection, is there any defect on the LCD screen? -
Page 15: System Requirements
System Requirements A host system that can support USB 1.x/2.x/3.x interfaces. USB 1.x does not support multi-device connections. A system that can boot via USB-CDROM/USB-HDD from the BIOS. A system with a USB port capable of holding voltages over 4.75V with a maximum current of 900mA. A HDD that is less than 10mm thick and has a SATA interface. -
Page 17: Boot Requirements
Boot Requirements When booting through the USB-CDROM, always use a bootable ISO file. When booting through the USB-CDROM, the OS installation (ISO) must include the USB host driver for the PC. When booting through the USB-HDD, always use a bootable VHD file. When booting through the USB-FDD, always use a bootable IMA file. -
Page 19: How To Assemble
How to assemble 2541 Things you will need: a mini screw driver and two plate screws. Open the aluminum cover. Connect the HDD to the SATA connector. - Page 20 16 | How to assemble Put the aluminum cover and fasten it using the two plate screws. 2531...
-
Page 21: Warranty / Product Label
HDD to obtain it. For your convenience, write down the serial number in the user manual before installing your HDD. It contains technical information about AES256bit encryption.(IODD 2541 only) There is no way to change your password, but there is a password hint to help you remember your password... - Page 22 18 | Warranty / Product Label in the case of loss. There is also provided a list of compatible devices.(IODD 2541 only) An serial number is on the device. Be careful not to damage it. 2531 The warranty label can be found on the inside of the aluminum cover along with the LOT number that can be used to find out product information.
-
Page 23: Part Ii. Guide
Part II. guide... -
Page 25: Connecting To Pc
Connecting to PC First, properly connect the device to a PC using the provided cable as shown below. It is recommend that you not use the USB ports on the front of your PC. It may cause issues, such as partition damage due to connectivity error. Even though the device is connected to a USB 3.0 port, it may perform as slow as USB 1.1 or USB 2.0 speeds. -
Page 27: Check Basic Operations (2541)
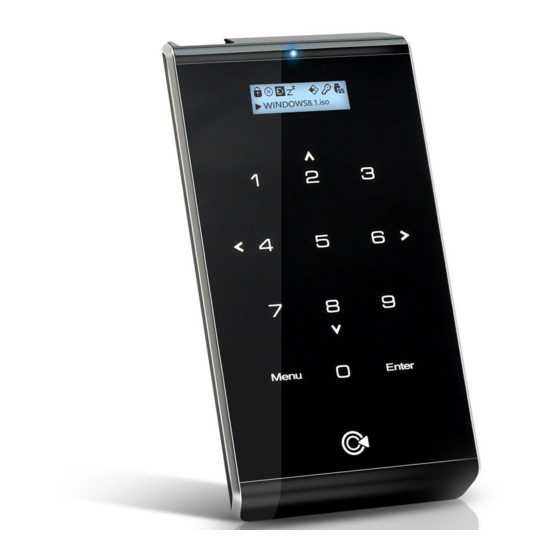
Check Basic Operations (2541) Make sure that the touch screen is working properly. If the touch screen is not working properly, it may be due to the low electrical current of the USB port the device is connected to. The device's touch sensitivity is lower than that of smartphone touch screens so it is not able to recognize stylus pens. -
Page 29: Check Basic Operations (2531)
Check Basic Operations (2531) Check the cable for defectiveness. Check LCD screen. Make sure that the power is on and that both, USB 3.0 and 2.0, are recognized. If they are not working properly, it may be due to a simple defective cable. Please contact Customer Support cnsiodd@- googlegroups.com and we will be more than happy to help you. -
Page 31: Password Settings(2541 Only)
Password Settings(2541 only) To activate the AES256 encryption, press When you activate the encryption, The data of the disk are all deleted. The encrypted disk requires a password each time a USB connection is made. -
Page 33: Initializing Iodd
Initializing iodd 13.1 Creating folder... - Page 34 30 | Initializing iodd After you open a formatted disk, create an "_ISO" folder in the top level of the path. You cannot give a custom name to the folder because it is a prescribed name. You must name the folder "_ISO"...
-
Page 35: Initializing Disk
Initializing Disk | 31 13.2 Initializing Disk if display iodd lcd message '1st partition:XX' Press Type and press The Disk Management window will pop up. In the [Not initialized] section, click the and a menu with [Initialize Disk (I)] will pop up. -
Page 36: Format Disk
32 | Initializing iodd 13.3 Format disk Press Type and press The Disk Management window will pop up. In the [Unallocated] section, click the and select [New Simple Volume (I)] right mouse button and the disk will be formatted as NTFS. - Page 37 Format disk | 33...
-
Page 39: Virtual-Rom Function
You can create a subfolder in the "_ISO" folder, and manage an ISO or VHD file. You can navigate the file list by pressing (UP) key and (down) key. iodd2531 navigate the file list by control jog-up and jog-down You may move into a folder by pressing (iodd2531 is... -
Page 41: Virtual-Hdd Function
Virtual-HDD function Mounting a virtual HDD is like mounting an ISO. If you press the (2531 is ) key on the desired VHD file, it will be mounted. Up to four VHD files can be mounted simultaneously. You can see the mounted VHD file icons. Figure 15-1 2541 VHD icon If you turn off the device, all of the mounted VHD files will be unmounted at the same time. - Page 42 38 | Virtual-HDD function iODD change automatically the mode of VHD according to VHD name ( example below ) filename.vhd => filename&D.vhd : dual mode filename.vhd => filename&DW.vhd : dual mode , write-enabled You can use the utility 'VHD Tool ++' to make Virtual Disk file.
-
Page 43: Changing The Mode
Changing the Mode Iodd provides three modes of smooth booting. Pressing the (2531 is while 3 seconds) key will bring up a menu in which the first option will be You can select a mode by moving to it using... -
Page 45: Write Protect
Write Protect The write-protect feature can be found by pressing the key, and selecting the sub-menu. It will be the first option. (2531 is while 3 seconds and selectig sub menu. and select * After pressing (2531 is ), the USB connection will reconnect and the process will begin. -
Page 47: Usb Control
USB control 18.1 USB Reconnection The USB reconnect feature can be found by pressing the key, and selecting the sub-menu. It will be the second option. selecting You may execute the USB reconnect through the or by pressing and holding the hot-key For 2531, while 5seconds and reconnect USB It is a helpful feature to use when you need to physically reconnect the USB cable. - Page 48 44 | USB control Caution!! If the HDD is formatted to NTFS and is removed without safely removing the HDD, data loss may occur or the HDD may be damaged. After safely removing the USB drive from the Windows taskbar, an iODD2541 window will appear. If you click this, the drive will be completely and safely removed.
-
Page 49: S.m.a.r.t. / Iodd Information
S.M.A.R.T. / iODD Information S.M.A.R.T. information displayed at LCD can be incorrect and is dependent on the HDD, therefore these errors are unrelated to iODD. You can find S.M.A.R.T. information through and select menu . It is the first option. You can navigate the menu using the keys. -
Page 51: Setting/Language
1 / 15 / 30 / 60 / 180 min. Set default : You can restore the default to all settings through > > Change Language : For user convenience, iODD 2541 provides various languages to choose (English, Kor- ean, Chinese, Japanese, and Russian). > and selecting Language. -
Page 53: Firmware Upgrade
Firmware Upgrade For stability, disconnect all other USB devices connected to your PC. Connect to CD-mode. Download the latest firmware from our website. ftp| ftp://sps.iodd.co.kr/open version info : https://drive.google.com/drive/folders/0B0-txRN3Yhu9cFVDcmtJbXkyVlE/0B0-t xRN3Yhu9Z0dnM0hTLUxxV1E/0B0-txRN3Yhu9fkFmcEdjUDVpUWh4d0lVeElvd- m1jdDBwT3ZwYkREOWtNeWFoN3BfX05QRXc Run the downloaded firmware updater. - Page 54 50 | Firmware Upgrade After it runs, click the button. A notification will appear once it has been completed. Reconnect the iODD. If the LCD screen flashes about a dozen times, and it is reconnected then it has been successfully completed.
-
Page 55: Emergency Firmware Recovery (2541 Only)
emergency firmware recovery (2541 only) If the firmware upgrade was unsuccessful through your PC, then you can follow these steps: First, remove the aluminum cover. REFERENCED_IMAGE_REMOVED Press and hold the small button on the warranty cover. While holding the button, connect the USB and release the button after 3 seconds. After running the downloaded latest firmware, proceed with the firmware upgrade. - Page 56 Basically, ISO files use the *.iso file extension and it refers to a source file to facilitate a repeated replication of a CD. iODD 2541/2531 offers a variety of status icons for the user's convenience. Read through them carefully and use them to your convenience.
-
Page 57: Appendix A. Menu Tree (2541)
Appendix A. Menu Tree (2541) -
Page 59: Appendix B. Menu Tree (2531)
Appendix B. Menu Tree (2531)
Need help?
Do you have a question about the IODD2531 and is the answer not in the manual?
Questions and answers