Advertisement
WARNING! SHUT POWER OFF AT FUSE OR CIRCUIT BREAKER
NOTE: The RC223 Universal Hand Held Remote System is equipped with a learning
frequency function which has 256 code combinations to prevent potential interference from
other remote units. The frequency on your Receiver and Transmitter units have been preset
at the factory. We recommend changing the frequency while installing your ceiling fan
instead of using the initial frequency set by the factory. (Fig. 1) Please use a small size tool
to change the setting.
Safety Precautions:
WARNING: Disconnect source of electrical power by removing the fuse or switching
off circuit breakers.
not use with solid state fans.
Electrical wiring must meet all local and national electrical code requirements.
Electrical source and fan must be 115/120 volts, 60 hz. Maximum fan motor amps 1.0.
Maximum light watts 300-incandescent only.
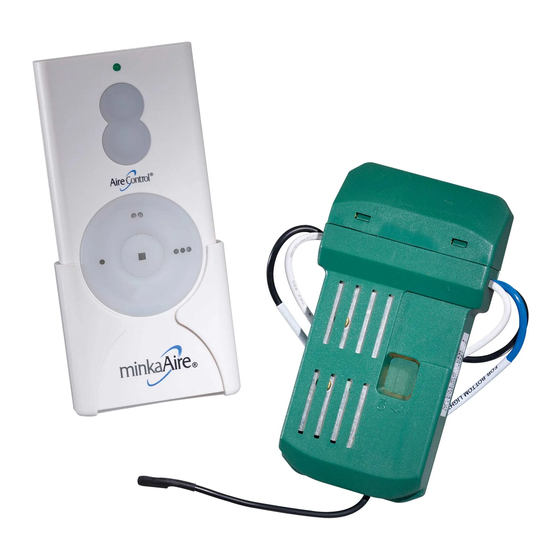
1. RECEIVER INSTALLATION
NOTE: Before the electrical power is disabled for the installation of the receiver and wall
control; the light kit must be left on the on position and the ceiling fan on the highest speed.
Step 1. Insert Receiver into Hanger Bracket with the flat side of the Receiver facing the
ceiling.
Step 2. Motor to Receiver Electrical Connections: Connect the WHITE wire from the fan to
the WHITE wire marked "TO MOTOR N" from the Receiver. Connect the BLACK wire from
the fan to the BLACK wire marked "TO MOTOR L" from the Receiver. Connect the BLUE
wire from the fan to the BLUE wire marked "For Light" from the Receiver. (Fig. 2)
Step 3. Receiver to House Supply Wires Electrical Connections: Connect the WHITE wire
(Neutral) from the outlet box to the WHITE wire marked "AC in N" from the receiver. Connect
the BLACK wire (Hot) from the outlet box to the BLACK wire marked "AC in L" from the
receiver. Secure all wire connections with the plastic wire nuts provided. (Fig. 2)
After all splices are made, check to make sure there are no loose strands. As an additional
precaution we suggest to secure the plastic wire connectors to the wires with electrical tape.
2. OPERATING THE HAND HELD REMOTE CONTROL
1. Light Button:
Press and release the button to turn the light ON or OFF. Press and hold the button to set the
desired light brightness. The light will cycle between bright and dim settings as long as the button
is pressed. The light key has an automatic auto-resume feature that allows the light to remain at
the same brightness as the last time it was turned off.
2. Speed Buttons
Press and release the button for the desired speed.
3. Stop Button
This button stops the fan.
Use the screw provided to install the wall holster on the wall or another convenient location of
your choice.
The installation of your new RC223 Universal Hand Held Remote System is complete.
CREATING A UNIQUE FREQUENCY
Step: 1. Within 60 seconds of turning the Receivers AC power ON. Press the transmitter's
"Stop" button.
Step: 2. Hold the "Stop" button for over 3 seconds, once the receiver has detected the
frequency, the down light will flash twice. This will indicate the receiver has learned the
frequency that was previously selected on the transmitter.
Note: After the AC power is on, do not press any other button on the transmitter before
pressing the "Stop" button doing so will cause the procedure to fail.
After completing the steps above, you should be able to operate the ceiling fan and light.
If the fan is not responding to the transmitter, please turn the power off to the receiver. And repeat
step 1 and 2.
Install the A23, 12v battery included. Remove the battery if not used for long periods of time to
prevent damage to the hand held remote
NOTICE!
Your ceiling fan and light kit assembly must meet the following requirements:
Universal Hand Held Remote System
INSTALLATION & OPERATING INSTRUCTIONS
For model RC223
U.S. Patents: D533,514; D551, 008
Advertisement
Table of Contents

Subscribe to Our Youtube Channel
Summary of Contents for minkaAire AireControl RC223
- Page 1 Universal Hand Held Remote System INSTALLATION & OPERATING INSTRUCTIONS For model RC223 U.S. Patents: D533,514; D551, 008 WARNING! SHUT POWER OFF AT FUSE OR CIRCUIT BREAKER NOTE: The RC223 Universal Hand Held Remote System is equipped with a learning frequency function which has 256 code combinations to prevent potential interference from other remote units.
- Page 2 1.Do Not install this fan with wall solid state speed control or wall light dimmer control. It will permanently damage the receiver of remote control and cause the fan function failure. CAUTION: Ceiling Angle shall Not Exceed 30 Degrees, For Mounting controller. Models UC-7067RC This product is protected by United States Federal and/or State Law, including Patent, Trademark and/or Copyright laws.
Need help?
Do you have a question about the AireControl RC223 and is the answer not in the manual?
Questions and answers
Can’t get remote to work on my airecontrol ceiling fan-I reset code turned the power off waited 1minute turned power back on, replaced batttery and held the middle button-didn’t work
@Neomie Howard Can’t get remote to work on my airecontrol ceiling fan-I reset code turned the power off waited 1minute turned power back on, replaced batttery and held the middle button-didn’t work
Two fans in same room need to be controlled independently but one power switch
To control two MinkaAire fans with part number RC223 independently using one power switch, each fan must be paired with its own RC223 remote control set to a unique frequency or dip switch setting. This allows each remote to control its assigned fan without interference, even though both fans share the same power line from one switch.
This answer is automatically generated