
Subscribe to Our Youtube Channel
Related Manuals for Dok CR08


Summary of Contents for Dok CR08
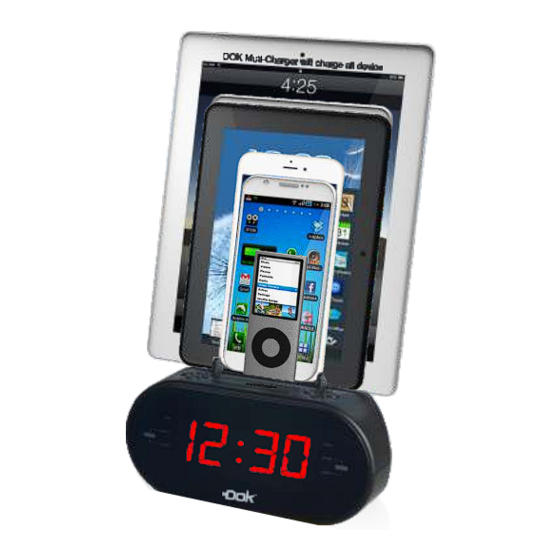
- Page 1 User’s Guide CR08 „ Single Charger „ Alarm Clock/FM Radio/ Universal Cradle & Charger...
-
Page 3: Table Of Contents
Contents Thank you for purchasing our product. For operation and security, read this manual carefully and keep it handy for future reference. Contents...........................01 Features............................01 Warnings and Precautions.....................02 Important Safety Instructions....................03 What’s in the Gift box......................04 Location of Functions ......................05-07 Use the unit..........................08-12 Troubleshooting........................13 Features •... -
Page 4: Warnings And Precautions
Battery shall not be exposed to excessive WARNING: To reduce the risk of fire heat such as sunshine, fire or the like. (for or electric shock, do not expose this once batteries could be used to operate apparatus to rain or moisture. apparatus and/or with battery operated remote control) CAUTION: Use of controls or... -
Page 6: What's In The Gift Box
CR07 Base Unit 1 Cradle Insert (For flat phones AC/DC Adaptor like SAMSUNG GALAXY II) universal charger with cradle and alarm clock User’s Guide CR08 „ Single Charger „ Alarm Clock/FM Radio/ Universal Cradle & Charger Speaker (AUX in) Cable Uer’s Guide... -
Page 7: Location Of Functions
Location of Functions PM Indicator Lights when the time is in the PM. LED Display Alarm 1 Buzzer/ Radio Indicator Lights when the alarm 1 is on and set to buzzer or radio. Alarm 2 Buzzer/ Radio Indicator Lights when the alarm 2 is on and set to buzzer or radio. - Page 8 Location of Functions DIMMER VOL+/AL1 TUNER+ TUNER- SNOOZE/SLEEP POWER SOURCE TIME- TIME+ AUX IN VOL-/AL2 CLOCK/PRESET ress repeatedly to switch between Line in, FM Radio modes. 6. Volume+/AL1 ress to increase the volume. Press and hold to begin setting Alarm 1. 7.
-
Page 9: Location Of Functions
Location of Functions DIMMER VOL+/AL1 TUNER+ TUNER- SNOOZE/SLEEP POWER SOURCE TIME- TIME+ AUX IN VOL-/AL2 CLOCK/PRESET 10. TUNER-/TIME- ress to tune the radio. Press to decrease the minute or hour when setting the clock or alarm. 11. Dimmer P ress to dim the display. 12. -
Page 10: Use The Unit
Use the unit Power Plug the included AC/DC power adapter (100-240V ~50/60Hz 1.5A max) into the DC POWER INPUT on the dock and an AC power outlet to power the dock. Line Input Battery Back up The battery backup is intended for short power outages only The clock radio's primary functions cannot run off of the... - Page 11 Use the unit 2. Your smart device 's shape will determine if an insert is needed. Use the insert for flat-bottom phones. Round-bottom phones do not need the insert; Optional Insert For FLAT-BOTTOM phones For ROUND-BOTTOM phones 3. Charging your iPhone/ ipad or other personal devices: This unit provides USB ports for charging up to 1 device (Output power 5V 2.1A).
- Page 12 Use the unit Clock and Sleep Timer Setting the Clock 1. If in standby mode,press and hold the CLOCK/PRESET to adjust mode. 2. When the display begins to blink,then release the button. 3. Press the TUNER-/TIME-&TUNER+/TIME+ button to adjust the hour. The PM indicator will light up when the hour is set in the PM.
- Page 13 Use the unit Tuning to a Preset Radio Station 1. In the Radio mode, press CLOCK/PRESET to the preset mode; 2. Press TUNER-/TIME- and TUNER+/TIME+ to cycle through radio stations. line Input Using the Line Input Requires a 3.5mm audio cable (Included) 1.
-
Page 14: Use The Unit
Use the unit Reviewing, Arming and Disarming Alarm 1. Alarms are automatically armed when set. Active alarms are indicated by alarm types on the display; 2. To review the alarm time, press and release the ALARM button on ce. The related wake to source and alarm time will show on the display;... -
Page 15: Troubleshooting
Troubleshooting Volume level is set too high Decrease the volume Sound is distorted Plug in USB to smart device and Charging cable is bad Change charging cable does not charge... - Page 16 Printed in china...
Need help?
Do you have a question about the CR08 and is the answer not in the manual?
Questions and answers