
Summary of Contents for YSMART CM20D
- Page 1 YSMART TECHNOLOGY CO.,LTD website:www.ysmart-tech.com Phone: 86-755-85232255 Intelligent Solar Charge Controller User’s Manual...
-
Page 2: Table Of Contents
Catalogue 1. Product Introduction………………………………………...3 2. Installation……………………………………………………4 3. Operation……………………………………………………..5 4. Common Fault and Handling……………………………….10 5. Technical Data………………………………………………..11... -
Page 3: Product Introduction
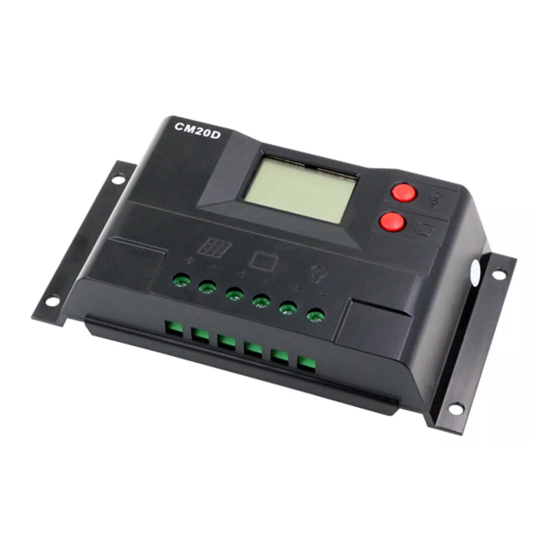
1. Product Introduction CM20D controller is a kind of intelligent, multi-purpose solar charge and discharge controller. Fixed LCD display with a very friendly interface is used in this product; various control parameters can be flexibly CM20D set, fully meet your various application requirements. -
Page 4: Installation
2. Installation Install: Ready tools and cables. Right cables are recommended. Ensuring that the current density < 4mm², which is conductive to reducing the line voltage drop. Recommended: 20A with 6mm² cables. Check weather the installation sites compliance with the relevant safety requirements. Please avoid using or installing the controller in damp, dusty places or places with flammable, explosive and corrosive gases. -
Page 5: Operation
To connect your load and the cables with right polarity and then connect with the load output port of the controller. Pay special attention to + - polarity to avoid reversed connection, otherwise, your load may be damaged. Demolition: In case of any accident, please disconnect the solar panel, battery and load with controller in order. curity Note:Reversed battery polarity will not damage the controller, but you may bear se risks on your load equipments. - Page 6 P6: load indication. This symbol indicates that controller is in output state, otherwise not in the output state. The flickering of this symbol indicates overload or the damage of the load. P7:A stands for the unit of current; stands for hour. P8:V stands for the unit of voltage.
- Page 7 3 Viewing and setting the parameters: The controller will default entry “battery voltage” interface after correct power-on. This is the main interface. Use the button could in turn visit the following parameters interface. If the parameters in that interface could be set, long press the button (>5seconds,...
- Page 8 reaches the floating voltage, the controller will maintain the voltage values by PWM charging mode to avoid overcharge. long press the button (>5seconds,numbers start flashing)to finish the setting of floating voltage values and use the button to adjust the 、 parameter;...
- Page 9 controller will cut off load circuit when batter voltage is lower than this value, in order to avoid over discharge of the battery. long press the button (>5seconds, numbers start flashing) to enter the setting interface of under-voltage protection and use the button to adjust the 、...
- Page 10 As pictured at right, different numbers represent different types of Battery. b00:Lithium battery (other controls parameters need to be adjusted to match the battery) b01:Sealed battery (default type for the controller) b02: Vented battery B03:Gel battery long press the button (>5seconds,numbers start flashing)at this interface to activate the battery type and use the button to adjust the parameter;...
-
Page 11: Common Fault And Handling
4. Common Fault and Handling Under-voltage protection and treatment: Shows up and flash on the screen means the battery voltage is lower than the under-voltage protection voltage. The controller has enter the under-voltage protection state and the output has been stopped. - Page 12 ● the product is guaranteed of replacement, returning and repairing within 7 days after Sale. ● the product is guaranteed of replacement and repairing within 1 month after sale. ● the product is guaranteed of repairing within 12 months after sale. 2.
-
Page 13: Technical Data
6. Technical data Type Type CM20D CM20D Parameters Parameters Charge and <0.2V|<0.1V Rated current 10A24V 20A24V 30A24V discharge voltage drop Rated voltage 12V/24V Automatic Identification Charging mode PWM mode Voltage of solar Temperature ≤50V -4mV/Cell/℃(to be customized) panel compensation Specification of Floating charge 13.8V/27.6V... - Page 14 b02 Gel14.2V/28.4V 88 mm×160 mm×37 mm Dimension tion: diameter of 2hour b03Flooded 14.6V/29.2V 64 mm×150 mm --Φ5 mounting hole Open circuit ≤13mA Weight 230g losses Remark You will not be notified if there is any change of this product.
Need help?
Do you have a question about the CM20D and is the answer not in the manual?
Questions and answers