Table of Contents
Advertisement
Advertisement
Table of Contents

Summary of Contents for TruTech PLV16320
- Page 1 08-09-1371 WIDESCREEN 32" THIN LCD MONITOR...
-
Page 2: Safety Precautions
SAFETY PRECAUTIONS SAFETY PRECAUTIONS SAFETY PRECAUTIONS SAFETY PRECAUTIONS SAFETY PRECAUTIONS WARNING: TO REDUCE THE RISK OF CAUTION ELECTRIC SHOCK, DO NOT REMOVE COVER BACK). USER- RISK OF ELECTRIC SHOCK DO NOT OPEN SERVICEABLE PARTS INSIDE. REFER SERVICING TO QUALIFIED PERSONNEL. RISQUE DE CHOC ÉLECTRIQUE NE AVIS PAS OUVRIR... -
Page 3: Important Safety Instructions
IMPORTANT SAFETY INSTRUCTIONS Read these instructions. 10. Protect the power cord from being walked on or pinched particularly at Keep these instructions. plugs, convenience receptacles, and Heed all warnings. the point where they exit from the Follow all instructions. apparatus. Do not use this apparatus near 11. -
Page 4: Table Of Contents
TABLE OF CONTENTS SAFETY PRECAUTIONS ............2 IMPORTANT SAFETY INSTRUCTIONS ........3 REMOTE CONTROL ............5 ACCESSORIES ..............5 REMOTE CONTROL REFERENCE GUIDE ....... 6 UNIT REFERENCE GUIDE ..........7-8 CONNECTIONS ............. 9-13 Connecting a TV antenna/Cable/Satellite ....9 Connecting to A/V devices (VCR, Camcorder, Game System, etc.) ............... -
Page 5: Remote Control
REMOTE CONTROL USING THE REMOTE CONTROL USING THE REMOTE CONTROL USING THE REMOTE CONTROL USING THE REMOTE CONTROL USING THE REMOTE CONTROL • Point the remote control at the REMOTE SENSOR located on the unit. • When using this unit in very bright light, the infrared REMOTE CONTROL SENSOR may not work properly. -
Page 6: Remote Control Reference Guide
REMOTE CONTROL REFERENCE GUIDE 7) 7) 7) 7) 7) DISPLAY button DISPLAY button DISPLAY button DISPLAY button DISPLAY button Press to show which input you are watching (TV Channel/AV1/AV2/ AV3/PC ). 8) 8) 8) 8) 8) FORMAT button FORMAT button FORMAT button FORMAT button FORMAT button... -
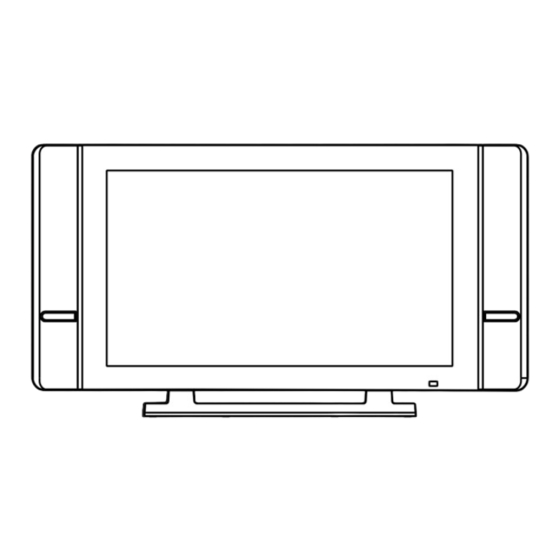
Page 7: Unit Reference Guide
UNIT REFERENCE GUIDE UNIT REFERENCE GUIDE UNIT REFERENCE GUIDE UNIT REFERENCE GUIDE UNIT REFERENCE GUIDE TOP & FRONT VIEW TOP & FRONT VIEW TOP & FRONT VIEW TOP & FRONT VIEW TOP & FRONT VIEW 6) 6) 6) 6) 6) STANDBY/ON button STANDBY/ON button STANDBY/ON button... -
Page 8: Unit Reference Guide
UNIT REFERENCE GUIDE UNIT REFERENCE GUIDE UNIT REFERENCE GUIDE UNIT REFERENCE GUIDE UNIT REFERENCE GUIDE BACK & BOTTOM VIEW BACK & BOTTOM VIEW BACK & BOTTOM VIEW BACK & BOTTOM VIEW BACK & BOTTOM VIEW 22 23 17 18 19 12) Power Cord Power Cord Power Cord... -
Page 9: Connections
CONNECTIONS CONNECTIONS CONNECTIONS CONNECTIONS CONNECTIONS CONNECTING A TV ANTENNA, CABLE BOX OR SA CONNECTING A TV ANTENNA, CABLE BOX OR SA CONNECTING A TV ANTENNA, CABLE BOX OR SATELLITE BOX TELLITE BOX TELLITE BOX TELLITE BOX CONNECTING A TV ANTENNA, CABLE BOX OR SA CONNECTING A TV ANTENNA, CABLE BOX OR SA TELLITE BOX To view television channels correctly, a signal must be received from one of the... -
Page 10: Connecting To A/V Devices (Vcr, Camcorder, Game System, Etc.)
CONNECTIONS CONNECTIONS CONNECTIONS CONNECTIONS CONNECTIONS CONNECTING TO A/V DEVICES CONNECTING TO A/V DEVICES CONNECTING TO A/V DEVICES CONNECTING TO A/V DEVICES CONNECTING TO A/V DEVICES (VCR, Camcor (VCR, Camcor (VCR, Camcorder (VCR, Camcor (VCR, Camcor der, Game System, etc.) , Game System, etc.) , Game System, etc.) , Game System, etc.) , Game System, etc.) - Page 11 CONNECTIONS CONNECTIONS CONNECTIONS CONNECTIONS CONNECTIONS Connecting to Devices with a Composite (yellow RCA-type) Video Output To connect to A/V devices such as a VCR or camcorder: - Connecting a VCR - Connecting a VCR - Connecting a VCR - Connecting a VCR - Connecting a VCR Connect the right (red) and left (white) audio output from the VCR to the right...
-
Page 12: Connecting To Sources With Component Video Output
CONNECTIONS CONNECTIONS CONNECTIONS CONNECTIONS CONNECTIONS CONNECTING TO CONNECTING TO CONNECTING TO SOURCES WITH COMPONENT VIDEO OUTPUT SOURCES WITH COMPONENT VIDEO OUTPUT SOURCES WITH COMPONENT VIDEO OUTPUT SOURCES WITH COMPONENT VIDEO OUTPUT CONNECTING TO CONNECTING TO SOURCES WITH COMPONENT VIDEO OUTPUT (DVD - only 480i, 480p, 720p &... -
Page 13: Connecting A Pc
CONNECTIONS CONNECTIONS CONNECTIONS CONNECTIONS CONNECTIONS CONNECTING A PC CONNECTING A PC CONNECTING A PC CONNECTING A PC CONNECTING A PC Connect the 15-pin D-SUB PC/VGA connector from your computer to the 15-pin D-SUB PC/VGA input on this unit using a monitor cable (not included). -
Page 14: Installation
INST INST ALLA ALLA TION TION INST ALLA ALLA TION TION INST INST ALLA TION REMOVING THE BASE ST REMOVING THE BASE ST REMOVING THE BASE STAND REMOVING THE BASE ST REMOVING THE BASE ST WARNING: The LCD Display is very fragile, and must be protected at all times when removing the base stand. -
Page 15: Using Headphones
USING HEADPHONES USING HEADPHONES USING HEADPHONES USING HEADPHONES USING HEADPHONES • Turn down the volume before connecting headphones to the unit, then adjust the volume to your desired level. • When headphones are connected, no sound will come from the front speakers. -
Page 16: Menu Setup
MENU SETUP MAIN MENU MAIN MENU MAIN MENU MAIN MENU MAIN MENU 1. Press the FUNCTION FUNCTION FUNCTION FUNCTION FUNCTION button. 2. Use button to select the options (TV (TV, , , , , AV1, AV2, AV3/Component, PC IN, DTV) AV1, AV2, AV3/Component, PC IN, DTV) AV1, AV2, AV3/Component, PC IN, DTV) AV1, AV2, AV3/Component, PC IN, DTV) -
Page 17: Screen Menu
MENU SETUP SCREEN MENU SCREEN MENU SCREEN MENU SCREEN MENU SCREEN MENU 1. Press the MENU MENU MENU MENU MENU button. 2. Use button to select the Screen Screen Screen Screen menu. Screen 3. Use button to select the options (Size mode, H-Position, V- (Size mode, H-Position, V- (Size mode, H-Position, V- (Size mode, H-Position, V-... - Page 18 MENU SETUP SOUND MENU SOUND MENU SOUND MENU SOUND MENU SOUND MENU 1. Press the MENU MENU MENU MENU button. MENU Sound Sound 2. Use button to select the Sound Sound Sound menu. 3. Use button to select the options (Sound mode, Bass, T (Sound mode, Bass, T (Sound mode, Bass, T (Sound mode, Bass, Tr r r r r eble &...
-
Page 19: Tv Channel Menu
MENU SETUP TV CHANNEL MENU TV CHANNEL MENU TV CHANNEL MENU TV CHANNEL MENU TV CHANNEL MENU 1. Press the MENU MENU MENU MENU MENU button. 2. Use button to select the TV Channel TV Channel TV Channel TV Channel menu. TV Channel 3. -
Page 20: Screen Menu
MENU SETUP SETUP MENU SETUP MENU SETUP MENU SETUP MENU SETUP MENU 1. Press the MENU MENU MENU MENU MENU button. Set up Set up 2. Use button to select the Set up Set up Set up menu. 3. Use button to select the options (Factory reset, Sleep (Factory reset, Sleep (Factory reset, Sleep... -
Page 21: Closed-Captioning
MENU SETUP CLOSED CAPTIONING CLOSED CAPTIONING CLOSED CAPTIONING CLOSED CAPTIONING CLOSED CAPTIONING Allows conversations, narration, and sound effects in TV programs and home videos to be viewed as captions on the TV screen. MENU MENU 1. Press the MENU MENU MENU button. -
Page 22: Parental Setting
MENU SETUP PARENT PARENT PARENTAL CONTROL AL CONTROL AL CONTROL AL CONTROL PARENT PARENT AL CONTROL 1. Press the MENU button. 2. Use button to select the Set up Set up Set up Set up Set up menu. Parental control Parental control 3. -
Page 23: Noise Reduction
MENU SETUP NOISE REDUCTION NOISE REDUCTION NOISE REDUCTION NOISE REDUCTION NOISE REDUCTION 1. Press the MENU MENU MENU MENU MENU button. 2. Use button to select the Set up menu Set up menu Set up menu Set up menu. Set up menu 3. -
Page 24: Troubleshooting Guide
TROUBLE SHOOTING GUIDE SYMPTOM CAUSE (AND REMEDY) • Ensure that the AC power cord is connected. No power. • Turn on the unit. • Remove any obstacles between the remote and the The remote does not unit. function. • Use the remote near the unit. •... - Page 25 Printed in China 811-162691-011...
Need help?
Do you have a question about the PLV16320 and is the answer not in the manual?
Questions and answers