Table of Contents
Advertisement
Quick Links
USER MANUAL
ABOUT THIS DOCUMENT
This document describes the user interface and controls for the Qolsys IQ
Panel, a "Smart home" control and automation system. Within these pages
you will find how to enable and simplify home security, home control, energy
management, home healthcare, and other services. The IQ Panel uses
wireless technology to communicate with a broad set of wireless peripherals
and sensors, and can also communicate with your security and home control
provider' s monitoring and safety systems, your smart phone and remote
access from your personal computer. If you have questions about the use,
features, or any aspect of this product, please consult your security and home
control dealer or visit http://Qolsys.com.
Qolsys Inc. proprietary.
Reproduction without permission is not permitted.
CERTIFICATION
Document#: IQPANEL-UM-06-15
Revision Date: 6/3/15
Software Version: 1.4.3
Qolsys Part #: QS-9004-VRZ
QS-9004-VRZ (Verizon CDMA)
QS9014-840-00-00 (Verizon CDMA)
QS9014-840-00-02 (AT&T HSPA)
QS9014-124-00-04 (Rogers HSPA)
QS9014-484-00-06 (Telefonica HSPA)
Conforms to UL Std. 1023, 985 & 1635
Certified to ULC Std. C1023 & S545
Advertisement
Table of Contents

Summary of Contents for QOLSYSYS IQ PANEL
-
Page 1: User Manual
This document describes the user interface and controls for the Qolsys IQ Panel, a “Smart home” control and automation system. Within these pages you will find how to enable and simplify home security, home control, energy management, home healthcare, and other services. The IQ Panel uses Document#: IQPANEL-UM-06-15 Revision Date: 6/3/15 wireless technology to communicate with a broad set of wireless peripherals Software Version: 1.4.3... - Page 2 CONGRATULATIONS! We’d like to thank you for making the decision to purchase the IQ Panel. We hope you’ll enjoy using it as much as we enjoyed developing it. Our name name is Qolsys, (pronounced kwal-siss) and stands for “Quality Of Life Systems.” We built our organization on the belief that we can improve the quality of life through innovation and technology.
-
Page 3: Hardware Overview
IQ PANEL- HARDWARE OVERVIEW HARDWARE OVERVIEW FRONT Panel Camera Header/ Status Bar Primary User Interface Footer/Help bar Emergency Button Home Button Microphone BACK Mounting holes Cooling Vents Mounting plate SD Card Slot Two-Way Voice Speaker Panel Sounds Speaker Rear access... -
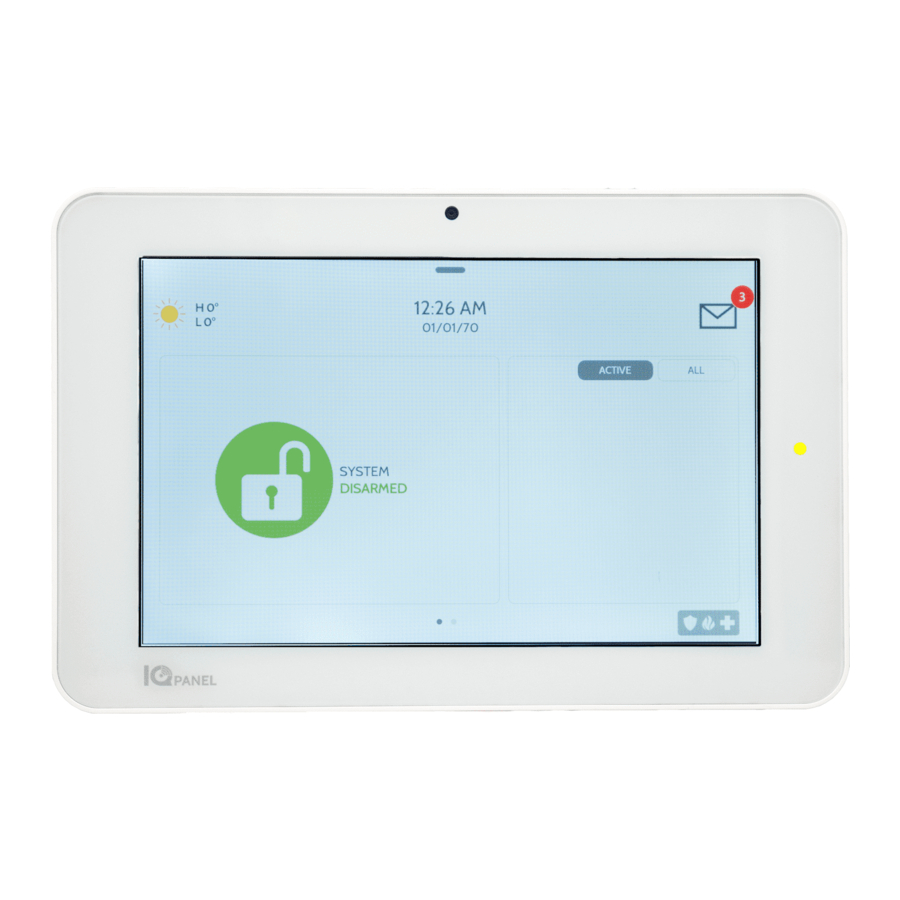
Page 4: Home Screen
HOME SCREEN FIND IT The home page is the primary page shown on the IQ Panel. It is the first page the user will see, and it is the default page when the user pushes the home button on the panel. It is divided into three sections: The header/status bar, the primary user interface, and the footer/help bar. - Page 5 IQ PANEL- HEADER/STATUS BAR STATUS TYPES & COLOR CODES STATUS The header bar is color coded based on system status, and shows the date, time, and current status. The green header is labeled “System Ready – Disarmed” and indicates that all of the sensors are closed and the system is ready to be armed.
-
Page 6: Emergency Button
IQ PANEL- EMERGENCY BUTTON EMERGENCY BUTTON FIND IT Below the 7” Touchscreen are two buttons: Emergency and Home. The Emergency Button is marked with a “+” sign. This button can be pressed at any time, regardless of the panel’ s status or the page currently displayed on the screen. -
Page 7: Alarm Events
ALARM EVENTS ALARM EVENTS When the alarm is triggered the IQ Panel will sound the siren and display a red alarm screen. If your security provider offers monitoring service, the panel will automatically contact the monitoring center using the built in cellular connection. -
Page 8: Emergency Panic
EMERGENCY PANIC EMERGENCY PANIC When you press the Emergency Button the Emergency Panic screen appears. Touching any of the buttons will trigger an alarm manually. POLICE An “Intrusion” alarm is triggered The alarm will sound until you when you touch the “Police” panic touch cancel. -
Page 9: Arming Options
ARMING ARMING FIND IT The first icon on the home screen is used for arming and disarming. PRESS TO ARM The green “unlocked” icons means your system is currently disarmed and ready to arm and will coincide with a “System Ready” message in the Header/Status Bar. -
Page 10: Quick Exit
The camera will take a picture and save the image in the camera app. The IQ Panel is designed to make knowing panel status easy. When armed, the buttons, arming button, and header bar will all appear red. - Page 11 MOSTLY SUNNY MOSTLY CLOUDY SUNNY PARTLY SUNNY Your weather reporting is based on your location, which is set by your dealer. When the IQ Panel is installed STORMY CLOUDY RAIN your dealer indicates your zip code in your Alarm.com account.
- Page 12 DISARM PHOTOS To change these settings, contact your The IQ Panel will automatically take a photo every time a user security and home control provider. attempts to disarm the panel. The 20 most recent images are saved in the camera app under “Disarm Photos” and also store DISABLED the date, time, user and whether the code used was valid.
- Page 13 The Status app is divided into four sections: Current Status, Alerts, Alarms and History. ALERTS If the IQ Panel is reporting a new issue, it will display a bubble above the app showing the number of new items that may require your attention.
-
Page 14: Home Control
See lock status, battery level and send a lock or unlock Smart Sockets command. Lights Control light modules from the IQ Panel, Turns lights on or off as needed Other Home Control Devices Devices such as Z-Wave repeaters, Z-Wave sirens and other... - Page 15 Market. See what issues the panel may be experiencing. UPGRADE SERVICES PHOTO FRAME Turn your IQ Panel into a digital photo frame when it’ s not being used. SOUND SETTINGS Adjust the sound settings for every aspect of your IQ Panel.
-
Page 16: Safety Sensors
Safety sensors function independently from the intrusion security system “Quick Access.” You will have on the IQ Panel. Safety sensors provide warning information via voice 300 seconds to open and close the prompts and/or chimes. The warning notifications will be announced sensor without triggering the chime. -
Page 17: Photo Frame
Press “Apps” and then select “Photo Frame.” PHOTO FRAME Turn your IQ Panel into a digital photo frame. Navigate. View pre loaded images or add some of your own! When you open the Photo Frame app, you will see thumbnails of the images saved in the panel, as well as buttons to play, remove and add photos as well as a settings button. - Page 18 IQ Panel must meet the following requirements: Safely eject the SD Card from your computer. Insert* the SD Card into the slot on the left side of the IQ Panel *Do not insert SD Card into panel if power is off DIMENSIONS...
-
Page 19: Sound Settings
SOUND SETTINGS SOUND SETTINGS FIND IT Choose to customize your panel’ s sounds. SOUND Navigate to the “Sound” icon through the “Apps”folder or through your panel’ s “System Settings” to manage and customize your panel’ s volume, chimes, etc. SPEAKER Panel sounds come from the left speaker just behind the screen. -
Page 20: Changing Language
LANGUAGES CHANGING LANGUAGE FIND IT ENGLISH, FRENCH OR SPANISH Your panel can easily switch from English to French or Spanish to accommodate your language of choice. Note: This toggle changes the words on the screen and the spoken words, but will NOT change your sensor names. Touch “Apps”... -
Page 21: Master Code
SETTINGS SETTINGS FIND IT The first icon in the footer/help section is “Settings.” SETTINGS Inside settings you’ll access a variety of options to customize the panel’ s interface and abilities to your location and situation. A valid master code is required to access this part of the system. -
Page 22: System Settings
SYSTEM SETTINGS SYSTEM SETTINGS FIND IT From the home page, press “Settings” and then “System Settings.” SYSTEM SETTINGS Access basic system settings like Wi-Fi, sound, and display settings. Wireless Settings View your current network or connect to new ones Sound Adjust the sound settings for your panel Brightness Change the panel’... -
Page 23: Wireless Settings
WIRELESS SETTINGS CONNECTING WI-FI FIND IT CONNECTING WI-FI Connecting to a local Wi-Fi network will allow a wide variety of features and benefits. To connect your panel to Wi-Fi, follow the steps below: Press “Settings” Enter your master code Select “System Settings” Select “Wireless Settings”... -
Page 24: Auto Update
If you make a change to a user on your Alarm.com portal, it will automatically The IQ Panel allows multiple users to control the system. Each user can update the information on your IQ have their own unique user code to arm, disarm and allow the panel to track Panel. -
Page 25: System Tests
SYSTEM TESTS SYSTEM TESTS FIND IT Press “Settings” and select “System Tests” SYSTEM TESTS Testing your panel’ s various communication paths are essential in the upkeep of your alarm. The panel provides a variety of different tests you can use to make sure everything is communicating accurately and effectively. -
Page 26: Edit Sensor
Edit a sensor name and chime with which it’ s associated. Navigate to “Settings” then “Edit Sensors” CUSTOM TEXT TO SPEECH Because the IQ Panel uses an Android operating system, it can read almost any name and speak it when the sensor Edit a sensor by using our list from the drop down or customize your own. - Page 27 PANEL REBOOT PANEL REBOOT FIND IT PANEL REBOOT Sometimes technology needs a swift kick. Simply reboot your panel to keep it in line!. Touch “Settings” Enter your master code Touch “Panel Reboot” Touch “OK” when the panel reboot pop up appears. Allow up to 5 mins for your panel to come back online.
-
Page 28: Video Tutorials
HELP HELP FIND IT The second icon in the footer is “Help” HELP APP The “Help” app is divided into three sections: Video tutorials, FAQs, and Contact Us VIDEO TUTORIALS The built in library of video tutorials includes video instructions on common To watch a video, select the Video Tutorials tab and press “Play”... - Page 29 CONTACT US CONTACT US FIND IT Select the “Contact Us” icon in the bottom right corner. CONTACT US Touching the “Contact Us” icon on the bottom right of your screen allows you to view your security provider’ s contact information. NOTE: (NOTE: the information shown here is for demonstration purposes only.
- Page 30 LEGAL LEGAL This document is subject to change without notice. Quality of Life Systems (“Qolsys”) assumes no responsibility for errors or omissions and disclaims any liabilities and losses experienced as a result of using this document. For the most recent documentation, contact your local vendor or visit us online at www.qolsys.com.
- Page 31 LEGAL LEGAL (Cont.) Warning: This Product should be installed in accordance with the National Fire Alarm Code, ANSI/NFPA 72, (National Fire Protection Association, Batterymarch Park, Quincy, MA 02269). Printed information describing proper installation, operation, testing, maintenance, evacuation planning, and repair service is to be provided with this Product. ...
- Page 32 LEGAL LEGAL (Cont.) • Do not short circuit the battery by connecting the positive terminal to the negative terminal. High currents can be generated resulting in high temperatures and risking fire and personal injury M. FALSE ALARM WARNINGS The following warnings cover the likely potential situations that may cause False Alarms Reports (FAR) to be generated. Cause of FAR: ...
Need help?
Do you have a question about the IQ PANEL and is the answer not in the manual?
Questions and answers