
Summary of Contents for Vitrea VT-MAN-INS-VBox-Pro
-
Page 1: Installation Guide
VBox - Pro Smart Home Wireless Controller Installation Guide Part Number: VT-MAN-INS-VBox-Pro Revision: 1.0... -
Page 2: Table Of Contents
Introduction Table of Contents 1 Introduction......................... 2 Important Safeguards..................... 3 Package Contents ....................3 2 VTouch Pro System Overview ..................4 VBox Pro - Product Description................5 System Application Options ................... 9 3 VTouch Pro Implementation Architecture ..............10 Stand-Alone......................10 VTouch Pro with Wi-Fi Environment.............. -
Page 3: Introduction
Introduction Introduction This is the installation and configuration manual of the VBox Pro smart home wireless controller. It describes installation and configuration procedures for building and creating a full smart home wireless solution. This manual is intended for installers who plan to install the products in homes or offices. Warnings / Cautions / Notes The manual includes several kinds of comments, marked with specific statements and aimed to attract user attention to a specific kind of information. -
Page 4: Important Safeguards
Introduction Important Safeguards Read Instructions All the safety and operating instructions should be read before the switches and the VBox Pro controller are installed. Retain Instructions The safety and operating instructions should be retained for future reference. Follow Instructions All installation and configuration instructions should be followed. Installation Guidelines WARNING VBox Pro wireless controller must be installed by a professional and... -
Page 5: Vtouch Pro System Overview
802.15.4 standard. The VTouch Pro system supports a mobile application. You can download the application Vitrea Control Pro for iOS devices from Apple App store, or for Android devices from Google Play. In addition, it is able to fully integrate with third-party smart home A/V systems such as Crestron, RTI, Bitwise and others. -
Page 6: Vbox Pro - Product Description
This makes ARANET one of the leading wireless communication protocols in the market today. VBox Pro has the following features: Wireless two-way communication with up to 150 Vitrea VTouch Pro electrical touch switches. Excellent wireless connectivity with the wireless switches. The ARANET Mesh technology enables communication with remote switches even in homes with multiple floors and multiple rooms. - Page 7 VTouch Pro System Overview Two built-in Normally-Open output ports. Two Voltage-Sense-Input ports. RS-232 Port for two-way communication with third-party systems. RS-485 Port for two-way communication with third-party systems. Multi-ways, Groups, Macros and Scenarios. Supports standard and astronomical clock for time-based events. ...
-
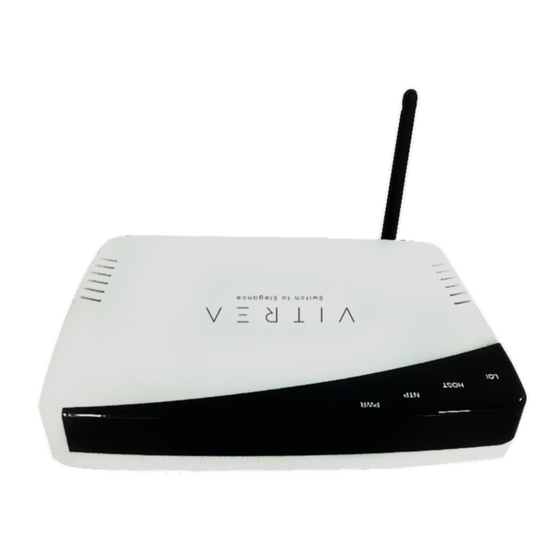
Page 8: Figure 2: Vbox Pro Top View
VTouch Pro System Overview 2.2.2 Top View The VBox Pro has four activity indicators on the top cover Figure 2: VBox Pro top view LQI – Line-Quality-Indication. This LED will be constantly On while all the Nodes (wireless switches) are connected. The LED will flash as long as at least one of the Nodes is missing (Lost connection). -
Page 9: Figure 3: Vbox Pro Rear View
GND pin of the VBox-Pro. RS-485 – The VBox Pro can be connected via this port to third party systems, such as blind controllers, AC controllers etc. Check with Vitrea’s support team regarding the supported protocols. -
Page 10: System Application Options
VTouch Pro System Overview System Application Options Retrofit – Existing Homes The wireless system can be implemented easily as a retrofit in existing homes, apartments, offices, restaurants and so on. The implementation of the VTouch Pro system is fast and simple. You just need to replace the existing mechanical switches with the VTouch Pro wireless touch switches, to register them wirelessly into the VBox Pro controller, and then create scenarios according to your needs. -
Page 11: Vtouch Pro Implementation Architecture
VTouch Pro Implementation Architecture VTouch Pro Implementation Architecture The VTouch Pro system architecture can be implemented in the smart home network in three ways: Stand-alone, VTouch Pro with Wi-Fi environment and VTouch Pro with 3 party integration. This section explains these implementation diagrams. Stand-Alone Figure 4 shows how the VTouch Pro system is implemented as a stand-alone architecture. -
Page 12: Vtouch Pro With Wi-Fi Environment
The connection between the Smartphone and the VBox Pro wireless controller is established via the Vitrea Mobile App (for iPhone or Android). With the Apps you can control and have indications of the electrical switches either locally, via the home Wi-Fi connectivity, or remotely, via the 3/4G Internet connectivity. -
Page 13: Vtouch Pro With Third-Party Integration
VTouch Pro Implementation Architecture VTouch Pro with Third-Party Integration Figure 6 shows how the VTouch Pro system is connected to the home network and 3 party A/V smart home systems. The system architecture consists of the VBox Pro wireless controller, VTouch Pro wireless electrical touch switches, a home router, with Wi-Fi capabilities and a 3 party A/V smart home system. -
Page 14: System Setup
Free space on the Hard Disk: at least 50 Megabytes. 4.1.2 VBox Pro Manager Installation Procedure 1. Download the software package from: www.vitrea-sh.com 2. In the download destination folder on your laptop, double click the VBoxManager.exe installation file. 3. Follow installation instructions. -
Page 15: Connect The Vbox Pro Controller - New Installation
System Setup Connect the VBox Pro Controller – New Installation 1. Unpack the VBox Pro controller and put it in its intended place. CAUTION Do not place anything on top of the VBox Pro controller. NOTE If you plan to mount the VBox Pro wireless controller on the wall, see the Wall-mounted installation instructions 2. -
Page 16: Configure The Vbox Pro Controller
1. Connect the RJ-45 cable to your laptop and to the Ethernet port of the VBox Pro. 2. Change local IP address of your laptop to 192.168.1.1 / 255.255.255.0. 3. Double click on the Vitrea VBox Pro Manager icon , Connect to VBox Pro window will appear. - Page 17 System Setup 7. Click Connect. VBox Pro Manager utility software will collect data from the VBox Pro controller and the configuration window will appear. 8. Configure the VBox Pro controller. Use VBox Pro Help inside the software. Once you have completed all required configuration parameters, you must set an IP address for the VBox Pro controller according to the local network parameters.
- Page 18 5. Enter the name of the customer in the Name field. 6. Click the Scan button, Vitrea Controller Scan window will appear. The VBox Pro Manager utility software will scan the network for active Vitrea devices in the network. VBox Pro Smart Home Wireless Controller - Installation Guide...
- Page 19 System Setup Once the VBox Pro controller is displayed in the devices pane, click the Stop button to stop the scan. If no devices are displayed, click the Scan Again button. 7. Double click on the VBox Pro controller entry. VBox Pro Manager utility software will collect data from the VBox Pro controller and the configuration window will appear.
- Page 20 System Setup 4.3.3 Enable Remote Access To enable remote access to the VBox Pro controller, you must configure the Port Forwarding option on the home router. 1. Login to the home router configuration menu. 2. Navigate to the Port Forwarding configuration screen. 3.
- Page 21 System Setup 4.3.4 Connect to the VBox Pro Remotely 1. Double click on the Vitrea VBox Pro Manager icon , Connect to VBox Pro window will appear. 2. Select the External radio button. 3. If you are configuring the VBox Pro controller for an existing customer, do as follows.
-
Page 22: List Of Vtouch Pro Switches
Warranty Two Years (Parts) Notices VITREA assumes no responsibility for any use not indicated in this manual. VITREA reserves the right to modify its products at any time and without notice. VBox Pro Smart Home Wireless Controller - Installation Guide...
Need help?
Do you have a question about the VT-MAN-INS-VBox-Pro and is the answer not in the manual?
Questions and answers