Table of Contents
Advertisement
This is HIGH-POWER item; please DO NOT USE THE SAME OUTLET WITH
OTHER HIGH-POWER HOUSEHOLD APPLIANCE like air-conditioning etc.
Please choose an outlet exclusively for the machine and make sure the fuse
is 10A.
Product may
Product
Product
Product
may vary
may
may
vary
vary
vary slightly
USER
USER' ' ' ' S S S S MANUAL
USER
USER
slightly
slightly
slightly from
from
from the
from
the item
the
the
MANUAL
MANUAL
MANUAL
item pictured
item
item
pictured
pictured due
pictured
due
due
due to
to
to model
to
model
model upgrades
model
upgrades
upgrades
upgrades
Advertisement
Table of Contents

Summary of Contents for Jada Fitness JS-21450
- Page 1 USER USER USER’ ’ ’ ’ S S S S MANUAL MANUAL MANUAL USER MANUAL This is HIGH-POWER item; please DO NOT USE THE SAME OUTLET WITH OTHER HIGH-POWER HOUSEHOLD APPLIANCE like air-conditioning etc. Please choose an outlet exclusively for the machine and make sure the fuse is 10A.
-
Page 2: Table Of Contents
Contents Contents Contents Contents 1. IMPORTANT IMPORTANT IMPORTANT IMPORTANT SAFETY SAFETY SAFETY SAFETY INSTRUCTIONS INSTRUCTIONS INSTRUCTIONS INSTRUCTIONS .................................................................................... 2 2 2 2 IMPORTANT IMPORTANT ELECTRICAL ELECTRICAL INFORMATION INFORMATION .................. 4 4 4 4 1.1 IMPORTANT IMPORTANT ELECTRICAL ELECTRICAL INFORMATION INFORMATION .................. -
Page 3: Important Important Important Safety Safety Safety Instructions Instructions Instructions
1. 1. 1. 1. IMPORTANT IMPORTANT SAFETY INSTRUCTIONS IMPORTANT IMPORTANT SAFETY SAFETY SAFETY INSTRUCTIONS INSTRUCTIONS INSTRUCTIONS WARNING: WARNING: WARNING: WARNING: To To reduce reduce reduce reduce the the risk risk risk risk of of serious serious serious serious injury, injury, injury, injury, read read... - Page 4 14. Read, understand, and test the emergency stop procedure before using the treadmill . 15. Never start the treadmill while you are standing on the walking belt. Always hold the handrails while using the treadmill. 16. The treadmill is capable of high speeds. Adjust the speed in small increments to avoid sudden jumps in speed.
-
Page 5: Information
ppliance by a person responsible for their safety. children should be supervised to ensure that they do not play with the appliance. 27. Install the treadmill on a flat level surface with a stuitable volt/Hz which marked in the machine label, grounded outlet. 28. -
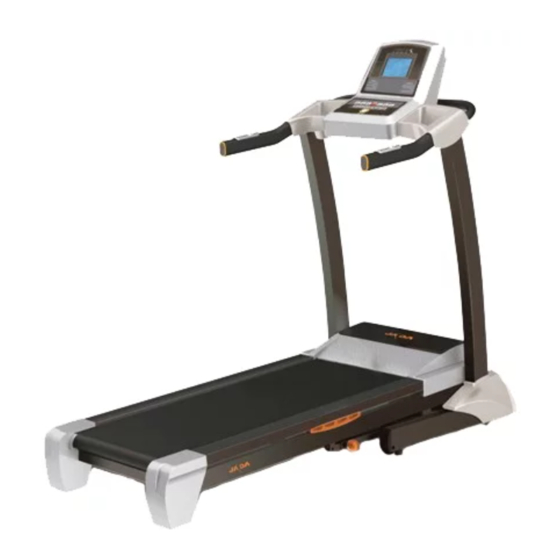
Page 6: Brief 2.Brief Description Description Description
� Do not use excessive pressure on console control keys. They are precision set to function properly with little finger pressure. 2 2 2 2 ..B B B B RIEF RIEF RIEF DESCRIPTION DESCRIPTION RIEF DESCRIPTION DESCRIPTION This motorized treadmill can help complete your goal of keeping fit. -
Page 7: Console Console Console Keys Keys
3.OPERATION INSTRUCTIONS 3.OPERATION 3.OPERATION 3.OPERATION INSTRUCTIONS INSTRUCTIONS INSTRUCTIONS 3. 3. 3.1 1 1 1 C C C C onsole onsole keys onsole onsole keys keys keys Quick speed keys Quick incline keys Start/stop Incline + Speed + Incline - Speed - Clear/set Mode (1)MODE... - Page 8 (5)SPEED – When running, press it to decrease speed by 0.5km/h. Hold on it, speed is deceased continuously. (6)QUICK SPEED Speed 3,6,9, when running, press it to choose speed. (7)INCLINE + When running, press it to increase incline by 1 level. Hold on it, incline is increased continuously.
-
Page 9: Getting Getting Getting Started Started
99minutes. Press START/STOP to start at speed of 1.0km/h. Speed can be adjusted by pressing SPEED+,-. The machine stops when time shows 00:00. 3. DISTANCE count-down traing: power on the machine, press CLEAR/SET two times, distance figure glittering, showing 1.0km. Press SPEED+,- to choose the distance between 1.0-9.0km. -
Page 10: Incline Incline Incline Feature Feature Feature
3. In a state of running, single press START/STOP , the walking belt will gradually slow down. 4. In the state of running, single press CLEAR/SET will reset time, distance, calorie. 3 3 3 3 .5 .5 .5 .5 Incline Incline Incline Incline Feature... -
Page 11: Program
displayed in the Speed window. Each program has various speed changes throughout. 3 3 3 3 .1 .1 .1 .10 0 0 0 To Select Select Select a a a a Program Program Program To Select Program � Power on the machine, press ‘ MODE’ to choose desired program, then press and release ‘... -
Page 12: General General General Care Care Care
brush will clean the top of the textured belt. This task should be done once a month. Allow to dry before using. � On a monthly basis, vacuum underneath your treadmill to prevent dust build up. Once a year, you should remove the black motor shield and vacuum out dirt that may accumulate. -
Page 13: How How How To To
If the treadmill belt/deck/roller is kept reasonably clean it is possible to expect over 1200 hours before additional re-lubing is necessary. 4 4 4 4 .4 .4 .4 check check running running proper proper lubrication lubrication .4 How How to to check check the the running... -
Page 14: Adjustment
4 4 4 4 .6 .6 .6 .6 Belt Belt Belt Belt Tracking Tracking Tracking Tracking Adjustment Adjustment Adjustment Adjustment This treadmill is designed to keep the belt reasonably centred while in use. It is normal for some belts to drift near one side while the belt is running with no one on it. -
Page 15: Exercise Exercise Exercise Guide Guide Guide
E1: No No feedback feedback feedback feedback from from from from controller controller controller controller or or speed speed speed speed sensor sensor sensor sensor 1. Check the condition of cables and ensure that all plugs are connected between the motor controller and display. 2. - Page 16 Exercising is great way to control your weight, improving your fitness and reduce the effect of aging and stress. The key to success is to make exercise a regular and enjoyable part of your everyday life. The condition of your heart and lungs and how efficient they are in delivering oxygen via your blood to your muscles is an important factor to your fitness.
- Page 17 EXPLODED EXPLODED DIAGRAM DIAGRAM 7. EXPLODED EXPLODED DIAGRAM DIAGRAM Item Item Item Item No. Factory Factory Factory Factory code code code code Description Description Description Description Specification Specification Specification Specification 040300030 console upper cover 438*360*214mm 040300031 console lower cover 354*260*33mm 042300005 console left cover 230*210*115mm...
- Page 18 049900057 safety key plate 049900009 pulse fixed plastic 049900011 plastic plate PPΦ20*Φ10.5*2.0mm 080000016 running deck 1220*614*T18mm 026000016 front roller Φ48*Φ15*565.5mm 026100002 rear roller Φ46*Φ17*555mm 050000003 running belt PVC 2825*450*T1.8mm 026200011 gas spring Φ22 250N, 800MM 037500001 magnetic circle Φ31*Φ19*13mm 051000015 v-belt 230J 7*8 038000001...
- Page 19 020100003 cup head hex screw M8*40(half tooth) 020100005 cup head hex screw M8*50 020200004 hex screw M8*85(full tooth) 020200003 hex screw M8*55(full tooth) 020300001 screw M8*12(full tooth) 020300002 screw M8*16(full tooth) left upright steel right upright steel 020800001 corss pan tapping screw ST4.2*13 020400011 cross screw...
- Page 20 incline bracket steel belt guide steel filter plate steel 000010020 foot pad 800*70 80﹟ 031400001 music board 031000066 console control board with incline, no back light 031000064 console control board with incline, back light 031000065 console control board with incline, LED display N100 031300033 button board...
- Page 21 music cable console cable AC power cable(red) bottom cable AC power cable(black) music cable AC power cable(red) speaker cable easy key cable AC power cable(black) MP3 cable easy key cable ground cable(yellow-green) speed sensor...
- Page 22 INSTALLATION INSTALLATION GUIDE GUIDE 8.INSTALLATION INSTALLATION GUIDE GUIDE CABLE right upright left upright Cup head hex screw machine body M8*16*8PCS flat washer D8*8pcs...
- Page 23 cup head hex screw M8*16*4pcs flat washer D8*4pcs upright right cover upright left cover cross pan screw ST4.2*13*4PCS console cup head hex screw M8*16*4PCS flat washer D8*4PCS...
- Page 24 We have checked the words carefully in the manual. If there is something wrong in printing, please kindly consider it. If the pictures are different from the product, please take the product as the final and correct one. Please note: : : : If there are changes in function and specification due to technical improvement, we will not keep you informed.
Need help?
Do you have a question about the JS-21450 and is the answer not in the manual?
Questions and answers