Table of Contents
Advertisement
Advertisement
Table of Contents

Related Manuals for ActionTec R3000


Summary of Contents for ActionTec R3000
-
Page 1: Wireless Router
Wireless Router Model # R3000 User Guide... -
Page 2: Table Of Contents
Table of Contents Introduction Minimum System Requirements Features Getting to Know the R3000 Performing a Quick Setup Accessing Quick Setup Screens Changing the Password Configuring Wireless Settings Accessing Wireless Settings Basic Settings Advanced Settings Wireless MAC Authentication Wireless Schedule Wireless Auto Configuration... - Page 3 Table of Contents Applications DMZ Hosting Firewall UPnP Viewing the R3000’s Status Accessing Wireless Settings Connection Status WAN Status WAN Ethernet Status Routing Table Firewall Status NAT Table Wireless Status Modem Utilization LAN Status Specifications General Wireless Operating Range LED Indicators...
-
Page 4: Introduction
Ethernet switch, and WAN port, as well as its dual-core processor and support for HPNA, the R3000 will propel you to new speeds as you traverse the Internet. We are sure the R3000 will provide you with years of hassle-free performance. - Page 5 R3000 Wireless Router • One 10/100/1000 Base-T Ethernet ports (WAN) • DHCP server option • MAC address cloning • QoS support, including diffserv and random early detection • PPPoE support • External Radius support • Web-based configuration support • FTP firmware upgradeable •...
-
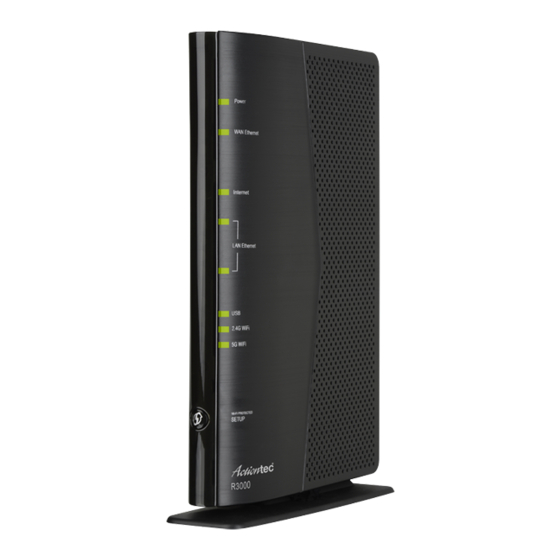
Page 6: Getting To Know The R3000
Front Panel The front panel of the R3000 features 11 LEDs: Power, WAN Ethernet, Internet, Ethernet (4), USB, 2.4G WiFi, 5G WiFi and WPS Push Button. - Page 7 R3000 is receiving power and fully operational. When the Power LED is rapidly flashing, the R3000 is initializing. If the Power LED is glows red when the Power cord is plugged in, the R3000 has suffered a critical error and technical support should be contacted.
- Page 8 The WPS button activates WPS (WiFi Protected Setup) on the R3000. To use WPS, press the WPS button on the R3000, then, within two minutes, press the WPS button on a device you wish to connect to the R3000’s wireless network.
- Page 9 The WAN Ethernet port is used to connect the R3000 to a WAN via an Ethernet cable. USB Port The USB port is used to connect the R3000 to a USB device. This port is not yet active; it may be activated in a future firmware update. Reset Switch Depressing the Reset switch for one second will restore the R3000’s factory...
-
Page 10: Performing A Quick Setup
Performing a Quick Setup This chapter is a guide through a quick set up of the R3000, including how to con- nect the R3000 to the To complete the quick setup, have the Welcome Letter or Worksheet handy. If the document is not available, contact the immediately. - Page 11 R3000 Wireless Router 2. Another screen appears. Click Manual Setup for Internet Access. 3. Follow the instructions in the “Quick Setup” screen, then click Next.
- Page 12 If “DHCP” was selected, go to step 5. 6. Click Apply at the bottom of the screen. 7. The Power light flashes rapidly while the R3000 restarts, then glows steadily green when fully operational. The Internet light will also glow steadily green.
- Page 13 R3000 Wireless Router 4. Click Apply at the bottom of the screen. Once the R3000 has rebooted, the new user name and password are active. To access the R3000’s Web Configuration screens, the new user name and password must be entered.
-
Page 14: Changing The Password
Performing a Quick Setup Changing the Password To create or change the password allowing access to the R3000’s Web Configuration screens, follow these instructions: 1. From the “Home” screen, select Advanced Setup. 2. The “Advanced Setup” screen appears. Select “Admin Password” from the menu on the left side of the screen (underneath “Security”). -
Page 15: Configuring Wireless Settings
Configuring Wireless Settings This chapter explains the options provided in the Wireless section of the R3000’s firmware, including setting up wireless security and WPS. Accessing Wireless Settings To access the Wireless screens: 1. Open a Web browser. In the Address text box, type: http://192.168.2.1... - Page 16 Wireless Settings 2. The Home screen appears, with a row of large icons across the top of the screen. Click Wireless Setup. 3. The Wireless Setup screen appears, with list of options on the left side of the screen. The rest of this chapter explains the options found in the menu on the left side of every wireless settings screen.
-
Page 17: Basic Settings
This screen displays step-by-step instructions to set up a secure wireless network with the Modem Router. To configure the basic wireless settings of the R3000: 1. Select a frequency at which the wireless signal will be broadcast (5G or 2.4G). -
Page 18: Advanced Settings
Wireless Settings 5. Select a WPA type (WPA2-Personal, WPA- or WPA2-Personal, or WPA- Personal). 6. To use the default security key, click in the button next to Use Default Key/ Passphrase. Make sure to write the passkey down (displayed in green text), as it will be needed to access the wireless network. - Page 19 R3000 Wireless Router Compatibility Mode Select the wireless networking standard with which the network will work. Selections include 802.11a, n, and ac. Channel Width Select the channel width. Options include 20, 40, and 80MHz. MDSU Aggregation Enable/disable MDSU aggragation by clicking in the appropriate button.
-
Page 20: Wps
R3000 and other wireless devices. To begin, select the frequency of the network, enable WPS by clicking in the appropriate button, then click Apply. There are three ways to set up WPS on the R3000: AP PIN, Push Button (PBC), and End Device PIN. AP Pin 1. - Page 21 End Device PIN 1. Click in the button next to End Device PIN. 2. Enter the end device’s PIN in the appropriate text box. 3. Click Connect. The R3000 joins the existing wireless network.
-
Page 22: Wireless Mac Authentication
Click MAC Address Control from any Wireless screen to generate the Wireless MAC Authentication screen. From here, the user can allow or deny access to the R3000’s wireless network for wireless devices using the devices’ MAC address. A MAC address is a unique code that identifies every wireless-capable device (print- ers, computers, tablets, smartphones, etc.). -
Page 23: Wireless Schedule
7. Repeat steps 4, 5, and 6 to add more wireless devices. Wireless Schedule Click Wireless Schedule in any Wireless screen to generate the Wireless Schedule screen. Wireless Schedule provides a way to control when a wireless network cre- ated on the R3000 is operational. -
Page 24: Wireless Auto Configuration
Wireless Settings To set up a wireless network schedule: 1. Select the wireless network frequency by clicking in the appropriate button. 2. Select the SSID (wireless network) to be scheduled from the SSID drop-down menu. 3. Click in the Wireless Schedule - Enable button. 4. -
Page 25: Configuring Firewall Settings
Configuring Firewall Settings This chapter will explain the options provided in the Firewall section of the R3000’s firmware, including various firewall options, port forwarding, and DMZ hosting. Accessing Firewall Settings To access the Firewall screens: 1. Open a Web browser. In the “Address” text box, type: http://192.168.1.254... - Page 26 Configuring Firewall Settings 2. The Router’s Home screen appears. Enter your user name and password, then click the “Firewall” icon from the row of icons at the top of the screen. 3. The “Firewall” screen appears, with various firewall options listed in the menu on the left side of the screen.
-
Page 27: Firewall
R3000 Wireless Router Firewall Click Firewall from any Firewall screen to generate the “Firewall” screen. This screen allows you to configure the firewall settings of the Router. If you make changes in this screen, click Apply at the bottom of the screen to save them. -
Page 28: Port Forwarding
Configuring Firewall Settings Firewall Security Level Select the level of firewall security level here, by clicking in the appropriate radio button. “None” provides no firewall security, while “Low, ” “Medium, ” and “High” provide different levels of security, as displayed in the Firewall table in the lower part of the screen. -
Page 29: Applications
R3000 Wireless Router To set up port forwarding 1. Enter the LAN starting port in the “Starting Port” text box. 2. Enter the LAN ending port in the “Ending Port” text box. 3. Select a protocol from the “Protocol” drop-down list box 4. -
Page 30: Dmz Hosting
Configuring Firewall Settings To set up a forwarded application: 1. Select a networked device by selecting it from “Select Device” drop-down list, or enter its IP address in the “Enter IP Address” text box. 2. Select the application’s category from the “Application Category” drop- down list, or select “All”... -
Page 31: Upnp
R3000 Wireless Router Caution! A DMZ host is not protected by the firewall and may be vulnerable to attack. Designating a DMZ host may also put other computers in the local network at risk. When designating a DMZ host, consider the security implications and protect it if necessary. -
Page 32: Configuringadvanced Setup
Configuring Advanced Setup This chapter will explain the options provided in the Advanced Setup section of the R3000’s firmware, including services blocking, firewall options, and setting up QoS (Quality of Service). Accessing Advanced Setup Options To access the Advanced Setup screens: 1. - Page 33 R3000 Wireless Router 2. The R3000’s host screen appears. Click Manual Setup. 3. The “Quick Setup” screen appears, with a row of large icons across the top of the screen. Click Advanced Setup.
- Page 34 Advanced Setup 4. An “Advanced Setup” screen appears, with list of options on the left side of the screen. The rest of this chapter explains the options found in the menu on the left side of every advanced setup settings screen.
-
Page 35: Services Blocking
R3000 Wireless Router Services Blocking Services blocking is used to prevent a device on the R3000’ s network from accessing particular services available on the Internet, such as receiving email or downloading files from FTP sites. To set up services blocking on a networked device: 1. -
Page 36: Website Blocking
3. Click Apply to save your changes. 4. Repeat steps 1-3 to block other web sites from being acesssed on the R3000’s network. The web sites blocked from being accessed on the R3000’s network are listed at the bottom of the screen. -
Page 37: Scheduling Access
R3000 Wireless Router Scheduling Access Scheduling access is used to allow a device on the R3000’s network to access the Internet at certain times of the day, or certain days of the week, only. During times not configured in the Scheduling Access screen, the device will not be able to access the Internet. - Page 38 5. Click Add to create a schedule access. 6. Repeat steps 1-5 to create multiple access schedules for other devices on the R3000’s network. The devices that are configured with an access schedule are listed at the bottom of the screen.
-
Page 39: Lan Ip And Dhcp Settings
R3000 Wireless Router LAN IP and DHCP Settings The LAN IP and DHCP Settings screen allows you to change the R3000’s default LAN IP address, and adjust the DHCP settings. To change the LAN IP: 1. Click LAN IP and DHCP Settings from the menu on the left side of any... - Page 40 2. Enter the new modem IP address and modem subnet mask in the appropriate text boxes. 3. Click Apply and Reboot. The R3000 reboots with the new settings. To change the R3000’s DHCP settings: 4. Click Enable to activate the R3000’s DHCP server.
-
Page 41: Wan Vlan
R3000 Wireless Router WAN VLAN The WAN VLAN screen allows the service operator to create additional network paths to accomodate new services. To use: 1. Click Services/VLAN Settings from the menu on the left side of any Advanced Setup screen. The WAN VLANs screen appears. - Page 42 Advanced Setup Enable under step; 4, then entering a VLAN ID (1 to 4094) and selecting a Priority (0-7). 5. Click Add to add the VLAN to the VLAN list, which appears at the bottom of the screen. You can also delete existing VLANs by clicking Delete, or modify a VLAN’s set- tings by clicking Modify.
-
Page 43: Qos Settings
QoS Settings The QoS Settings screens allow you to prioritize certain types of data traffic (video, for example) over other data traffic on the R3000’s network. Both incoming data traffic (QoS Upstream) and outgoing data traffic (QoS Downstream) can be configured. - Page 44 Advanced Setup QoS option should be sufficient. 3. Click Apply to save your changes. The new QoS setting will appear at the bot- tom of the screen, under QoS Rule List. QoS Downstream 1. Click QoS Downstream from the menu on the left side of any Advanced Setup screen.
-
Page 45: Remote Gui
QoS Rule List. Remote GUI The Remote GUI screen allows you to setup the R3000 so that it can be accessed from a remote location. To use: 1. Click Remote GUI from the menu on the left side of any Advanced Setup screen. -
Page 46: Remote Telnet
6. Click Apply to save your changes. Remote Telnet The Remote Telnet screen allows you to set up the R3000 so that it can be accessed from a remote (not local) telnet device. To use: 1. Click Remote Telnet from the menu on the left side of any Advanced Setup screen. -
Page 47: Dynamic Routing
The Dynamic Routing screen allows you to set up the R3000 for dynamic routing, which is useful if the R3000 is set up in a network behind a modem To use: 1. Click Dynamic Routing from the menu on the left side of any Advanced Setup screen. -
Page 48: Static Routing
Advanced Setup Static Routing The Static Routing screen allows you to set up static routes on the R3000. To use: 1. Click Static Routing from the menu on the left side of any Advanced Setup screen. The Static Routing screen appears. -
Page 49: Admin Password
R3000 Wireless Router Admin Password To change the password that allows access to the R3000’s firmware screens: 1. Click Admin Password from the menu on the left side of any Advanced Setup screen. The Admin Password screen appears. 2. If needed, enter a new username in the text box next to Admin username. -
Page 50: Port Forwarding
Port Forwarding Port forwarding is used for Internet applications that need access to devices con- nected to the R3000’s network: 1. Click Port Forwarding from the menu on the left side of any Advanced Setup screen. The Port Forwarding screen appears. -
Page 51: Applications
Applied Port Forwarding Rules. Applications The R3000 comes preloaded with a list of popular applications that require port forwarding. Instead of entering all the port forwarding values in the port forward- ing screen, you can simply select the application in this screen to configure all of its ports. - Page 52 Advanced Setup 2. Select the device on the R3000’s network that you want the application to work with. Alternatively, you can enter the device’s IP address in the appropriate text box. 3. Select the application from the Applications drop-down list. To make searching...
-
Page 53: Dmz Hosting
2. Click in the Enable radio button to activate DMZ hosting. 3. Select the device on the R3000’s network that you want use as the DMZ host. Alternatively, you can enter the device’s IP address in the appropriate text box. -
Page 54: Firewall
To use: 1. Click Firewall in any Advanced Setup screen. The Firewall screen appears. 2. Select one or all device(s) on the R3000’s network from the Apply rule to drop- down list on which you want to apply the firewall. -
Page 55: Nat
Selecting UPnP (Universal Plug and Play) from any Advanced Setup screen generates the UPNP screen, which is used to set up gaming consoles on the R3000’ s network. To activate UPnP, click in the Enable radio button, then click Apply. - Page 56 Advanced Setup...
- Page 57 R3000 Wireless Router...
- Page 58 Advanced Setup...
-
Page 59: Viewing The R3000'S Status
Viewing the R3000’s Status This chapter gives an overview of the various status tables provided by the R3000, which allow you check on various parameters, including WAN connections, WAN Etherent connection, and wireless status. Accessing Wireless Settings To access the Wireless screens: 1. - Page 60 Status 2. The R3000’s host screen appears. Click Manual Setup. 3. The Quick Setup screen appears, with a row of large icons across the top of the screen. Click Status.
-
Page 61: Connection Status
Click Connection Status from any Status screen to generate the Modem Status screen. This table displays various parameters regarding the Internet connection of the R3000, including broadband and ISP connection status, upstream rate, least time remaining, and DNS addresses. The only user-configurable option in the screen are the Connect and Disconnect buttons, which, when clicked, connects and/or disconnects R3000 from your service provider. -
Page 62: Wan Status
WAN Status Click WAN Status from any Status screen to generate the WAN Status screen. This table displays various parameters relating to the WAN connection of the R3000, including PPP and broadband status. There are no user-configurable options in this screen, but there is a Clear button at the bottom of the screen (not shown) that resets all of the statistics back to zero, at which time the statistics will begin accu- mulating again. -
Page 63: Wan Ethernet Status
Click WAN Ethernet Status from any Status screen to generate the WAN Ethernet Status screen. This table displays various parameters relating to the WAN Ethernet connection of the R3000, including subnet mask, default R3000, and sent packets. There are no user-configurable options in this screen. -
Page 64: Routing Table
Firewall Status Click Firewall Status from any Status screen to generate the Firewall Status screen. This table displays the status of the R3000’s firewall. There are no user-configurable options in this screen. For more details, see the “Configuring the Firewall Settings”... -
Page 65: Nat Table
R3000 Wireless Router NAT Table Click NAT Table from any Status screen to generate the “NAT Table” screen. This screen displays the R3000’s NAT table. There are no user-configurable options in this screen. Wireless Status Click Wireless Status from any Status screen to generate the “Wireless Status” screen. -
Page 66: Modem Utilization
Modem Utilization Click Modem Utilizations from any Status screen to generate the Modem Utilization screen. This table displays the R3000’s modem statistics, including wireless memory used, LAN TCP settings, and, at the bottom of the screen, a LAN device session log. -
Page 67: Lan Status
LAN Status Click LAN Status from any Status screen to generate the LAN Status screen. This table displays the R3000’s LAN (local network) statistics, including Ethernet connec- tions, and various networked device details. There are no user-configurable options in this screen. -
Page 68: Specifications
Specifications General Model Number R3000 Standards IEEE 802.3 (10BaseT) IEEE 802.3u (100BaseTX) IEEE 802.3ab (1000BaseTX) IEEE 802.11b/g/n (Wireless) RFC 1483, 2364, 2516 Protocol LAN - CSMA WAN - , Static DHCP 10/100/1000 RJ-45 switched ports Speed LAN Ethernet: 10/100/1000 Mbps auto-sensing Wireless: 802.11n/ac 300 Mbps optimal (see “Wireless Operating Range”... -
Page 69: Wireless Operating Range
Specifications Wireless Operating Range Indoors Up to 91M (300 ft.) @ 300 Mbps Outdoors Up to 457M (1500 ft.) @ 300 Mbps Topology Star (Ethernet) LED Indicators Power, WAN Ethernet, Internet, LAN Ethernet (4), HPNA, USB, Wireless Environmental Power 12V DC, 3A Certifications FCC Class B, FCC Class C (part 15), UL Operating Temperature... -
Page 70: Notices
Modifications The FCC requires the user to be notified that any changes or modifications made to this device that are not expressly approved by Actiontec Electronics, Inc., may void the user’s authority to operate the equipment. Declaration of conformity for products marked with the FCC logo – United States only. -
Page 71: Gpl (General Public License)
25 cm from all persons and must not be co-located or operating in conjunction with any other antenna or transmitter. For questions regarding your product or the FCC declaration, contact: Actiontec Electronics, Inc. 760 North Mary Ave. Sunnyvale, CA 94086 United States...
Need help?
Do you have a question about the R3000 and is the answer not in the manual?
Questions and answers