
Related Manuals for REI VR-3000

Summary of Contents for REI VR-3000
- Page 1 AM/FM/DVD/CD/MP3 Receiver with USB/SD & Auxiliary Inputs 3 Built-in Microphone inputs for PA Announcements Installation/Operation Manual 50W x 4 VR-3000...
- Page 2 Thank you for purchasing the VR-3000 AM/FM/DVD/CD/MP3/USB/SD Receiver from REI. This product is designed and tested to withstand temperature and vibration extremes. Please read the owner’s manual carefully before attempting to install. If you have an installation question or need installation assistance, please call the: SERVICE HOT LINE 1-877-726-4617 Toll Free USA &...
-
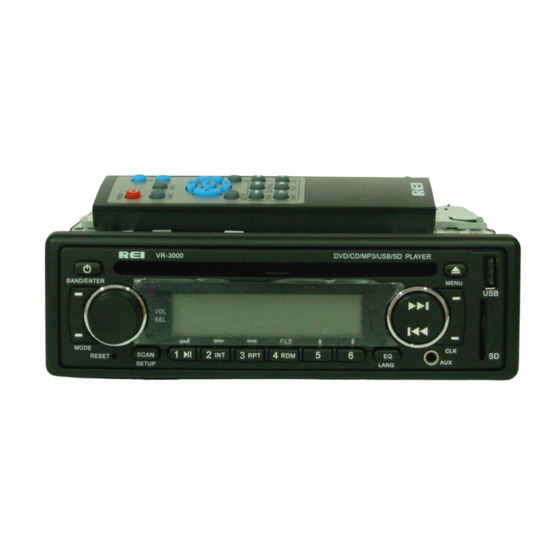
Page 3: Controls And Indicators
CONTROLS AND INDICATORS Power Button Volume/Select Knob Band/Enter Button Mode Button Reset Button Scan/Setup Button Preset Memory/ Menu Scroll Buttons EQ/Language Button Radio Station Tune/Seek, Track Control Buttons (10) Front Auxiliary Input Jack (11) SD Card Input slot (12) Display Button (13) Menu Button (14) USB Input Slot (15) Eject Button... -
Page 4: Operation
OPERATION 1) Power Button Press the Power Button to turn ON or OFF the unit. A red light means the unit is in standby, a Blue light means the radio is on. 2) Volume/Select Knob Rotate the knob left or right to change the volume level. Press the knob to select one of the following functions: VOL---BASS---TREB---BAL---FAD Rotate the knob to adjust the desired setting. - Page 5 When connected to GROUND, the Brown AUX 2 trigger wire on the rear of the radio will automatically power the VR-3000 and switch the source to AUX 2. When the ground is removed, the Radio will return to its previous state.
- Page 6 11) SD Card Input Insert the SD card and the radio will automatically switch to the CARD input and begin playback. 12) DIS Button Press this button to change between Time and Mode Information display. Setting the Time: Press this button momentarily to display the time. Next, press and hold this button until the hour display begins to flash.
- Page 7 “UNLOCKED” and restore the radio to normal operation. PA OPERATION The VR-3000 has three PA Microphone inputs, 2 Dynamic & 1 Carbon microphone input. All microphones have priority over all other audio modes and MUTE the source audio being played when keyed. When the PA is triggered, the front display will show MIC 1, MIC 2 or MIC, until the trigger is un-keyed.
-
Page 8: Remote Control
REMOTE CONTROL *Requires 2AA Batteries (included) Power Button Language Button Menu Button Volume Up/Down Buttons Enter/Play/Pause Button Scroll Buttons Setup Button Mode Button Playback Buttons (10) Zoom Button NOTE: For easy viewing at night, the backlighting will always be on when ACC +12V switched power is applied. -
Page 9: Setup Operation
SETUP OPERATION Setup operation requires the user be in either DVD/CD/USB or SD CARD mode to operate. When in on of these source modes, press SETUP to activate the on-screen display. Press SETUP again to go BACK and/or EXIT at any time. Changes made in the SETUP menu will not return to default by pressing the RESET button on the front of the radio. -
Page 10: Music Video
RADIO: The RADIO option allows the user choices between either EURO MODE or USA MODE. These modes will change the frequency steps of the FM/AM tuner in the radio. Press the BAND/ENTER button to confirm selection. MUSIC VIDEO: The MUSIC VIDEO option gives the user the option to output a composite video image during digital music playback. -
Page 11: Disc Options
DEFAULT: The DEFAULT option allows the user the option to return all SETUP settings to their default conditions including language options. Press the BAND/ENTER button to confirm selection. DISC OPTIONS OSD LANG: The OSD LANG option allows the user to change the default On-Screen Display (OSD) language displayed on the SETUP menu from ENGLISH to PORTUGUESE. -
Page 12: Audio Lang
AUDIO LANG: The AUDIO LANG option allows the user to change the default audio soundtrack on a DVD disc. The disc must support the language type. Due to different DVD encodings, this feature may not work on all Disc’s, and the user may be required to access this feature from the DVD’s main menu. -
Page 13: Video Options
AUTOPLAY: The AUTOPLAY option enables AUTO PLAY of most the DVD discs. When set to ON the disc will immediately begin playback when inserted, allowing the user to skip the MENU and previews section. When set to OFF the user must navigate to the disc MENU to playback the disc. - Page 14 BRIGHTNESS 0-100 CONTRAST 0-100 HUE 0-100 SATURATION 0-100 SHARPNESS 0-100...
- Page 15 TV RATIO: To select the appropriate aspect ratio of the connected monitors, select TV RATIO and press the BAND/ENTER button. Once selected, the user can scroll to choose either; 4:3 PAN & SCAN, 4:3 LETTERBOX, or 16:9 WIDE-SCREEN. Press the BAND/ENTER button to select the option.
-
Page 16: Radio Connections
RADIO CONNECTIONS Follow this easy wiring diagram when installing. Be sure to disconnect the batteries negative terminal before beginning. - Page 17 AUDIO FILE REQUIREMENTS (.MP3/.WMA using ISO9660 formatting) • The MP3 files with a sampling rate of 32, 44.1, or 48 kHz. And a bitrates between 32 to 320 kbps. (44.1khz/128kbps or higher is recommended) • The WMA file with a sampling rate of 32, 44.1, or 48 kHz. And a bitrates between 62 to 192 kbps.
-
Page 18: Radio Installation
RADIO INSTALLATION Verify lock Clips on the DIN collar are pressed inward. Place the collar into the dash opening. Bend the tabs outward as shown on the drawing below to secure into place in the Dash Opening. Route all cable through the DIN collar and make all the necessary rear connections with the radio. -
Page 19: Troubleshooting
TROUBLESHOOTING Problem Cause Measure Power light does not turn on No power to yellow wire; no power to red Check for ACC/BATTERY voltage with wire; blown fuse Multi-meter, check fuse; press RESET button. Speakers have no sound Speakers not connected; speakers Connect speakers to harness;... -
Page 20: Usb Interface
FM STEREO RADIO Frequency range USA 87.5MHZ – 107.9MHZ (0.2 MHz step) EURO 87.50MHZ –108.00MHz (0.05 MHz step) 10.2 dBf. (0.9 uV, 75Ω) Usable Sensitivity 15.2 dBf. (1.6 uV, 75Ω) 50db Quieting Sensitivity Frequency Response 30Hz – 15kHz (+/- 3dB) Alternate Channel Selectivity 75dB Stereo Separation... - Page 21 Dynamic Range 80dB (1kHz) Harmonic Distortion 0.01% Decoding Format same as DVD AUDIO PRE-AMP SPECIFICATIONS Max Output level Output Impedance 600Ω Subwoofer output Not adjustable AUXILIARY INPUT SPECIFICATIONS Frequency Response (+/- 1db) 20HZ – 20Khz Input Voltage Maximum Voltage 1200mV Input impedance 100KΩ...
- Page 22 Radio Engineering Industries, Inc. 6534 “L” Street Omaha, Nebraska 68117 Phone: 402-339-2200 Toll-Free 1-800-228-9275 www.radioeng.com Rev B.4 8-14-15...
Need help?
Do you have a question about the VR-3000 and is the answer not in the manual?
Questions and answers