Table of Contents
Advertisement
The D 500X is an ultrasound recording unit intended for long-term, unattended recording of
bat calls. The recorder is equipped with four slots for CF cards. The triggering system allows
the device to start recording as a sound is detected. The recording length can be selected in
steps from 0.3 up to 20 seconds. In order not to fill the card too fast at locations with high
activity, a minimum time between two recordings can be applied. The recorder is normally
operated in a low-power mode with no pre-trigger (i.e. the recording starts as the sound
exceeds the chosen threshold level), but both pre-and post-trigger functions are available in
the standard (not low-power) mode.
Some of the features of the D500X are:
• Built-in electret microphone
• Jack for external microphone
• Powered either from 4 AA cells (internal) or external batteries/power supply
• Timer to turn the unit on/off at desired intervals
• Weather-protected housing (built-in microphone requires some protection)
• Size: 165 x 170 x 53 mm, rugged aluminium housing
• Sampling rates: 44.1 kHz, 300 kHz and 500 kHz (optimized for 500 kHz)
• ADC resolution: 16 bits
• Selectable high-pass filter to attenuate low frequency signals
• Optional external trigger input jack
• Time/date stamped sound files
D500X USER'S MANUAL
Firmware version 2.2.6
Advertisement
Table of Contents

Summary of Contents for Pettersson D500X
-
Page 1: Firmware Version
(i.e. the recording starts as the sound exceeds the chosen threshold level), but both pre-and post-trigger functions are available in the standard (not low-power) mode. Some of the features of the D500X are: • Built-in electret microphone • Jack for external microphone •... - Page 2 (1) the customer acknowledges that such use or sale is at the customer's sole risk; (2) the customer agrees that Pettersson is not liable, in whole or in part, for any claim or damage arising from such use;...
-
Page 3: What's New In Version
Time settings and the times for sunset and sunrise are automatically calculated. * CF cards in all four slots can be formatted in the D500X, not just in slot 1. * Various bug fixes and cosmetic changes. -
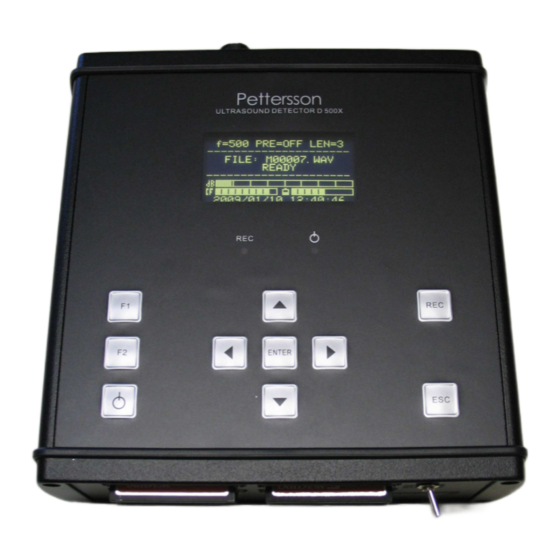
Page 4: Top Panel Overview
Top panel overview Pettersson ULTRASOUND DETECTOR D 500X The REC indicator in The POWER LED is on on while the detector is when the detector is recording. It flashes switched on. It flashes momentarily once momentarily once every 5 every 5 seconds in the seconds in the sleep mode. - Page 5 CF card panel overview The protection cover must be removed to access the power switch and CF card slots. POWER CF card slot #1 CF card slot #3 CF card slot #2 CF card slot #4 EXT OFF INT Power switch to select external or internal batteries.
-
Page 6: Settings Menu Overview
Settings menu overview PROFILE2 D500X SETTINGS ---------------------------------- --------------------------------------- CF1: M00337 (6.367G) 1-USER PROFILES READY 2-RECORDING SETTINGS ---------------------------------- 3-TIMERS dB … 4-TIME SETTINGS CF … 5-DISPLAY 2013/05/31 18:05:20 6-UTILITIES PROFILE = USER0 SAMP. FREQ = 500 Use ↑↓ to switch between Use ←... -
Page 7: Input Gain
PROFILE2 Use ← → to change INPUT Press the 1/0 key and then ---------------------------------- ENTER to enter standby. GAIN. CF1: M00337 (6.367G) READY ---------------------------------- dB … CF … 2013/05/31 18:05:20 REC* ENTER RECORDING SETTINGS -------------------------------- INPUT GAIN= 45 Current profile. Use ← → to TRIG LEV = 36 switch between 10 user INTERVAL = 5... - Page 8 Remove the batteries from the D500X if you do not plan to use it for more than two weeks.
- Page 9 CF card. To safely switch the power off, first put the D500X to sleep with the 1/0 key and then set the INT/EXT switch to OFF (or remove the external power supply). Failure to follow these steps may cause loss of recorded files and/or corruption of the CF card.
- Page 10 Usually, the D500X is used in the automatic recording mode and to test this mode, select e.g. “Profile 2”. At least one timer has to be enabled in order for this mode to work so if this has not already been done press F1 and “3 –...
-
Page 11: Changing The Settings
Switching between different profiles is an easy and fast way to change the settings. The D500X has ten fixed profiles and ten “user profiles”. To select which one of the 20 profiles to use, press ENTER while the display shows the “READY” screen and use the left/right arrow keys to select the desired profile. -
Page 12: Recording Settings
The high-pass (HP) filter attenuates low-frequency signals and should usually be used (ON). It starts cutting off at around 20 kHz. To record signals with a frequency below ca. 15 kHz, set the filter to OFF. The trigger sensitivity (T SENS in the User Profiles menu) - not to be confused with the trigger level –... -
Page 13: Time Settings
TIMERS The D500X has a timer function that can be used to turn the detector off for parts of the day, e.g. during daytime. This will make the batteries last longer. Two timer types are available, "Absolute" and "Relative". The absolute timer simply turns the detector on and off at the points of time that you enter in the timer setup screen, whereas the relative timer uses settings relative to sunset and sunrise to turn the unit on and off. - Page 14 The "ZONE" is the time zone. The "SEL" parameter of the DST (daylight saving time) can be set to OFF, EUR, USA or usr (user). To enter user values, press the down arrow key when usr is highlighted and then use the up/down arrow keys to move to the desired digits.
-
Page 15: Service Modes
There are separate warning levels for internal and external batteries. If the battery voltage continues to decrease and falls below the "shut down" level, the D500X will interrupt any recording in progress and put itself into sleep mode. It then regularly monitors the battery voltage to determine if it has increased enough to resume normal operation (useful in e.g. -
Page 16: Formatting A Cf Card
CF card for the D500X. D500X firmware version 1 used a different method to store the files on the CF cards, requiring the CF cards to first be “prepared” using the D500X Utility program. The preparation stage has been eliminated in firmware version 2, so this version only requires that the CF cards used have been FAT32 formatted as described above. - Page 17 Using more than one CF card The D500X can use up to four CF cards. The first card must be located in slot #1 and the next in slot #2 etc. The CF card indicator on the display shows the remaining total space on all of the cards.
- Page 18 Using the D500X for automatic recording To set up the D500X for automatic recording, start with the display in the standard mode, showing “READY” and then follow the steps below. Steps 1-4 can be skipped if the settings do not need to be changed.
- Page 19 ESC key and then wake the detector up to show the READY screen. To safely switch the power off, first put the D500X to sleep with the 1/0 key and then set the INT/EXT switch to OFF (or remove the external power supply). Failure to follow these steps may cause loss of recorded files and/or corruption of the CF card.
-
Page 20: File Management
Using the D500X for manual recording To set up the D500X for manual recording, select a profile with “AUTOREC = NO” (A = N). To start recording, press the REC key. If a profile without pre-trig (“PRE=OFF”) is used, a recording of the chosen length (e.g. - Page 21 For units that come with firmware version 2.1.1 (or higher) installed, the identification number is the serial number of the detector by default. The metadata (or parts of it) can be retrieved by the D500X Utility program and the BatSound program.
- Page 22 • Transfer D500X firmware upgrade files to a CF card The first step in using the D500X Utility is to select the drive that has the CF card. This is done in the “Select CF card” section in the D500X Utility main window. Please make sure you select the correct drive or the following operations (including formatting) will be performed on a disk in a drive you did not intend.
- Page 23 D500X Utility program (copying the upgrade file to the CF card through Windows will not work). Then put the card in slot #1 of the D500X and turn the power on with the EXT/INT Power switch. The detector will automatically recognize the card as a “firmware upgrade”...
- Page 24 Ctrl-C to copy the highlighted section to the Windows clipboard. The Copy & Rename function is used to copy one or more D500X files from the CF card to the computer’s hard disk. Optionally the files can also be renamed. The Rename function can also be used to add the time and date to the original file name.
- Page 25 The actual current consumption depends on several factors, such as CF card type, number of CF cards, display intensity, etc. The above figures are for the D500X in the recording mode. When it is not recording, the current consumption is lower.
-
Page 26: Weather Protection
The recommended operating temperature range is 0 - 50 degrees C. System requirements In order to use the D500X Utility program as well as to access the recorded files, a PC with Windows XP-SP3/Vista/7 and a CF card reader are required.
Need help?
Do you have a question about the D500X and is the answer not in the manual?
Questions and answers