
Related Manuals for Blizzard snowblind

Summary of Contents for Blizzard snowblind
- Page 1 Blizzard Lighting, LLC www.blizzardlighting.com Waukesha, WI USA Copyright (c) 2012...
-
Page 2: Table Of Contents
The Control Panel Control Panel Menu Structure DMX Channel Values In-Depth Troubleshooting 5. Appendix A Quick DMX Lesson Keeping Your SnowBlind™ As Good As New Returns (Gasp!) Shipping Issues Tech Specs Page 2 SnowBlind™ Manual - Rev. A Copyright (c) 2012 Blizzard Lighting, LLC... -
Page 3: Snowblind
Getting It Out Of The Box Congratulations on purchasing one way cool, way flexible, way original LED strobe light! Now that you’ve got your SnowBlind™ (or hopefully, Snow Blind’s!), you should carefully unpack the box and check the contents to ensure that all parts are present and in good condition. If anything looks as if it has been damaged in transit, notify the shipper immediately and keep the packing material for inspection. -
Page 4: Safety Instructions (Don't Stick Your Hand In The Toaster!)
• Avoid direct eye exposure to the light source while it is on. Caution! There are no user serviceable parts inside the unit. Do not open the housing or attempt any repairs yourself. In the unlikely event your unit may require service, please contact Blizzard Lighting at support@blizzardlighting.com. Page 4 SnowBlind™ Manual - Rev. A Copyright (c) 2012 Blizzard Lighting, LLC... -
Page 5: Meet The Snowblind
2. MEET THE SNOwBLIND™ LED STROBE LIGHT CONTROL FEATURES • Way bright output from 18x 1-watt cool white LED’s • Variable electronic strobe • Variable electronic dimmer • Controlled via 3-channel DMX and master/slave • Sound active mode in standalone and DMX modes • Microphone sensitivity adjustment in standalone and DMX modes • 4-button easy to use LED control panel menu • Aluminum mounting bracket with locking knobs • Lightweight and Compact (It kept its New Years’ resolution!) The SnowBlind™ is a great little LED strobe fixture that packs a nice big punch. Your new SnowBlind™ fixture is very easy to use in any of its working modes. Modes: • Sound Active • Master/Slave • DMX Mode Below is the basic structure for 3 channel DMX mode. (For more in depth information on DMX mode see pages 10-11.) DMX Quick Reference - 3 Channel Mode Channel What It Does (3-ch.) -
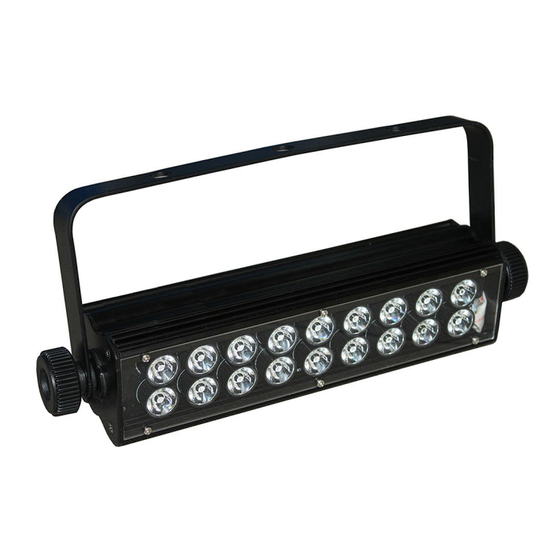
Page 6: The Snowblind™ Pin-Up Picture
Figure 1: The SnowBlind™ Pin-Up Picture Aluminum Housing Mounting Bracket Locking Knobs 18x 1-Watt Cool White LED’s Figure 2: The Rear Connections Mic Sensitivity LED Control Adjustment Knob Panel 3-Pin 3-Pin AC Power In DMX512 In DMX512 Out Page 6 SnowBlind™ Manual - Rev. A... -
Page 7: Setup
3. SETUP Fuse Replacement CAUTION! The SnowBlind™ utilizes a high-output switch-mode power supply with an internal fuse. Under normal operating conditions, the fuse should not require replacement. The fuse is field replaceable, however it is an advanced procedure suited to qualified individuals. Should your SnowBlind™ fuse require replacement, please contact Blizzard Lighting for instructions, or to return your unit for service. Connecting A Bunch of SnowBlind™ Fixtures... -
Page 8: Cable Connectors
We recommend connecting the fixtures in terms of their proximity to the controller, rather than connecting the lowest fixture number first, and so on. Step 3: Connect other fixtures in the chain from output to input as above. Place a DMX terminator on the output of the final fixture to ensure best communication. Page 8 SnowBlind™ Manual - Rev. A Copyright (c) 2012 Blizzard Lighting, LLC... -
Page 9: Fixture Linking (Master/Slave Mode)
It is important never to obstruct the fan or vents pathway. Mount the fixture using a suitable “C” or “O” type clamp. The clamp should be rated to hold at least 10x the fixture’s weight to ensure structural stability. Do not mount to surfaces with unknown strength, and ensure properly “rated” rigging is used when mounting fixutres overhead. Adjust the angle of the fixture by loosening both knobs and tilting the fixture. After finding the desired position, retighten both knobs. • When selecting installation location, take into consideration lamp replacement access (if applicable) and routine maintenance. • Safety cables MUST ALWAYS be used. Page 9 SnowBlind™ Manual - Rev. A Copyright (c) 2012 Blizzard Lighting, LLC... -
Page 10: Operating Adjustments
4. OPERATING ADJUSTMENTS The Control Panel All the goodies and different modes possible with the SnowBlind™ are accessed by using the control panel on the side of the fixture. There are 4 control buttons below the LED display which allow you to navigate through the various control panel menus. Mode Setup doWN <MODE> Is used to navigate the various modes. <SETUP> Is used to enter into the selected mode setup. -
Page 11: Dmx Channel Values In-Depth
Use Only DMX Cables and/or check cables for defects Erraticly Install a Terminator. Reset fixture(s). Intermittant Check lamp for properly installation. Lamp Relamp, lamp may have reached end of life. Page 11 SnowBlind™ Manual - Rev. A Copyright (c) 2012 Blizzard Lighting, LLC... -
Page 12: Appendix
DMX source. Generally, the “Secondary” channel is not used so data flows only from sources to receivers. Hence, most of us are most famil- iar with DMX-512 as being employer over typical 3-pin “mic cables,” although this does not conform to the defined standard. Page 12 SnowBlind™ Manual - Rev. A Copyright (c) 2012 Blizzard Lighting, LLC... - Page 13 In summary, since its design and evolution in the 1980’s DMX has become the standard for lighting control. It is flexible, robust, and scalable, and its ability to control everything from dimmer packs to moving lights to foggers to lasers makes it an indispensable tool for any lighting designer or lighting performer. Page 13 SnowBlind™ Manual - Rev. A Copyright (c) 2012 Blizzard Lighting, LLC...
-
Page 14: Keeping Your Snowblind™ As Good As New
Keeping Your SnowBlind™ As Good As New The fixture you’ve received is a rugged, tough piece of pro lighting equip- ment, and as long as you take care of it, it will take care of you. That said, like anything, you’ll need to take care of it if you want it to operate as designed. -
Page 15: Tech Specs
Operating Modes Sound Active, Master/Slave, DMX Special Ability Can make things appear to move in slooow motion. 2-year limited warranty, does not cover malfunction caused by Warranty damage to LED’s. Page 15 SnowBlind™ Manual - Rev. A Copyright (c) 2012 Blizzard Lighting, LLC... - Page 16 Enjoy your product! Our sincerest thanks for your purchase! --The team @ Blizzard Lighting...
Need help?
Do you have a question about the snowblind and is the answer not in the manual?
Questions and answers