Baby Jogger City Mini Zip Assembly Instructions Manual
Hide thumbs
Also See for City Mini Zip:
- Assembly instructions manual (100 pages) ,
- Assembly instructions manual (28 pages) ,
- Assembly instructions manual (28 pages)
Table of Contents
Advertisement
Advertisement
Table of Contents

Related Manuals for Baby Jogger City Mini Zip


Summary of Contents for Baby Jogger City Mini Zip
- Page 1 ™ ASSEMBLY INSTRUCTIONS...
-
Page 2: Table Of Contents
TABLE OF CONTENTS English Warnings . . . . . . . . . . . . . . . . . . . . . . . . . . . . . . . . . . . . . . . . . . . . 3 Features . -
Page 3: Warnings
WARNING IMPORTANT- Keep these instructions for • Always lock the brake when loading and future reference. unloading children . • Accessories which are not approved by SINGLE STROLLER • This stroller seats one passenger . the manufacturer or distributor shall not •... -
Page 4: Features
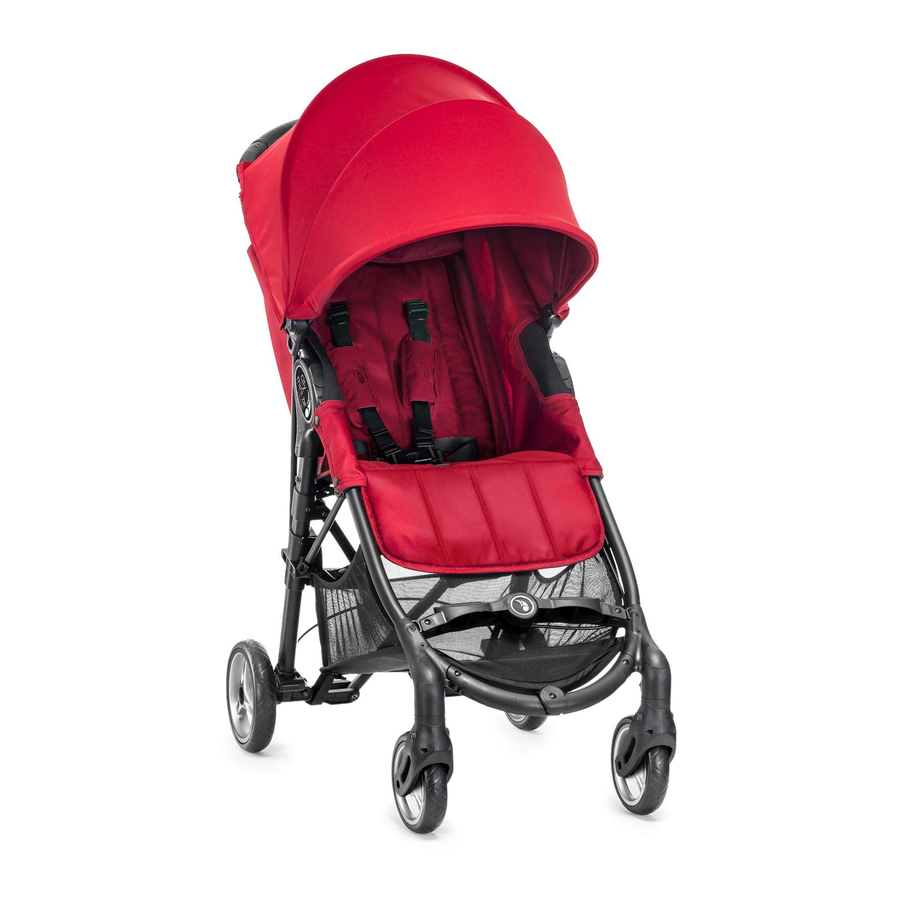
Handlebar Rear Wheel Release Button Handlebar Fold Button Storage Basket Weather Cover Front Wheels AutoLock Swivel Lock Canopy Attachment Bracket Footbar/Footrest Accessory Mounting Bracket Adjustable Footwell Fold Handle Harness Buckle Parking Brake Canopy Rear Wheel... -
Page 5: Frame
FRAME 1 Unpack the stroller from the box and set the wheels aside . 2 Unfold the stroller by pressing the Auto-lock release button and lifting the handlebar away from the lower frame . 3 Place the stroller in the upright position Lock handlebar by pressing both sides forward until it clicks . -
Page 6: Front Wheel
FRONT WHEEL 1 Installation CLICK • Lay stroller on its back so the Handlebar is resting on the floor . • Attach the front wheels by sliding them into the front wheel mounts until they click . Gently pull on the front wheels to make sure they are properly attached . -
Page 7: Rear Wheels
REAR WHEELS 1 Installation • Align the Rear Wheel axle with the wheel mount on the stroller frame and insert it into CLICK the wheel mount until it clicks into place . • Gently pull on the Rear Wheel to make sure it is properly attached . -
Page 8: Brake
BRAKE 1 Simply push the red parking brake down to engage the brakes . 2 Press the green brake release down to release the brakes . WARNING: Always apply the brakes whenever the stroller is stationary . WRIST STRAP 3 Always use the wrist strap when stroller is in use . -
Page 9: Canopy
CANOPY 1 Insert canopy attachments into canopy attachment brackets on each side of the stroller . Click into place . CLICK 2 Attach velcro along back of canopy to seat . 3 Snap the canopy straps to the back of the handlebar . -
Page 10: Adjustable Legrest
ADJUSTABLE LEGREST 1 Press the adjustment levers located underneath the legrest and move legrest up or down until desired position is reached . CUP HOLDER 2 Attach the cup holder to the attachment knob on the right side of the handlebar . Click into place . NO TE: Containers carrying hot liquids should not be used . -
Page 11: Safety Harness
SAFETY HARNESS 1 To adjust harness height: Slide upper section of shoulder straps up and down to fit close to your child’ s shoulders . 2 To adjust harness length: Hold the plastic guide and pull the strap end to tighten, or pull the upper harness strap to loosen . - Page 12 3 Insert shoulder strap buckle into side strap buckle on both sides . 4 Insert connected harness and side strap buckles into the sides of the crotch buckle . 5 Press button on crotch buckle to release . WARNING: Harness straps have loops that can cause strangulation .
-
Page 13: Seat
SEAT - RECLINE 1 Pinch the clamp behind the seat and slide it down to desired recline . 2 Pull seat down on both sides to match recline position of clamp . Reverse steps to return to the upright position . WEATHER COVER 3 If desired, pull the weather cover down and over the seat back mesh . - Page 14 SEAT - REMOVAL 1 Remove canopy . Unsnap all snaps around frame, including the fold strap . 2 On the back of the footwell, remove elastic loops from knobs . Slide fabric off of footwell folding mechanism . 3 Pull fabric upward off of seatback .
-
Page 15: Basket Removal
BASKET REMOVAL 1 From the rear of the stroller: Remove velcro straps from hooks located in front of the rear folding area . 2 From the front of the stroller: Remove velcro straps from hooks under seat . Unsnap the snaps from the front of the stroller frame and remove basket . -
Page 16: Folding
FOLDING 1 Remove the child from the seat . Unsnap the red safety straps from the frame . Press the release button located under the cap on the handlebar . 2 Pull upwards on the pull strap in the center of the seat with a gentle tug and your stroller will fold . -
Page 17: Care & Maintenance
• Do not press, iron, dry clean, tumble dry or wring the fabric . • If the seat covers need to be replaced, only use parts from a Baby Jogger Authorized Dealer . They are the only ones that are guaranteed to have been safety tested and designed to fit this seat . -
Page 18: Limited Warranty
BABY JOGGER LIMITED WARRANTY Baby Jogger’ s Limited Warranty: Baby Jogger warrants that the frame is free of manufacturer defects for the lifetime of the product . Manufacturer’ s defects include but are not limited to the breaking of welds and frame tube damage . - Page 20 T: (64) 03 . 3 38 . 7 613 • F: (64) 03 338 7615 www . b abyfirst . c o . n z Baby Jogger, LLC 8575 Magellan Parkway, Suite 1000 • Richmond, VA 23227 T: 800.241.1848 • F: 804.262.6277 • www.babyjogger.com...
Need help?
Do you have a question about the City Mini Zip and is the answer not in the manual?
Questions and answers