
Summary of Contents for MANONI Smarty 300 VX VE
- Page 1 Slicers Models Instructions for use and maintenance Smarty 300 VX VE Smarty 300 VX BV Smarty 300 VX BVC Smarty 300 IX Translation of original instructions Edition October 2011...
- Page 2 FOREWORD This manual has been prepared by MANCONI to provide Clients with all possible information on the machine and the safety precautions relating to it, as well as instructions for operation and maintenance, which will enable them to obtain the best possible performance, and to keep the machine working efficiently for a long time.
-
Page 3: Warranty Certificate
WARRANTY CERTIFICATE (Copy to be delivered to the TAS Manconi) Machine mod. _________________________________ serial n. __________________ Acquired by ________________________________________________________________ Your place Post code__________ City ____________________________Country ____________________ Street __________________________________________ Tel. number _____________________ The above-mentioned company claims to have taken note of the warranty conditions and accept them without reservation. - Page 4 Page intentionally left blank...
- Page 5 English EC-Declaration of Conformity (according to 2006/42/EC, Annex II, No.1 A) - Company name: Manconi & C. S.R.L - Address: Via Varese 8 21040 Sumirago (VARESE) - Mr. Manconi Paolo is authorised to compile the technical file according to Annex VII A. - Address of the authorized person: Via Varese 8 21040 Sumirago (VARESE) - We hereby declare that: SLICING MACHINE Mod.
-
Page 6: Table Of Contents
PAGE Section 1 SAFETY INFORMATION, RISKS AND RESIDUAL RISKS GENERAL PRECAUTIONS, RISKS AND RESIDUAL RISKS MECHANICAL SAFETY ELECTRICAL SAFETY Section 2 TECHNICAL DATA GENERAL DESCRIPTION MAIN CHARACTERISTICS DIMENSIONS AND PERFORMANCES Section 3 UNPACKING CHECKS ON RECEPTION DISPOSAL OF THE PACKAGING Section 4 INSTALLATION POSITIONING OF THE MACHINE... -
Page 7: Safety Information, Risks And Residual Risks
Section 1 SAFETY INFORMATION, RISKS AND RESIDUAL RISKS GENERAL PRECAUTIONS, RISKS AND RESIDUAL RISKS The slicer should be used by trained personnel only, who must be completely familiar with the safety regulations contained in this manual. Should it be necessary to alternate operators, training should be provided in good time. -
Page 8: Mechanical Safety
MECHANICAL SAFETY As far as safety against mechanical risks are concerned, the slicer described in this manual complies with the Directive EN 1974: 1998 + A1 “Food processing machinery – Slicing machines – Safety and hygiene requirements” so is compliant with machine directive 2006/42/CE. Safety has been achieved by means of: a) A non-removable blade guard around the blade, to protect the area not used for the cutting. -
Page 9: Main Characteristics
MAIN CHARACTERISTICS - External parts of the machine are produced in aluminium-magnesium alloy suitable for the contact with the foodstuff, mirror polished and anodised. - Parts and bits in stainless steel, to avoid risks of oxidations. - The cutting blade is driven by a completely enclosed motor with ample external ventilation, drive transmission is obtained with a ground worm screw and helical gear. - Page 10 Picture 2 – Overall Dimensions “VX BV SMARTY” 729* * Overall dimensions with carriage support at the end of its stroke. Picture 3 – Overall Dimensions “VK BVC SMARTY” 678* * Overall dimensions with carriage support at the end of its stroke.
- Page 11 Picture 4 – Overall Dimensions “IX SMARTY” * Overall dimensions with carriage support at the end of its stroke. Model 300 Technical data U.M. Blade diameter Blade speed Slice thickness from–to 0-16 0-16 0-16 0-16 Carriage stroke Electrical protection IP grade IPX3 IPX3 IPX3...
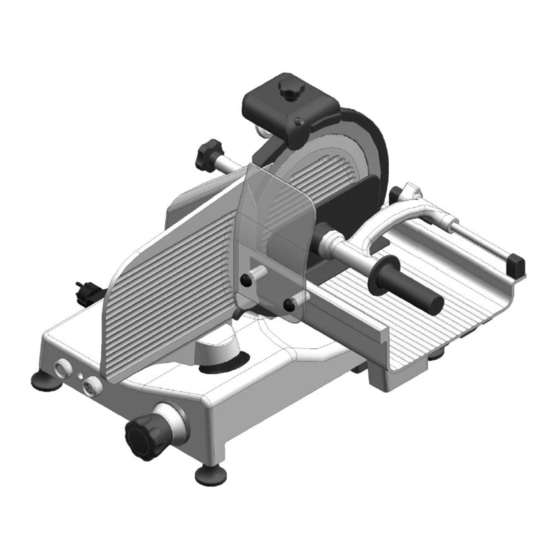
- Page 12 STRAIGHT SLICER VERSION “VX VE SMARTY” Picture 5 – MAIN COMPONENTS “VX VE SMARTY” CAPTIONS 01 – ON Switch 12 – Tie-rod knob 02 – OFF Switch 13 – Sharpener cover 03 – Light indicator 14 – Sharpener knob 04 – Slice thickness control 15 –...
- Page 13 STRAIGHT SLICER VERSION “VX BV SMARTY” 9 10 Picture 6 – MAIN COMPONENTS “VX BV SMARTY” CAPTIONS 01 – ON Switch 12 – Tie-rod knob 02 – OFF Switch 13 – Sharpener cover 03 – Light indicator 14 – Sharpener knob 04 –...
- Page 14 STRAIGHT SLICER VERSION “VX BVC SMARTY” 9 10 PICTURE 7 – MAIN COMPONENTS “VX BVC SMARTY” CAPTIONS 01 – ON Switch 12 – Tie-rod knob 02 – OFF Switch 13 – Sharpener cover 03 – Light indicator 14 – Sharpener knob 04 –...
- Page 15 11 – Blade cover 22 – Height arm regulator 23 – Regulation knob GRAVITY SLICER VERSION “IX SMARTY” Picture 8 – MAIN COMPONENTS “IX SMARTY” CAPTIONS 01 – ON Switch 13 – Sharpener cover 02 – OFF Switch 14 – Sharpener cover knob 03 –...
-
Page 16: Unpacking
Section 3 UNPACKING CHECKS ON RECEPTION When the package containing the slicer arrive, carry out a careful examination of the packaging to check that it has not suffered serious damage during transport. If an external examination shows signs of ill treatment, blows or fall, the Courier must be informed of this damage and an accurate report of any damage to the machine itself must be written. - Page 17 (6) Power (7) Manconi code identification of the slicer Before finally connecting the machine to the three-phase power, check the direction of blade rotation by pressing the ON button (1) and stopping it immediately with the OFF button (2) (see pic. 5-6-7-8). The direction of blade rotation must be counter clockwise when facing the machine from the blade cover side.
- Page 18 Motor Plug Brown Grey Black Picture 12 – Three phase electrical 230Volt 50 Hz (3P+T) Motor Plug Black Brown Grey Blue Picture 13 – Three phase electrical box 400Volt 50 Hz (3P+N+T)
-
Page 19: Functional Checks
FUNCTIONAL CHECK (Ref .Pic. 5-6-7-8) On the straight slicers, before proceeding with the checks, the food carriage included in the machine packing must be installed (see Section 5). The functions can be tested several times by the following procedure: - Press the ON button (1) and the OFF button (2) and check that the white indicator light (3) goes on and off, the motor starts and stops, the blade runs and stops. - Page 20 - At the end of the cutting operation, return the knob (4) at the stroke end clockwise and switch off the machine with the OFF button (2).
-
Page 21: Straight Slicer "Vx Ve Smarty
5.1.2 STRAIGHT SLICER “VX VE SMARTY” ( Ref. Pic. 5) - Place the foodstuff for slicing on the plate (19) now position it against the surface facing the operator. - Block the position of the foodstuff with the last slice device (18) with the knob (17). - Use the knob (4) to adjust the slice thickness. -
Page 22: Sharpening The Blade With Integrated Sharpener
- The last slice device (18) can be unlocked moving upward the knob (23). BLADE SHARPENING (Ref. Pic. 14-15) WARNING! Be careful at this stage cause are being discovered all the points of contact between the blade and grinding wheels. Always use a metal mesh safety gloves to avoid cuts. - The blade should be sharpened only after it has been cleaned as described in Section 6 - Cleaning and Maintenance. -
Page 23: General Remarks
Section 6 CLEANING GENERAL REMARK (Ref. Pic. 5-6-7-8) WARNING! Before carrying out any cleaning or maintenance operation it is important: - Disconnect the plug in order to isolate the machine from the mains. - Return the gauge plate knob (4) at the stroke end clockwise. - Move the food carriage to its stroke end facing the operator, unscrew the knob or lever locking the carriage and remove it. - Page 24 In IX SMARTY version (ref.pic.8), to optimize the cleaning is possible to turn out the carriage from the machine by moving the knob (9) at the end of the stroke, front face operator, and gauge plate regulator set to zero. Remove the blade cover (Ref.
- Page 25 CLEANING Clean the blade (Ref. Pic. 5-6-7-8-24) WARNING! This operation must be done with great attention and concentration, cause there is danger of cutting. Disconnect the plug from the socket before cleaning the blade guard. - Close the gauge plate by rotating clockwise the knob (4) till the end of stroke.
- Page 26 During washing do not direct water jet on parts housed in the basement!
-
Page 27: Normal Service
Section 7 NORMAL SERVICE According to the use, but at least once a day, clean the machine as per Section 6. Sharpen the blade as necessary. Check the power cable integrity. Sometimes remove dirty from the sliding bar of the food carriage and lubricate the sliding surfaces with Vaseline oil (Fig.26). -
Page 28: Dismalting And Disposal
Section 8 DISMALTING AND DISPOSAL INFORMATION FOR THE END USER according to European Directives 2002/95/EEC, 2002/96/EEC and 2003/108/EEC, relevant to the use of hazardous substances in electrical and electronic equipment, as well as their disposal. The label with the crossed litterbin, glued to the slicing machine, means that, at the end of its working life, the machine must be collected separately from other waste material. - Page 29 the product. Blade not sharp enough. Sharpen the blade. Slices are not neatly cut. Dented blade. Contact the MANCONI authorized TAS to replace the blade. Dirty wheels. Clean the wheels. Worn wheels. Contact the MANCONI authorized Blade cannot be sharped in TAS to replace the wheels.
Need help?
Do you have a question about the Smarty 300 VX VE and is the answer not in the manual?
Questions and answers