Table of Contents
Advertisement
Advertisement
Table of Contents

Summary of Contents for KA Security KAS-820-DE
- Page 1 USER GUIDE KAS-820-DE KAS-830-RDE kas.com.au Verison: UG_V002...
-
Page 2: E-Touch Technical Parameters
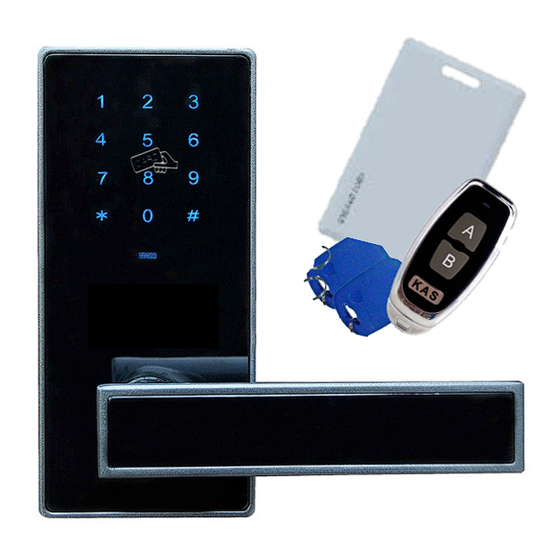
Discover the eTouch Remote Control Keyless Lock Thank you for choosing KA Security’s eTouch Remote Control Keyless Lock. As you’ll soon discover, this stylish electronic touch screen lock represents the next generation in security by combining four methods of access for added security and convenience - choose from pin code, keycard, FOB or remote control. -
Page 3: Table Of Contents
Table of Contents e-Touch Technical Parameters Preface - Guidelines Before Use 2 e-Touch Electronic Lock Features/ Systems 2.1 Panic Exit Function 2.2 Tamper Alert Alarm 2.3 Automatic Locking 2.4 Low Voltage alarm 3 Installation Guide 3.1 Lineation 4 Drilling 4.1 Lock Installation 5 Management Instructions 5.1 Factory Reset... -
Page 4: Preface - Guidelines Before Use
Preface - Guidelines Before Use Electronic locks are sensitive and advanced products with fragile micro- chips and hardware. Please be aware that the position and type of environment the lock is installed in can affect its lifespan To install the lock, we recommend professional carpenters or builders. Incorrect installation of the lock can lead to irreparable damage After the lock is installed, please change the default management pin code immediately and keep a record of your new code. -
Page 5: Installation Guide
Installation Guide Lineation Select your lock height, and place a marking on the door where you • want the lock to sit From this marking, measure out the backset *60mm or 70mm • provided with lock Measure out the other markings required that are provided on your •... - Page 6 Ensure the rubber gasket cover is on both sides of the locks • Take the front handle and place it on the door, ensuring all screws • and holes line up. Place the wires from the lock through the rubber gasket and through door hole to ensure no pinching of the wires and a flush covering [Image B] Insert spindle into the front handle ensuring it is inserted into the...
- Page 7 Place the back handle onto the metal frame; screw the 2 screws at • the base of the lock and 1 screw in the battery pack area. [Image Insert batteries • Your lock is now ready for programming, see instructions below •...
-
Page 8: Management Instructions
Management Instructions Factory Reset The lock will be in factory reset with the management pin code default ‘123123’. ALL programmed data will be deleted a. Open battery cover on the inside of the door. b. Hold the default switch in the back plate for 3 seconds [Figure 13.3] c. -
Page 9: Pin Code
Pin Code Pin code capacity: 8 Program User Pin Code Pin codes can be from 3 to 6 digits long. a. Log into “Settings Management” [5.3] b. Press " 1 ", then press " * " c. Enter new user pin code, then press " * " (A long beep will sound) d. -
Page 10: Alter Key Card/Fob
Serial No: Card ID (i.e first/last name) Alter Key Card/FOB (Suitable for: KAS-820-DE, KAS-830-RDE) To alter a card/FOB you must know the serial number that you want to replace. The serial number should be 3 figures. i.e ‘001’. a. Log into “Settings Management” [5.3] b. -
Page 11: Delete Key Card/Fob
Delete Key Card/FOB (Suitable for: KAS-820-DE, KAS-830-RDE) This process will delete all current cards/FOBs from the system. To remove an individual card/FOB you must replace the card/FOB with a new one. a. Log into “Settings Management” [5.3] b. Press " 5 ”, then press " * " (A long beep will sound) c. -
Page 12: Passage Mode Function
Passage Mode Function Passage mode will leave the door in an “unlocked” state until mode is deactivated. Passage mode allows access through the door without the need for a pin code, key card/FOB or remote. NOTE: If the lock is left in Passage Mode for a long period of time it will signifcantly decrease battery life. -
Page 13: Lock Operation And Technical Information
Lock Operation and Technical Information Should you need to open your door without using electronics, a Master Key is required a. Insert a small pin into the hole at the back of the front handle [Figure 13.1] b. Press out the magnetic cover and remove the front panel from the lock handle c. - Page 14 Figure Diagrams 13.1 Figure Mechanical Cylinder Location 13.2 Figure Base Of Front Plate 13.3 Figure Back Plate Battery Location kas.com.au Verison: UG_V002...
-
Page 15: Kas.com.au
For orders, enquiries and technical support please contact 1300 939 669 support@kas.com.au KAS.com.au kas.com.au Verison: UG_V002...
Need help?
Do you have a question about the KAS-820-DE and is the answer not in the manual?
Questions and answers