Sound Devices PIX 220 User Manual
Hide thumbs
Also See for PIX 220:
- User manual and technical information (51 pages) ,
- User manual and technical information (66 pages)
Table of Contents
Advertisement
Quick Links
PIX Packing List
Thank you for purchasing the PIX Video Recorder. Please make certain that this package contains
the listed items below.
PIX Video Recorder
1)
1) Universal In-Line Power Supply; 100–240 VAC input, 12 VDC/45 watt output
1) 1/4-20 Simple Stand
1) Printed User Guide and Technical Documentation
1) Purchase Registration Card
April, 2012
Advertisement
Table of Contents

Subscribe to Our Youtube Channel
Related Manuals for Sound Devices PIX 220


Summary of Contents for Sound Devices PIX 220
- Page 1 PIX Packing List Thank you for purchasing the PIX Video Recorder. Please make certain that this package contains the listed items below. PIX Video Recorder 1) Universal In-Line Power Supply; 100–240 VAC input, 12 VDC/45 watt output 1) 1/4-20 Simple Stand 1) Printed User Guide and Technical Documentation 1) Purchase Registration Card April, 2012...
- Page 3 PIX 220 & PIX 240 User Guide and Technical Information Firmware rev. 2.0 Sound Devices, LLC E7556 State Rd. 23/33 • Reedsburg, WI • USA +1 (608) 524-0625 • fax: +1 (608) 524-0655 Toll-Free: (800) 505-0625 www.sounddevices.com support@sounddevices.com...
-
Page 5: Table Of Contents
Environmental ........49 PIX 220 Timecode Features ......27 PIX 220 &... -
Page 6: Introduction
LLC. SOUND DEVICES is not responsible for any use of this information. SOUND DEVICES, LLC shall not be liable to the purchaser of this product or third parties for damages, losses, costs, or expenses incurred by purchaser or third parties as a result of: accident, misuse, or abuse of this product or unauthorized modifi cations, repairs, or alterations to this product, or failure to strictly comply with SOUND DEVICES, LLC’s operating and installation instructions. -
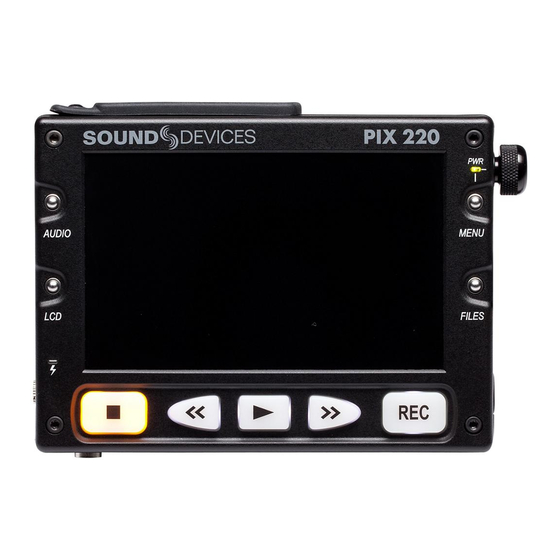
Page 7: Front Panel Descriptions
PIX 220/PIX 240 User Guide and Technical Information Front Panel Descriptions LCD Display Rewind Button Displays operating information when the Pressing once during playback reverses On-Screen Display (OSD) is active (see playback at 2x realtime speed. Subse- On-Screen Display), user interface, source quent presses switch to 4x and 8x realtime video, and playback video. -
Page 8: Top And Bottom Panel Descriptions
PIX 220/PIX 240 User Guide and Technical Information Power LED Time Code / Charge LED Hold the Menu butt on down, then press Flashing green: Accurate timecode is main- the Control Knob to power on the unit. tained by internal Li-Ion batt ery. -
Page 9: Right Panel Descriptions
PIX 220/PIX 240 User Guide and Technical Information Timecode BNC SDI Input BNC Selectable timecode input or output. Con- HD-SDI video input. Accepts SMPTE fi gured with Video Timecode/Sync 292M (HD-SDI) signal with up to 8 chan- Timecode BNC menu item. -
Page 10: Left Panel Descriptions
PIX 220/PIX 240 User Guide and Technical Information Left Panel Descriptions eSATAp External Drive Connector SATA PIX-CADDY Connector Connection for portable, bus-powered High-reliability eSATAp connection de- drives. Also compatible with (non-pow- signed to mate with the PIX-CADDY. ered) eSATA to connect to large capacity Headphone Output - 3.5 mm... -
Page 11: Rear Panel Descriptions
PIX 220/PIX 240 User Guide and Technical Information Rear Panel Descriptions Battery Mounts Accepts Sony® InfoLithium L-Series bat- Whisper-quiet, low-speed, single, large teries. Also accepts third party batt eries diameter fan. Runs continuously. compatible with the Sony mount. Mounting Point - ¼ - 20... -
Page 12: Pix-Caddy (Optional)
PIX-CADDY (Optional) The PIX-CADDY is a recommended accessory to record video fi les to approved 2.5” drives. When removed from a PIX 220 or PIX 240, PIX-CADDY operates as a high-speed drive interface to Mac OS and Windows computers. FireWire 800... -
Page 13: Powering
PIX 220/PIX 240 User Guide and Technical Information Powering The PIX 220 and PIX 240 are powered from either removable, Li-ion rechargeable batt eries or ex- ternal DC. One or two removable 7.2 V Li-ion batt eries can be mounted to the recorder and used as either primary or backup power. -
Page 14: Menu
PIX 220/PIX 240 User Guide and Technical Information On-screen Display Menu Item Description 1. ABS Time Absolute Time: Total time of an active video recording. 2. File Codec The presently selected video codec. 3. File Name Name of the current file. Pressing STOP shows the next file name. -
Page 15: Audio
PIX 220/PIX 240 User Guide and Technical Information Audio Press the AUDIO butt on (keyboard: F3) to enter the Audio Metering and Gain control screen. From this screen, the level for both analog (XLR mic/line) and digital (XLR AES, HDMI, or SDI) audio in- puts can be adjusted. -
Page 16: Files
PIX 220/PIX 240 User Guide and Technical Information Files Press the FILE butt on (keyboard: F2) to display the File List; A list of all of the clips (grouped by reel) on the selected storage media. Turn the Control Knob to highlight an item. Press Play to start play back of the highlighted clip. -
Page 17: Video Inputs
PIX 220/PIX 240 User Guide and Technical Information Video Inputs The PIX 240 accepts SDI or HDMI video; the PIX 220 only accepts HDMI video. Both recorders will accept either high-defi nition or standard-defi nition rates. Since the PIX recorders do not record stan- dard-defi... -
Page 18: Audio Inputs
MS microphone confi gurations. Digital Audio Inputs The PIX 220 and PIX 240 accept digital audio from HDMI, SDI (PIX 240 only), and AES/EBU (PIX 240 only) inputs. All audio is sampled at 48 kHz. HDMI / SDI Embedded Audio The PIX 220 and PIX 240 accept two channels of embedded digital audio on the HDMI Video Input. -
Page 19: Input Linking
PIX 220/PIX 240 User Guide and Technical Information AES3 The PIX 240 accepts AES3 (AES/EBU) digital signals with sampling rates from 32 kHz up to 192 kHz and bit depths up to 24-bits. Files recorded by the PIX 240 are uncompressed 24 bit, with sampling rates of 48 kHz. -
Page 20: Input Level Control
PIX 220/PIX 240 User Guide and Technical Information Audio Source Tracks on Recorded Files and Video Outputs Analog XLR 1: Analog Input XLR 1 2: Analog Input XLR 2 AES (Digital) XLR 1-2ch 1: Channel 1, AES XLR A 2: Channel 2, AES XLR A... -
Page 21: Audio Outputs
PIX 220/PIX 240 User Guide and Technical Information Push the Control Knob to enter gain adjustment mode (indicated by a blue highlight) Turn the Control Knob to adjust the gain value up or down. This adjustment will aff ect gain in real-time. -
Page 22: Video Monitoring Features
PIX 220/PIX 240 User Guide and Technical Information LCD A/V Alignment Audio signal is routed to the headphones in real-time. The video displayed on the LCD is delayed slightly. When the Setup Menu option Audio Headphone: LCD A/V Align is set to On, the audio signal to the headphones will be delayed slightly to align with the video displayed on the LCD. - Page 23 PIX 220/PIX 240 User Guide and Technical Information False Color False Color exposure assist mode replaces pixels with a specifi c color relative to the luminance level. The two types of False Color (selectable from Setup Menu option LCD Monitor Exposure Assist) are 12-step and 4-step.
-
Page 24: Focus Assist
PIX 220/PIX 240 User Guide and Technical Information Zebras Zebra stripe exposure assist mode overlays diagonal stripes over areas that are in a defi ned lumi- nance range (Zebra 1) or above a defi ned luminance threshold (Zebra 2). The range for Zebra 1 is 5% above and below the IRE value of Setup Menu option LCD Monitor Zebra 1 Level. - Page 25 PIX 220/PIX 240 User Guide and Technical Information The color of the Peaking marks can be set with the Setup Menu option LCD Monitor Peaking Color. The following image comparison demonstrates the eff ect of Peaking on an image with a shallow depth-of-fi...
-
Page 26: Zoom
PIX 220/PIX 240 User Guide and Technical Information Zoom AUDIO The Zoom function enlarges the video image to a 1:1 pixel ratio. To toggle Zoom on and off , hold down the LCD butt on and press the AUDIO butt on. When Zoom is enabled, “ZOOM” is displayed on the OSD in yellow text and all other OSD elements are hidden. -
Page 27: Selecting File Resolution And Frame Rate
PIX 220/PIX 240 User Guide and Technical Information Selecting File Resolution and Frame Rate The PIX recorders can record video in numerous resolutions and frame rates. The Setup Menu op- tion Video File Resolution/Rate sets the resolution and frame rate of recorded Quicktime fi les. -
Page 28: Interruption Of Signal During Recording
PIX 220/PIX 240 User Guide and Technical Information Interruption of Signal During Recording In the event that video signal is lost (an unplugged HDMI or SDI cable, for example) during record- ing, the PIX recorder will pause the recording and wait for video signal to be re-initialized. If video signal is re-initialized within 10 seconds, the PIX recorder will begin recording again to a new fi... -
Page 29: Playback
PIX 220/PIX 240 User Guide and Technical Information Not all frame rate conversions are visually desirable. When the OSD Item File Resolution/Rate is red, the conversion of the frame rate of the input video to the frame set by Video File Resolution/ Rate will contain a fi... -
Page 30: Shuttle Mode
PIX 220/PIX 240 User Guide and Technical Information Fast Forward and Rewind Hold down the Fast Forward (>>) or Rewind (<<) butt on during playback for 2x (double) speed playback. When the Fast Forward (>>) or Rewind (<<) butt on is held down for more than 5 seconds, playback will become 8x speed. -
Page 31: Playing Back Files On A Computer
This section gives a concise overview of timecode and video synchronization. This information ap- plies primarily to the PIX 240 and its advanced timecode and synchronization options; however it is useful information for PIX 220 and PIX 240 users alike. For information about the PIX 220’s timecode capabilities... -
Page 32: Timecode Reader
PIX 220/PIX 240 User Guide and Technical Information from camera to camera from the beginning to end of the take’s fi le. Even if the heads match, the tails of a take may not. These drift problems can be mitigated during recording by using a Genlock (or “Sync”) Input on a camera which takes over the camera’s internal master clock. -
Page 33: Pix 220 Timecode Features
Timecode Mode is set to Ext TC (HDMI), and a camera is sending valid timecode embedded in the HDMI signal, the PIX 220 will stamp recorded fi les with this timecode. This also allows for the PIX 220 to optionally begin recording when it senses advancing timecode. -
Page 34: External - Hdmi Timecode Mode (Pix 220)
The PIX recorders can use timecode embedded in the HDMI input signal. Timecode/Sync Time- code Mode must be set to Ext TC (SDI, HDMI) on the PIX 240 or Ext TC (HDMI) on the PIX 220. Synchronization/Timecode Examples The following examples illustrate common scenarios where synchronization can be employed with the PIX 240 and other devices. -
Page 35: Single Video Camera, No Genlock
PIX 220/PIX 240 User Guide and Technical Information Single Video Camera, no Genlock In this scenario, the video camera is the master source of the video sync. The timecode can either be read from the camera or be generated by the PIX 240. The accuracy of the recording is dependent on the internal clock accuracy of the camera. -
Page 36: Camera #1 To Pix #1, Camera #2 To Pix #2, No Genlock
Triggering Recording from External Timecode The PIX 240 can be confi gured to record only when running timecode is present on the 5-pin LEMO, the Timecode BNC, or embedded timecode on the SDI or HDMI input. The PIX 220 can be v. 2.0... -
Page 37: Triggering Recording From Sdi Flag Bits
PIX 220/PIX 240 User Guide and Technical Information confi gured to record only when running timecode is present on HDMI input. The device that is sending timecode to the PIX recorder must be confi gured to send running timecode when recording and stopped timecode when not recording (often referred to as “Rec Run”). -
Page 38: Usb Keyboard
Moves the highlight to the beginning of a list. Storage Devices Supported Storage Devices Sound Devices maintains a list of storage devices that are approved for use with the PIX recorders. An up-to-date list of supported storage devices can be found online: htt p://www.sounddevices.com/ approved Approved mechanical drives are recommended for use only in stationary applications. -
Page 39: File Storage
PIX 220/PIX 240 User Guide and Technical Information This port can be used to power an external drive via 5V eSATAp, or it can be used with powered external enclosures using an eSATA (non-powered) cable. File Storage PIX recorders format and write to a UDF (v2.50) fi lesystem. The UDF fi lesystem is readable and writ- able by Mac OS X, Windows 7, and Windows Vista. -
Page 40: File Management And Metadata
PIX 220/PIX 240 User Guide and Technical Information • In order for automatic switching to occur, the drive to be switched to must be att ached and mounted prior to hitt ing Record. Drives that are not mounted prior to hitt ing record will not be available for automatic switching until recording is Stopped. -
Page 41: File Size Limit
PIX 220/PIX 240 User Guide and Technical Information Deleting a File To delete a fi le: Push the fi les butt on to enter the File View. Scroll with the Control Knob to highlight and select the fi le to be deleted. -
Page 42: Metadata
USB 3.0 connection must be used; Not both. Sound Devices recommends fi rst copying fi les from the 2.5” drive or CF card to the computer fi rst and then editing the fi les. It is not recommended to edit fi les directly off of the 2.5” drive or CF card. -
Page 43: Firmware Upgrades
PIX 220/PIX 240 User Guide and Technical Information Firmware Upgrades At times, Sound Devices makes updates available for PIX recorders. These updates are easy to apply: Download the new .prg fi le from the Sound Devices website. 2. Copy this fi le to the CF card or 2.5” drive, and insert into the PIX recorder. - Page 44 PIX 220/PIX 240 User Guide and Technical Information 4. After the correct password has been entered, the Sett ings Customization Menu will appear. Select Edit Menu & Default Values. 5. The Setup Menu will be shown with a colored background. There will be check boxes next to each menu item.
- Page 45 PIX 220/PIX 240 User Guide and Technical Information Crossed out items will be hidden Sett ings changed at this point will become the default sett ings. When fi nished, press Esc or F1 on the keyboard. This will show the Sett ings Customization Menu again.
-
Page 46: Setup Menu Options
PIX 220/PIX 240 User Guide and Technical Information Setup Menu Options The Setup Menu controls a wide range of parameters for the PIX. The parameters are organized into categories, making the setup Menu easy to navigate. The following tables show the parameter name, a description, options available, and the factory default sett ing where applicable. -
Page 47: Video
PIX 220/PIX 240 User Guide and Technical Information Video Parameter Name Description Options Video Input Physical source to derive recorded video from. • HDMI » File Resolution/Rate The resolution and frame to convert input video to. » Same as Video Input This will affect files recorded and all video outputs. - Page 48 PIX 220/PIX 240 User Guide and Technical Information Parameter Name Description Options Analog 1 Low cut Engages low-cut filter on analog Input 1 at the speci- » OFF fied frequency. • 40Hz • 80Hz • 120Hz • 160Hz • 200Hz •...
-
Page 49: Timecode/Sync
PIX 220/PIX 240 User Guide and Technical Information Timecode/Sync Parameter Name Description Options Timecode Mode Sets the running mode for the internal timecode » Off generator and/or the method which the PIX recorder • Freerun receives SMPTE timecode.. • Record run •... -
Page 50: Lcd Monitor
PIX 220/PIX 240 User Guide and Technical Information LCD Monitor Parameter Name Description Options Exposure Assist » False Color, 12-step • False Color, 4-step • Zebras 1 • Zebras 2 • Zebras 1+2 Focus Assist » Peaking • Edge Enhance Zebra 1 Level »... -
Page 51: System
PIX 220/PIX 240 User Guide and Technical Information Parameter Name Description Options Timecode Display of current timecode value » On • Off SSD Status Display of time remaining (or offline) status of the » On • Off CF Status Display of time remaining (or offline) status of the CF »... -
Page 52: Quick Setup
PIX 220/PIX 240 User Guide and Technical Information Quick Setup Parameter Name Description Options Load Factory Settings Loads default setup Load Settings From SSD Loads selected setup from setups saved on the SSD • All settings files located on SSD... -
Page 53: Connector Pin Assignments
PIX 220/PIX 240 User Guide and Technical Information Connector Pin Assignments Connector Pin Assignments Notes XLR-F Mates with XLR-Male connector (Analog inputs) 7.5k ohm input impedance, mic level 1–ground 20k ohm input impedance, line level, active- 2–signal (+) balanced 3–signal (-) -
Page 54: Specifi Cations - Pix Recorders
PIX 220/PIX 240 User Guide and Technical Information Specifi cations - PIX Recorders Video HDMI Input & Output Version 1.4a input, Version 1.3a output, HDCP enabled on input SDI Input & Output SMPTE 259 and 292 Supported Resolutions / • 1080p30 •... -
Page 55: Storage
PIX 220/PIX 240 User Guide and Technical Information Storage See Sound Devices’ website for a list of Sound Devices approved 2.5” drives. approved media: CompactFlash Sound Devices approved CompactFlash cards http://www.sounddevices.com/approved External eSATAp connection, supplies 5V @ 2A Timecode and Sync... -
Page 56: Pix 220 & Pix 240 Ce Declaration Of Conformity
Sound Devices, LLC 300 Wengel Drive Reedsburg, WI 53959 USA declares that the product, PIX 220 and PIX 240 Video Recorder is in conformity with and passes: Product Family Application EMC-Product family standard for audio, visual, audio-visual and lighting control apparatus for... -
Page 57: Ce - Cispr Publication Dates
PIX 220/PIX 240 User Guide and Technical Information CE - CISPR Publication Dates Standard # Date Am.1 Am. 2 Standard # Date Am.1 Am. 2 EN 61000-4-11 2004-10 ANSI C63.4 2003 EN 61000-6-1 2007-02 CISPR 11 2009-05 EN 61000-6-2 2005-12... -
Page 58: Software License
Sound Devices, LLC product, even if Sound Devices, LLC has been advised of the possibility of such damages. -
Page 59: Warranty And Technical Support
Warranty and Technical Support Warranty & Service Sound Devices, LLC warrants the PIX 240 and PIX 220 Portable Video Recorder against defects in materials and workmanship for a period of ONE (1) year from date of original retail purchase. This is a non-transferable warranty that extends only to the original purchaser. Sound Devices, LLC will repair or replace the product at its discretion at no charge. - Page 61 PIX 220 and PIX 240, v 2.0 - Printed in U.S.A.
Need help?
Do you have a question about the PIX 220 and is the answer not in the manual?
Questions and answers