Table of Contents
Advertisement
Advertisement
Table of Contents

Summary of Contents for HD-iP VHDIPL-8 Concept Pro
- Page 1 VHDIPL-8 8 CHANNEL NVR USER MANU AL...
-
Page 2: About This Document
About this document Purpose This document is for the VHDIPL-8, including the product features, hardware installation, network access, network configuration, daily maintenance, and troubleshooting. Intended Audience This document is intended for: Technical Support Engineer Maintenance Engineer End User ... -
Page 3: Table Of Contents
Contents About this document ....................i 1 Preface ........................1 1.1 Important note ........................ 1 1.2 Check the installation environment ................2 2 Specification ......................3 3 VHDIPL Networking solutions ................5 4 Installation ........................ 6 4.1 Estimated Storage Times ....................6 4.2 Front panel description .................... - Page 4 10.6 VHDIPL setup ......................49 10.7 Network camera setup ....................50 11 HD-IP Access for VHDIPL ................. 51 11.1 Start and run ....................... 51 11.2 Login .......................... 51 11.3 System main interface ....................52 11.4 VHDIPL management ....................52 11.5 Playback ........................61 12 NVR Client………………………………………….……………………………63...
-
Page 5: Preface
Preface 1.1 Important note Thank you for choosing the Concept Pro VHDIPL Network Video Recorder (NVR). Please read this user manual carefully before installing the VHDIPL. Never open or disassemble the device unless it is by a qualified or professional ... -
Page 6: Check The Installation Environment
1.2 Check the installation environment Installation environment Before installing the device, check the installation environment according to Table 1-1 Table 1-1 Installation environment check items Check item standard Moisture-resistant The relative environment humidity must be in the range of 0% to 95%. -
Page 7: Specification
Specification System Operating system Embedded Linux 2.6 Embedded CMS system, user friendly interface, easy to use Quick configuration and simple operation. Plug-and-play, auto detection and schedule setup. Features Real-time fault alarm mechanism for timely reporting of hard disks, networks, fault information. - Page 8 G711_A,G711_U Audio formats Network Transmission control Embedded network bandwidth adaptive flow control technology. Interface 2 RJ45 10M/100Mbps network port. Web server supported with Flash technology for and popular browsers in real-time monitoring, video playback, and system configuration. Network protocol RTP/RTCP, TCP/UDP, ONVIF, HTTP, DHCP, DNS Client, RTMP for Flash Video Characteristic Ambient temperature: 0 °...
-
Page 9: Vhdipl Networking Solutions
VHDIPL Networking solutions The VHDIPL has 9 Ethernet ports, one is RJ45 without POE, others are POE supported ports. The 8 POE ports are for connecting to the cameras. Cameras should not exceed a distance of 100 metres from the POE Ports. POE port The POE ports on the VHDIPL can connect to the cameras directly. -
Page 10: Installation
Installation 4.1 Estimated Storage Times Table 4-1 Estimated video storage time HDD capacity Video stream Cameras Days recorded 2x4TB D1 1.5Mbps 2x4TB 720p 3Mbps 2x4TB 1080p 4.5Mbps... -
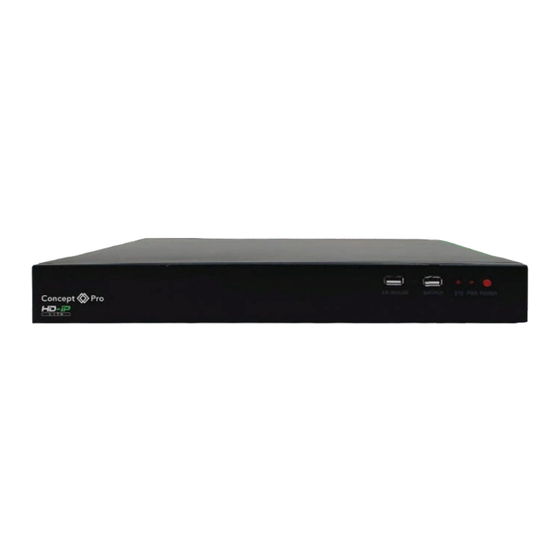
Page 11: Front Panel Description
4.2 Front panel description Figure 4-1 shows the front panel of the VHDIPL. Table 4-1 shows the description of the front panel. Figure 4-1 Front panel Table 4-2 Front panel description Name Description USB Interface For connecting external mouse and keyboard. USB Interface For connecting USB memory stick. - Page 12 Table 4-2 Real panel description Name Description Power AC110/220V power in. Power button Power ON/OFF. Ground connector Safety ground connector. POE Ethernet ports 8ch POE Ethernet ports for IP cameras Ethernet LEDs POE Ethernet port LEDs. Alarm out 1ch Alarm Out, for future development. Alarm In 1ch Alarm In, for future development.
-
Page 13: First Boot
4.4 First boot Make sure that the VHDIPL has the correct amount of power. Once the VHDIPL starts and after the self test, (which takes about 2 minutes) the results are displayed on the screen shown in figure 4-3. Figure 4-3 Device power on If an error occurs while the VHDIPL is in self-test, this mode will stay in the lower right of the screen, you can choose to continue or shutdown. -
Page 14: Shutdown
4.5 Shutdown Shutdown process, the system prompts are off, do not cut off the power. Do not remove the power cables while the VHDIPL is still on. If the device is logged into the main interface, you can click the top right ... - Page 15 Adjustment Steps: Click change on login interface and find the adjustment interface shown in figure 4-5. Step 1 Figure 4-5 Monitor Adjustment Setup Choose the type of resolution in the resolution drop-down box. Step 2 The VHDIPL will automatically switch to the selected resolution and show the following dialog options Yes or Cancel.
-
Page 16: Add Network Cameras
Exit display interface Back to Login interface 4.7 Adding Network Cameras The VHDIPL-8 allows you to connect a maximum of 8 networked cameras. The total recording bit rate is 36 Mbps and the live bit rate is 36Mbps. The VHDIPL will support a maximum of 8 cameras at 1080p resolution with ... -
Page 17: Login
4.8 Login Login to the VHDIPL using the following steps: In the login screen shown in figure 4-6, enter a user name (default is admin), password Step 1 (default is admin). Figure 4-6 Login screen Click Login and enter the main interface. Step 2... -
Page 18: Quick Configuration
Quick configuration To quickly configure, use the quick configuration interface of the VHDIPL. It provides: The network configuration, disk management, date and time configuration, search network cameras, video configuration, camera network configuration stream configuration and motion detection configuration. Enter the quick configuration interface, as shown in figure 5-1. - Page 19 Area 2:Managing camera certification accounts. The certification accounts used to log on to the network cameras. Only certified network cameras can be added to VHDIPL system. System cameras will have a default user account: admin and default password: admin. Click to add a network camera certification account.
- Page 20 Area 5:Search cameras and delete cameras. The VHDIPL-8 will automatically add the 8 cameras once they are connected to the POE ports. To remove the camera in the camera list, click the check box , select the camera and then click delete to remove, shown in figure 5-1. Area 6:Configuring the network cameras.
- Page 21 Figure 5-2 Stream Quick Configurations 2. Click the Apply button to set the current parameters to the devices. Set to detect motion detection alarm, shown in figure 5-1. 1. Click motion detection, and the motion detection alarm dialog pops up. 2.
-
Page 22: Live Video
Live video To input the username (default is admin) and password (default is admin), click login. Enter the live video interface, shown in figure 6-1. Figure 6-1 Live Video Interface In the live video interface, you can select the cameras from the left list to view live video. - Page 23 Intelligent adaptive mechanism of stream frame rates This system provides the intelligent adaptive mechanism of stream frame rates. When you are selecting the camera to watch in live video, the system will select the suitable stream according to system’s own decoding ability and live video windows. It will always ensure the system works with the best performance.
-
Page 24: Ptz Control
Items Name Content : Automatic Full Screen control Live video Right mouse click on the live display will allow the changing of some display information. Start the audio, bookmark the current video footage for ease of finding later, change the video stream and access the sensor configuration set up menu of the camera being viewed. - Page 25 Click button to close the PTZ configuration menu. Click button to exit the PTZ control menu. Live video fast operation Right click mouse button to activate figure 6-3 interface, call the menu to: Show Title, Show Stream Information, Start Audio, Stream, Sensor Configuration etc. Figure 6-3 Live video monitor menu...
-
Page 26: Playback
Playback 7.1 Recording playback Recording playback will playback the video which is recorded to the local HDD, shown in figure 7-1. Figure 7-1 Local playback Playback operations steps. Choose the camera to playback. Step 1 Click one from the list on the left hand side, icon means this camera has been selected, means camera has not been selected. -
Page 27: Recording Backup
Recording shown. Step 3 After selecting the device and date, at the bottom area of the live video, it will display the recording status. The scale on the time axis shows the recording time period, blue means the current playback video time. The playback video will be displayed above the time axis, blue means retain video, red means alarm video, yellow means label video, green means normal video. - Page 28 Figure 7-3 Backup Path Browser In the backup path, it will display the current backup path, if it is blank, and then select one option. In the below list it shows the available storage paths. The VHDIPL will support two kinds of the storage: Network Attached Storage (NAS) and USB storage device (USB memory stick or Removable HDD).
- Page 29 7. Double click the network disc path list, select the backup path, click ok button save and exit. USB Storage device 1. Insert USB memory stick or removable HDD to the USB interface. 2. The VHDIPL will detect the USB storage device automatically, after detection, it will show USB storage device.
- Page 30 Step 4 View backup file progress Check the backup status in backup interface, indicates backup is in processing, indicates wait for backup, indicates backup stopped, indicates backup failed, means backup finished. Step 5 On a computer Enter the backup directory folder, enables the user to check all the backup files. Enter the backup path folder to check the backup files, shown in figure 7-6.
-
Page 31: Alarm Searching
Alarm searching Alarm searching Interface Operation steps Step 1 Click to enter the alarm management interface shown in figure 8-1. Step 2 Select the camera which you want to search the alarm information from the list on the left. left. Indicates this camera has alarm information. - Page 32 Recording shown. Step 5 When you have selected the time and date you can play the alarm recording. Alarm triggers playback. Step 6 Select the alarm trigger recording files, click button to start playing. Alarm recording backup Step 7 Select the recorded files and click backup button to create backup files.
-
Page 33: Setup
Setup Setup includes the VHDIPL setup and the camera setup. 9.1 VHDIPL setup Click NVR setup in upper right to show the VHDIPL configure interface shown in figure 9-1. Figure 9-1 NVR setup 9.1.1 Device information When in the VHDIPL setup interface, we can see the system information shown in Figure 9-1. - Page 34 Hardware Version Software Version Channel Quantity Disk Quantity Only the device name can be edited, other parameters can’t be edited. 9.1.2 Camera Management You can see and delete cameras via Camera Management. Select NVR setup > Camera Management Enter the camera management interface, shown in Figure 9-2;...
- Page 35 9.1.3 System Warning Select Setup > System warning Enter the system warning shown in figure 9-3. Figure 9-3 System Warning Information. Warning information searching steps. Select the warning type (Disk Alarm, Record Alarm, All). Step 1 Input search begin and end time. Step 2 Click , then the results will be displayed.
- Page 36 Figure 9-4 Network Interface Configure the network parameters, shown in table 9-1. Step 2 Table 9-1 Network parameters Items Introduction How to configure Get IP address It will get the IP address from DHCP server Switch DHCP to on by automatically automatically.
- Page 37 9.1.5 Live video layout You can configure the live video layout in order to call the live video quickly. Live video layout can do the below operations: Create a new layout View a current layout Edit a current layout Create New layout The steps to create new layout are shown below: NVR Setup >...
- Page 38 Figure 9-6 New layout Input the New layout name Step 3 Configure the New layout position, you can select the Shared layout or my layout. Step 4 Shared layout means the layout for all the users. My layout means the layout for current login user only. Shared layout can only be created by authorized users.
- Page 39 9.1.6 Recording You can configure the Recording by Schedule, Alarm Recording, Recording Quality, and Recording Policy. Choose Setup > Record > Record Policy. Step 1 Enter the Record Policy shown in figure 9-7. Figure 9-7 Record Policy Enable the record (Enabled as Default) Step 2 Please select √...
- Page 40 Figure 9-7 Record Policy Configuration Interface. Configure Record Policy Step 5 When configuring the record policy, there are two policies, 24 x 7 or Schedule. If you select record by schedule, you need to configure the schedule plan. Follow the steps below.
- Page 41 Figure 9-8 Schedule record configuration To enable the alarm record Step 6 If you do not want to enable the alarm record, then just set the button to OFF. If you want to enable the alarm record, then set the button to ON. To enable the audio Step 7 ...
-
Page 42: Account Management
9.1.7 Storage policy In storage policy interface, you can do the following operations: Check the current HDD status. Check the HDD information details include: HDD capacity and free space. Unload and format operations. When you first use the VHDIPL you will need to format the HDD otherwise recording will not be written to the HDD. - Page 43 System Management Shutdown Record service Set shared layout Accounts > Group Step 1 Enter the Group configuration interface, shown in figure 9-10. Figure 9-10 Group configuration interface Add and Delete Groups Step 2 Add privilege group. 1.
- Page 44 User setting You can add and delete users. The users which have the privilege of system configuration can unlock the system, it may be locked by inputting an incorrect password more than 3 times. System configuration > Account > User Step 1 Enter the user interface shown in figure 9-11.
-
Page 45: Camera Management
Unlock the locked user When logged on to the system, if the user inputs the wrong password more than 3 times, then the system will lock the user, but only the administrator can unlock the user. 9.1.9 Date and Time Configuration You can set the Date and Time and the Date and Time format of VHDIPL. -
Page 46: Web Browser Access For Vhdipl
Web Browser Access for VHDIPL VHDIPL Web Server, built-in flash technology supports IE, Chrome, Firefox, Safari and other popular browsers. It can be quickly be configured through the Web. Live preview, video playback, alarm retrieval, VHDIPL configuration, camera configuration and other operations can be configured through a web browser. 10.1 Login The VHDIPL default IP address is: 192.168.0.120. -
Page 47: Operation Read
Administrator user ID: admin, administrator password: admin. User names and passwords are case-sensitive. Please modify the password after the first login. After three failed attempts of inputting the incorrect password the user will be locked, and will no longer be able to continue to log in until the administrator can unlock the user. - Page 48 VHDIPL web will only support 8 channels live video and 1 channel playback for one user login (maximum ability), with other users it will only support 1 channel Live video and 1 channel playback (minimum ability). The first login user will be the maximum ability user. Other users are the minimum ability users, when the maximum ability user logs out then the next user login will be the maximum ability user.
-
Page 49: Live Video
Figure 10-6 Set User Video Ability If other users are set to a maximum ability the interface will go back to figure 10-6 and you can’t set the ability anymore. If a setting failed then a failed message will be displayed. -
Page 50: Playback
10.4 Playback You can play back the video by the playback interface. Operation Steps Click Playback to enter the playback interface shown in figure 10-8. Step 1 Select the camera to playback. Step 2 Click the camera list, means device was chosen, means device was not chosen. - Page 51 Figure 10-8 Playback...
-
Page 52: Alarm Search
10.5 Alarm Search Click the Alarm Search in the Alarm Management Interface shown in figure 10-9. Figure 10-9 Alarm search Choose the device on the left that you want to see the alarm information. Step 1 Choose the alarm type by the bar Type. Step 2 Choose the date. -
Page 53: Vhdipl Setup
10.6 VHDIPL setup Click the NVR Setup on the web browser enter the VHDIPL configure interface shown in figure 10-10. For a detailed setup please refer to chapter 9 VHDIPL setup. Figure 10-10 VHDIPL setup interface... -
Page 54: Network Camera Setup
10.7 Network Camera Setup Click the Network Camera Setup on the web, enter the Camera Configuration interface shown in figure 10-11. For a detailed setup please refer to the VIPC-MD720 and VIPC-MB720 User Manual. Figure 10-11 Camera Configure interface... -
Page 55: Hd-Ip Access For Vhdipl
HD-IP Access for VHDIPL Operation condition Please install HD-IP client from the USB stick provided. The HD-IP client installation methods will be in the "Network Video Management System manual” 11.1 Start and Run If you have installed HD-IP please run it by this icon to the Login interface. -
Page 56: System Main Interface
11.3 System main interface After entering the correct user name (admin) and password (admin), click Login to the system main interface shown in figure 11-2. Figure 11-2 Main Interface 11.4 VHDIPL management After entering main interface, select Device Manager > NVR management go to VHDIPL configure interface. - Page 57 Only the Device Name can be edited, other parameters can’t be edited. Operation Steps Select Device Manager > NVR management > Device Info Step 1 The VHDIPL information is shown in figure 11-3. Figure 11-3 Device info interface Set Device Name, Enter the name and click Set. Step 2...
-
Page 58: Date And Time
11.4.1 Login Once logged into the interface you can change the default user name and password. Operation Steps Select Device Manager > NVR management > Login in to enter the interface shown in Step 1 figure 11-4. Figure 11-4 Login Interface Enter the user name and password, and click Save to exit. - Page 59 Figure 11-5 Date and Time Settings Change the VHDIPL Date and Time Step 2 Click the Set button behind the Current Computer Time to sync the time from the PC to the device. Set the Computer current time to the VHDIPL time. ...
-
Page 60: Device Management
11.4.3 Device Management Add/Delete the IP cameras to the VHDIPL through the Device management. Select Device manager > VHDIPL management > Device management enter the Step 1 device manager interface shown in figure 11-6. Figure 11-6 Device Management Select the cameras and click Add. Step 2 Call the adding device interface, shown in figure 11-7 to add all the network cameras. - Page 61 Figure 11-7 Add Device...
- Page 62 11.4.4 VHDIPL Record VHDIPL can set the Record Policy and Record Storage. Record Policy Select Device Manager > NVR management > Record > Record Policy and enter the Step 1 Record Policy interface shown in Figure 11-8. Figure 11-8 Record Policy Select the device and click Configure.
- Page 63 Figure 11-9 Record Storage Select the Hard Disk and click Modify enter the path setting interface shown in figure Step 2 11-10. Figure 11-10 Hard Disk Setting...
- Page 64 Select Enable. Step 3 Select the Disk Group ID. Step 4 Input the Usable Space. Step 5 Click Modify to save the configuration and exit the interface. Step 6 Select the file system. Step 7 Click disk format to format the disk. Confirmation will be required, if yes, then it will Step 8 start to format.
-
Page 65: Playback
11.5 Playback HD-IP can remotely playback the video from the VHDIPL. 11.5.1 Video Search and playback In HD-IP click Playback then click to enter the VHDIPL playback shown in figure 11-12. Figure 11-12 Playback Means: Play, Pause, Stop, back 1 frame, forward 1 frame, 1/2 fast forward, ¼ fast forward, 1/8 fast forward, 1/16 fast forward, 2 x fast forward, 4 x fast forward, 8 x fast forward, 16 x fast forward. - Page 66 11.5.2 Backup Enter the Backup interface, select the video that needs to be backed up by dragging the mouse on the time axis and right click, click backup to start the video backup. Blue file on time axis is the video chosen for backup. Press Ctrl to select more parts of the video.
-
Page 67: Nvr Client
NVR Client You need to install NVR Client on the computer, which is on the UDB stick provided. 12.1 Start and Run If you have installed NVR Client please run it by this icon 12.2 Login When the Login interface pops up, enter default user name: admin and Password: admin shown in figure 12-1 Figure 12-1 Login interface 12.3 System main interface... -
Page 68: System Management
Figure 12-2 Main Interface 12.4 System Management After entering the main interface, select System Manager. 12.4.1 Accounts Accounts interface can change the default user name and password. Operation Steps Select System Manager->Accounts->User interface shown in figure 12-3... -
Page 69: Nvr Management
Figure 12-3 Accounts interface Enter the user name and password, and click Apply to save. 12.4.2 NVR Management Add NVR to system. Select System Manager->NVR management Figure 12-4 NVR Management Add NVR by Search or Add manually. - Page 70 Click the Search button and then click Scan to search the NVR within the same LAN or click Add to add the NVR by IP address. 12.4.3 Live Video Layout Modify the Layout by customize. Select Device manager->NVR management->Live Video Layout shown in figure 12-5. Figure 12-5 Live Video Layout Click New, and select a 1/4/6/9/16 default layout Select the cameras from the NVR, and drag the camera to the default layout to...
- Page 71 12.4.4 System Warning To check the Alarm information, select System Management->System Warning, shown in Figure 12-7. Figure 12-7 System Warning Select the NVR, and select the Type Set the Begin Time and End Time->Click Search 12.4.5 System Tip Select System Management->System Tip shown in figure 12-8. To turn on/off System Warning Tip and Security Alarm Tip.
-
Page 72: Live Video Playback
Figure 12-8 System Tip 12.5 Live Video and Playback NVR Client can remotely view live and playback mode. 12.5.1 Live Video Click Live Video , and drag the camera to the layout for live video show in figure 12-9. Figure 12-9 Live Video... - Page 73 12.5.2 Playback Click Playback to enter the Playback interface. Choose the camera Click the date, if there is a recording then it will be green. Click Play show in figure 12-10. Figure 12-10 Playback...
-
Page 74: Hd-Ip Lite App
HD-IP Lite App 13.1 HD-IP Lite Android device How to download the HD-IP Lite on an Android device From your smart Select Install Click on Accept Once installed click on Open phone access the Play Store and search for HD-IP Lite. -
Page 75: Hd-Ip Lite Ios Device
From your smart phone Install to install the access the App Store Open app, you may need to and search for HD-IP enter your apple Lite. account details. For more information about the HD-IP Lite app, please see the HD-IP Mobile Viewer Guide. -
Page 76: A.q
F.A.Q 1. Why does the device’s self-test interface not move? Method One: Check the VHDIPL is equipped with a HDD. Method Two: Check the VHDIPL’s HDDs are detected. Method Three: Check the VHDIPL’s HDDs has not been damaged. 2. Why is the display interface incomplete or location offset? Method One: Automatically adjust the display function.
Need help?
Do you have a question about the VHDIPL-8 Concept Pro and is the answer not in the manual?
Questions and answers