Table of Contents
Advertisement
Advertisement
Table of Contents

Summary of Contents for Renovator twist-a-saw
- Page 1 SAFETY AND OPERATING MANUAL FOR THE STANDARD AND DELUXE KIT...
- Page 2 Twist-A-Saw™ Manual...
-
Page 3: Table Of Contents
United States Technical data . . . . . . . . . . . . . . . . . . . . . . . . . . . 11 Parts of the Twist-A-Saw . - Page 4 Power indicator light . . . . . . . . . . . . . . . . . . . . . . . . . . . . . . . . . 44 Looking after your Twist-A-Saw .
-
Page 5: Welcome
Congratulations on purchasing your Twist-A-Saw rotary tool . Before using it, ™ please read this manual carefully . This manual covers how to safely use your Twist-A-Saw rotary tool, as well ™ as tips for using and maintaining it . -
Page 6: Safety
Safety Safety first! Your Twist-A-Saw is an advanced power tool . Your enjoyment will rely on ™ observing a high level of personal safety as well as protecting the safety of others . This section sets out important safety guidelines for operating your Twist-A-Saw ™... -
Page 7: Electrical Safety
Safety guideline • Power tool plugs must match the outlet . Never modify the plug in any way . Do not use any adapter plugs with the Twist-A-Saw ™ • Avoid body contact with earthed or grounded surfaces, such as pipes, radiators, ranges and refrigerators . -
Page 8: Personal Safety
™ Safety guideline • Stay alert, watch what you are doing and use common sense when operating the Twist-A-Saw . Do not use a power tool while you are ™ tired or under the influence of drugs, alcohol or medication. -
Page 9: Dust Safety
Safety Dust safety Some dust created by Twist-A-Saw from sanding, sawing, grinding, drilling ™ and other construction activities on certain materials may contain chemicals known to cause cancer, birth defects or other harm . Some examples of these chemicals are: Lead from lead-based paint . -
Page 10: Power Tool Use And Care
. • Only use accessories that are recommended for Twist-A-Saw ™ • Never use the Twist-A-Saw around flammable or volatile ™ substances or use any volatile substance to clean the Twist-A-Saw ™ Page 8 Twist-A-Saw Manual ™... -
Page 11: What's Included
What’s included Twist-A-Saw components ™ The following components are included with your Twist-A-Saw ™ Part Description Twist-A-Saw rotary ™ tool Twist-A-Saw Multi- ™ Purpose Handle (includes: Depth Guide and Fence Guide) Twist-A-Saw Circle ™ Cutter Twist-A-Flex rotary ™ tool attachment Continued on next page…... -
Page 12: Twist-A-Saw ™ Components
6 .35mm (1/4”) Collet 4 .76mm (3/16”) Collet 3 .2mm (1/8”) Collet Accessories For a list of the accessories included with Twist-A-Saw , refer to the ™ separate Twist-A-Bits workshop guide . Note: All components and accessories listed in this manual are manufactured using metric measurements . -
Page 13: Australia & New Zealand Technical Data
This Device complies with part 15 of the FCC Rules, Operation is subject to the following two conditions: (1) This device may not cause harmful interference, and (2) this device must accept any interference received, including interference that may cause undesired operation . Twist-A-Saw Manual Page 11 ™... -
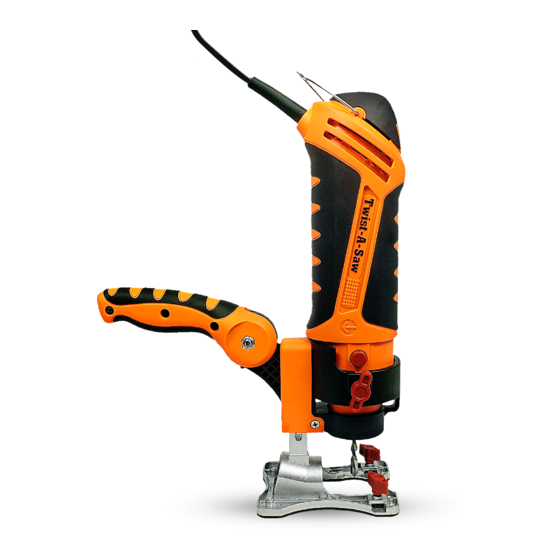
Page 14: Parts Of The Twist-A-Saw
What’s included Parts of the Twist-A-Saw ™ The following diagrams show the labelled parts of the Twist-A-Saw rotary ™ tool, Multi-Purpose Handle and Twist-A-Flex rotary tool attachment . ™ Twist-A-Saw™ rotary tool and Multi-Purpose Handle Hanging Loop Comfort Control Grip... - Page 15 What’s included Twist-A-Saw Circle Cutter ™ ON/OFF Switch Variable Speed Dial Collet Nut Circle Cutting Handle Internal Mounting Pivot Pin Locking Knob Disc Centre External Circle Cutter Guide Pivot Mounting Disc Twist-A-Flex rotary tool attachment ™ Flexible Shaft Twist-A-Flex™ Tail Spindle Locking Hole Twist-A-Flex™...
-
Page 16: Setting Up
Setting up Which parts do I need? Before you set up the Twist-A-Saw , you must first determine which ™ components you need for your task . Part Description The Twist-A-Saw Twist-A-Saw contains the motor, so this will ™ ™... -
Page 17: Changing The Collets
The Ø 4 .76mm (Ø 3/16”) collet secures the Ø 4 .76mm (Ø 3/16”) ✔ cutting bits . Note: Ø is the symbol for ‘diameter’ . Follow the steps below to change the collets on your Twist-A-Saw ™ Part Action Remove any bits from the Twist-A-Saw , if applicable . - Page 18 Setting up Changing the collets (1) Collet Nut (2) Collet (3) Spindle Page 16 Twist-A-Saw Manual ™...
-
Page 19: Installing Cutting Bits
Setting up Installing cutting bits Follow the steps below to change the cutting bits on your Twist-A-Saw ™ Warning! Cutting bits and router bits are extremely sharp . Handle with care . Part Action Remove plastic coating on cutting bit, if applicable . - Page 20 . Use the Ø 16mm (Ø 5/8”) collet wrench to tighten the collet nut securely . (1) Locking Button (2) Collet Nut (4) Cutting Bit (3) Collet Wrench Cutting Flutes Page 18 Twist-A-Saw Manual ™...
-
Page 21: Attaching The Multi-Purpose Handle
Setting up Attaching the Multi-Purpose Handle Always use the Multi-Purpose Handle when operating your Twist-A-Saw ™ Because Twist-A-Saw spins as it cuts it can ‘pull’ or ‘drift’ to the left . ™ Operating the Twist-A-Saw with two hands combats this, giving you greater ™... - Page 22 Setting up Attaching the Multi-Purpose Handle (4) Key (3) Bottom Of The Twist-A-Saw ™ (1) Collar Locking Knob (5) Keyway (2) Multi-Purpose Handle Collar Page 20 Twist-A-Saw Manual ™...
-
Page 23: Adjusting The Comfort Control Grip
Position the Comfort Control Grip: horizontally to use Twist-A-Saw as a regular jigsaw ™ ✔ vertically or on an angle to use Twist-A-Saw for freehand cutting, or ™ ✔ upside down to provide a more comfortable, practical grip, depending ✔... - Page 24 Setting up Adjusting the Comfort Control Grip (1) Comfort Control Grip Locking Knob (2) Comfort Control Grip Adjusting the Comfort Control Grip angle Page 22 Twist-A-Saw Manual ™...
-
Page 25: Adjusting The Depth Guide
Tighten the Depth Guide locking knob securely . Re-check the bit depth before cutting . Ensure both the bit and the collet are securely fastened . (1) Depth Guide Locking Knob (2) Depth Guide Foot Twist-A-Saw Manual Page 23 ™... -
Page 26: Attaching The Circle Cutter
. Hand-tighten . Note: Make sure the boss (6) of the external mounting disc goes through and sits firmly in the mounting hole. Hand- tighten only . Do not over-tighten . Continued on next page… Page 24 Twist-A-Saw Manual ™... - Page 27 . (1) Internal Mounting Disc (3) Multi-Purpose Handle Foot (7) Pivot Pin Knob (4) Circle Cutting Guide Mounting Hole (6) Boss (5) Pivot Pin (2) External Mounting Disc Twist-A-Saw Manual Page 25 ™...
-
Page 28: Attaching The Fence Guide
Multi-Purpose Handle foot . Slide the adjustable Fence Guide (2) into the Multi-Purpose Handle foot . Set the adjustable Fence Guide depth and tighten the locking knobs . (1) Fence Guide Locking Knobs (2) Fence Guide Page 26 Twist-A-Saw Manual ™... -
Page 29: Installing The Vacuum Hose
Part Action Insert the Vacuum Hose (1) into the vacuum collar (2) . Insert the nozzle of your vacuum cleaner into the Twist-A-Saw vacuum hose dock (3) . ™ Note: If your vacuum cleaner nozzle does not match the Twist-A-Saw vacuum hose dock, use a piece of irrigation ™... -
Page 30: Attaching The Twist-A-Flex
. Refer to Turning the Twist-A-Saw on and off on ™ page 30 . Remove existing bit if one is already in Twist-A-Saw ™ page 17 . Ensure the Ø 6 .35mm (Ø 1/4”) collet is in the spindle . -
Page 31: Installing A Bit In The Twist-A-Flex
3/16”) collet that will take all accessories with a Ø 4 .76mm (Ø 3/16”) shank . Rotate the collet by hand to make sure the installed bit does not wobble . (2) Locking Hole (4) Bit (1) Shaft Locking Pin (3) Collet Nut Twist-A-Saw Manual Page 29 ™... -
Page 32: Using The Twist-A-Saw
Using the Twist-A-Saw ™ Turning the Twist-A-Saw on and off ™ Follow the steps below to turn your Twist-A-Saw on and off . ™ Part Action When Twist-A-Saw is connected to mains power the power ™ indicator light (1) glows GREEN . -
Page 33: Turning The Twist-A-Saw ™ On And Off
™ If Twist-A-Saw won’t turn on ™ If the power indicator light turns red or starts flashing, or if the Twist-A-Saw ™ will not start, refer to Tips and troubleshooting on page 43 . Twist-A-Saw Manual Page 31... -
Page 34: Changing The Variable Speed Dial
Using the Twist-A-Saw ™ Changing the Variable Speed Dial The Variable Speed Dial lets you change the speed that the bit turns in increments of 5,000 revolutions per minute (/min) . The lowest setting is 5 (5,000/min) and the highest setting is 25 (25,000/min) . -
Page 35: Making Practice Cuts
. This will help you select the speed that will produce the smoothest cut . Follow the steps below to make a practice cut with your Twist-A-Saw ™... - Page 36 . ™ Turn Twist-A-Saw ON . ™ Warning! Make sure you are holding Twist-A-Saw firmly with two ™ hands before turning the power switch ON . The starting torque will cause Twist-A-Saw to twist or jump to the ™...
- Page 37 ™ the work, and use slow and steady pressure as you cut . Note: Always cut in a clockwise direction, except when cutting drywall/plasterboard . When you have finished the cut, switch the Twist-A-Saw off . ™ Wait until Twist-A-Saw has come to a complete stop and ™...
-
Page 38: Cutting Outlet Openings In Drywall/Plasterboard
Refer to Adjusting the Depth Guide on page 23 . Hold Twist-A-Saw firmly with both hands and switch it ON. ™ Refer to Turning the Twist-A-Saw on and off on page 30 . ™ Continued on next page… Page 36... - Page 39 Tracing the inside edge of the box, move Twist-A-Saw ™ upward . Maintain light pressure on the box edge . As you feel the bit reach the top right corner, move Twist-A-Saw ™ the left . Maintain light pressure on the box edge, and continue to trace counter-clockwise around the box until the shape is cut .
-
Page 40: Using The Circle Cutter
Using the Twist-A-Saw ™ Using the Circle Cutter Follow the steps below to use the Circle Cutter to cut circles with your Twist-A-Saw ™ Part Action Mark the centre of the circle to be cut . Drill a Ø 4 .76mm (Ø... - Page 41 Using the Twist-A-Saw ™ Using the Circle Cutter Part Action Place the edge of the Multi-Purpose Handle foot on the workpiece at a 45° angle . Align the centre guide pivot pin with the pilot hole . Switch Twist-A-Saw ON on page 30 .
- Page 42 Purpose Handle foot flat on the material. Carefully rotate the Circle Cutter handle and Twist-A-Saw around the centre ™ guide pivot pin . When you have finished the cut, switch Twist-A-Saw off . ™ Wait until Twist-A-Saw has come to a complete stop and ™...
-
Page 43: Using The Twist-A-Flex
™ the workpiece . Note: When etching and engraving, etch with the side of the bit, not the tip . Note: If you can, avoid laying Twist-A-Saw on the ™ workbench while working with the Twist-A-Flex . Use the ™... - Page 44 Using the Twist-A-Saw ™ Using the Twist-A-Flex rotary tool attachment ™ Warning! Never bend the Twist-A-Flex rotary tool shaft to a radius of less than ™ Ø 100mm (Ø 4”) when operating, otherwise overheating can occur . Whenever possible, store the Twist-A-Flex without bends .
-
Page 45: Tips And Troubleshooting
✔ It’s easy to increase speed, so if in doubt, start slow . ✔ Using the right speed will protect and prolong the life of Twist-A-Saw ™ ✔ bits . Applying too much pressure or speed will raise the temperature of the bit and shorten its life . -
Page 46: Power Indicator Light
™ hour before turning back on . Power indicator Switch was Turn the power switch off light flashes accidentally left ON and remove Twist-A-Saw ™ green when Twist-A-Saw from the workpiece, then ™ was plugged into turn the switch back on . -
Page 47: Looking After Your Twist-A-Saw
. Do Not use any liquids or flammable substances to clean your ✔ Twist-A-Saw . These substances may damage the Twist-A-Saw ™ ™ Use a clean cloth to remove dirt, dust, oil, grease, etc . Use safety goggles when using an air jet to blow dust out of ✔... - Page 48 Looking after your Twist-A-Saw ™ Servicing and repairs Remove the power cord from the power socket before carrying ✔ out any servicing, adjustments or maintenance to Twist-A-Saw ™ attached accessories . There are no user-serviceable parts in Twist-A-Saw ™ ✔...
-
Page 49: Warranty
This warranty applies only to the original purchaser and may not be transferred . Replacement items will be covered by the limited warranty for the balance of the warranty period from the date of the original purchase . Continued on next page… Twist-A-Saw Manual Page 47 ™... -
Page 50: Dispute Resolution
This Limited Warranty shall be governed by the laws of the State of California without giving effect to any conflict of laws principles that may provide the application of the law of another jurisdiction . Continued on next page… Page 48 Twist-A-Saw Manual ™... - Page 51 Parnell, Auckland 1151 Fax: +64 9 306 8203 NZ Customer Care: 0800 002 999 United States Contact Brand Developers USA, LLC 2440 Clements Ferry Road, Charleston, South Carolina 29492, USA USA Customer Care: 1800 200 3111 Twist-A-Saw Manual Page 49 ™...
- Page 52 Exclusively Distributed by: Brand Developers Australia • New Zealand • United States Brand Developers Aust Pty Ltd 461 Plummer Street, Port Melbourne, VIC 3207, AUSTRALIA AUST Customer Care: 1800 890 840 Brand Developers Limited Unit H, 686 Rosebank Road, Avondale, 1026 Auckland, NEW ZEALAND NZ Customer Care: 0800 002 999 Brand Developers USA LLC 2440 Clements Ferry Road, Charleston,...
Need help?
Do you have a question about the twist-a-saw and is the answer not in the manual?
Questions and answers
hi when I switch on the Twist a Saw it starts up for a second and then stops and the light goes red. then I switch of and on again and it do the same.
The Renovator Twist-A-Saw may be stopping with a red light due to blocked vents or an overheated motor. To fix this, turn off the power switch, unplug the power cord, remove the tool from the workpiece, and ensure the vents are clear.
This answer is automatically generated