Table of Contents

Subscribe to Our Youtube Channel
Related Manuals for MAXTEK 67531

Summary of Contents for MAXTEK 67531
- Page 1 Bluetooth Car Stereo with 7” Flip up Multimedia Display MODEL NUMBER: 67531 USER GUIDE After Sales Support UK/N.IRELAND HELPLINE N 01270 508538 REP.IRELAND HELPLINE N 1800 995 036 WEBSITE: www.quesh.co.uk EMAIL: enquiries@quesh.co.uk...
-
Page 2: Table Of Contents
Contents Welcome Section General Information & Safety Instructions Contents & Features 4-5. Installation Wiring Connection Fascia Controls Remote Control 9-10. Radio Operation • Operating the Remote • Choose Radio Band • Radio Tune / Seek Function • Mono / Stereo Reception Control •... - Page 3 Contents 14-15. USB/SD Operation • Playing Media • Navigate Files AUX Operation • AUX Inputs SWC (Steering Wheel Control) • SWC Inputs • EQ Inputs 19-21. Settings • Audio Settings • Date Settings • Default Settings • General Settings • System Settings Movie Options •...
-
Page 4: Welcome Section
Welcome Section Congratulations! You have made an excellent choice with the purchase of this quality MAXTEK product. ® By doing so you now have the assurance and peace of mind which comes from purchasing a product that has been manufactured to the highest standards of performance and safety, supported by the high quality standards of Quesh Ltd. -
Page 5: General Information & Safety Instructions
General Information & Safety Instructions To ensure safety while driving and to comply with UK laws, drivers should not watch video or operate the video device while driving. It is illegal to drive while operating a hand-held phone or a similar device. This applies even if you’re stopped at traffic lights or queuing in traffic. -
Page 6: Contents & Features
Contents & Features Contents 1 x Deckless Multimedia Player 1 x Mounting Cradle 1 x Remote Control 1 x Media Connection Cable 2 x Installation Keys 1 x ISO Cable Features • 7” TFT touch screen display (800x480pxl) • Bluetooth (Hands Free & Audio) •... -
Page 7: Installation
Installation WARNING! Disconnect the negative terminal from the battery before starting installation. Consult the vehicle owner’s manual for detailed instructions. Please Note: Mark the polarity of the existing speaker wires before disconnecting battery. DIN Front Mount 1. After removing the old radio and mounting sleeve, insert supplied mounting sleeve into opening. -
Page 8: Please Note
Installation WARNING! Disconnect the negative terminal from the battery before starting installation. Consult the vehicle owner’s manual for detailed instructions. Parking Wire (Green) Once connected correctly you will be able to view video media on the screen when the parking brake has been engaged and the vehicle has power. -
Page 9: Wiring Connection
Wiring Connection Make sure that you have a good earth connection. A good earth connection will eliminate most electrical noise problems. A good earth connection requires a tight connection to the vehicle's metal chassis. The area around the earth connection should be clean, bare metal without rust, paint, plastic, dust, or dirt for a good electrical connection. -
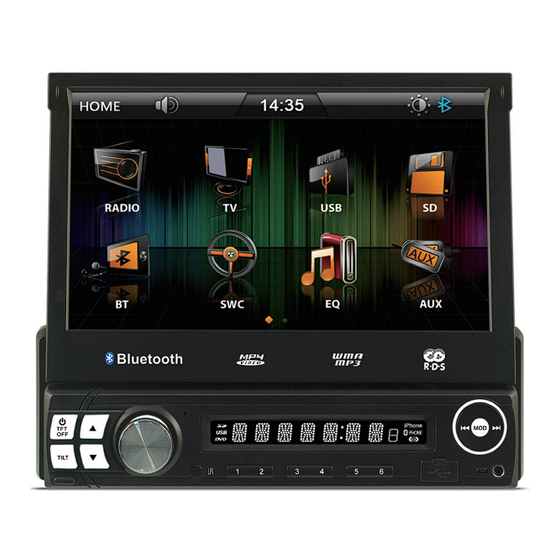
Page 10: Fascia Controls
Fascia Controls 1. TFT Display 10. Open 2. Power/TFT Off 11. Down 3. Up 12. Volume/Select Dial 4. Microphone 13. IR sensor 5. LCD Screen 14. 1-6 Presets 6. Skip Back 15. USB Port 7. MOD 16. AUX Port 8. Skip Forward 17. -
Page 11: Remote Control
Remote Control Operating the Remote Control Aim the remote at the IR sensor on the fascia. The maximum distance at which signals can be received is approximately 6m. Vol + Power On/Off Navigation Up Stop/Playback Enter Navigation Left Navigation Down Mute Tuning/Preset Source Select... -
Page 12: Radio Operation
Radio Operation Operating the Radio When turning on the unit it will automatically go into radio mode unless a USB stick or SD card has been inserted. By pressing the PAGE button you will be able to cycle between the two available option screens for the radio functions. -
Page 13: Choose Radio Band
Radio Operation Choose Radio Band Local / DX Press the BND Button anytime to access the radio Press LOC Button on the display. When “LOC ON” is shown on the display, this means local reception function. The unit comes with five bands, three FM Bands (FM1, FM2, and FM3) and two AM Bands is turned on. -
Page 14: Main Menu
Main Menu Home Screen On the home screen you can select any of the 8 options listed. The sun icon near the top right corner controls the brightness of the screen. Press this to dim it in night mode. Press it again to turn the screen off. Press it a third time to return it to day mode. -
Page 15: Bluetooth Operation
Bluetooth Operation Pairing The bluetooth function of this radio is always in standby mode ready for pairing and connection, signalled by a flashing bluetooth icon on the screen. Run the bluetooth search and connect function on your mobile phone. Find and select “BT car stereo”... -
Page 16: Bluetooth Phone History
Bluetooth Operation Bluetooth Phone History Press the middle button on the screen at the bottom of the page to access the call history. You can see Dialed, Received and Missed calls. You can select a number from the list a call back by pressing the green phone icon. To return to the main menu press the return arrow in the top right of the screen. -
Page 17: Usb/Sd Operation
USB/SD Operation Playing Media Insert either the SD card or USB stick into the relevant port the unit will start to automatically play the first readable file. If the media is music you will see the screen above. If the media is a video you will see this warning if the vehicle is in motion or if the parking cable has not been fitted correctly. -
Page 18: Navigate Files
USB/SD Operation Navigate Files To navigate all files on either SD Card or USB stick, press the Return button in the top right corner on the screen on either the video screen or music screen. You will see the ‘explorer’ screen. The first of the three icons on the left is for filtering music files only. -
Page 19: Aux Operation
AUX Operations AUX Inputs You can either connect a device through the 3.5mm port in the fascia for audio or a device through the RCA connectors are the back for video and/or audio. The screen will be blank if there is no video to display. To view the AUX options press the screen anywhere and the screen above will appear. -
Page 20: Swc (Steering Wheel Control)
(Steering Wheel Control) SWC Inputs If the three steering wheel cable have been correctly wired to an adaptor you will be able to configure your controls through the SWC option on the main screen. Select an option to program. Press the corresponding button on your steering wheel control and press ‘Enter’... -
Page 21: Eq Inputs
EQ Inputs You can customise your personal preferences to audio output where the option is available. In most cases EQ options will be Pop, Rock, Classical and Off. On this screen you can activate the Sub and Loudness option as well as control the volume (VOL), treble (TRE) and bass (BASS). -
Page 22: Settings
Settings Audio Settings Press settings on the main screen and you will go directly to the audio options. Here you can change Volume level, the default volume level and to turn on or off the loudness option by pressing the option. Use the arrow keys where presented to change the values. -
Page 23: Default Settings
Settings Default Settings Press settings on the main screen and you will go directly to the audio options. Press ‘DEFAULT’ to access the reset option. Please enter the code to reset the unit and press enter on the screen to confirm. The Default code is: 888888 General Settings Press settings on the main screen and you will go directly to the audio options. -
Page 24: System Settings
Settings System Settings Press settings on the main screen and you will go directly to the audio options. Press ‘SYSTEM’ to access the system options. Use the arrow keys where presented to change the values. Press any where on the screen to confirm. Follow the on screen instructions after selecting ‘Touch Calibrate’. -
Page 25: Movie Options
Movie Options Movie Controls There are 2 sets of control available. To change between the two use the button on the bottom right of the screen. Buttons from the bottom left: Skip back, Play/Pause, Skip Forward, EQ, Aspect Ratio, Next Page Buttons from the bottom left: Loud, Random, Repeat, Subtitles, Audio Channel, Next Page. -
Page 26: Rca Setup
RCA Setup RCA, AUX IN It is possible to connect a DVD player or device that uses RCA out. Connect the corresponding colours of the RCA out from the device to the RCA plugs marked AUX IN. You will be able to view the input via the AUX option on the main menu. RCA, AUX OUT It is possible to connect slave screen or device that can receive an RCA input to this unit. -
Page 27: Screen Function
Screen Function Deployment & Stowing After you press the power button you will need to press the ‘TFT’ button to deploy the screen. Press the ‘TFT’ button again to stow the screen. If you press the power button while the screen is deployed the screen will turn off but be left in position. -
Page 28: Faq
Problem Cause Solution No power. The car ignition is switched If the power supply is properly con- off. nected, switch the ignition key to ON or ACC. The fuse is blown. Replace the fuse according to the wiring diagram. Error on LCD display or no Inbuilt processor is not Press the RESET button. -
Page 29: Specification
Specification General Power supply requirement DC 12V Current Consumption 10A max Maximum power output 4 x 25W (measured at 14.4V) Number of channels 2 x Stereo Impedance load 4 Ohms - 8 Ohms Dimensions 178mm x 170mm x 58mm Weight Resolution 800 x 480 pixel Brightness/Contrast... - Page 30 Warranty Certificate Warranty This product is warranted to be free from defects in workmanship and parts for a period of 36 months from the date of purchase. Defects that occur within this warranty period, under normal use and care, will be repaired, replaced or refunded at our discretion, solely at our option with no charge for parts and labour.
-
Page 31: Warranty Card
Warranty Card Bluetooth Car Stereo with 7” Flip Up Multimedia Display Model Number: 67531 Please keep your purchase receipt together with your warranty card Name: Address: Date of purchase: Location of purchase: Fault Description: We recommend that you attach a photocopy of your receipt, showing the date of purchase, to this warranty card and keep it for your reference.
Need help?
Do you have a question about the 67531 and is the answer not in the manual?
Questions and answers