
Subscribe to Our Youtube Channel
Summary of Contents for General tools iBORESCOPE DCiS1
- Page 1 iBORESCOPE USER’S MANUAL DCiS Please read this manual carefully and thoroughly before using this product.
-
Page 2: Table Of Contents
TABLE OF CONTENTS Introduction ......... . 3 Key Features . -
Page 3: Introduction
INTRODUCTION Thank you for purchasing General Tools & Instruments’ (General’s) DCiS1 iBorescope. Please read this manual carefully and thoroughly before using the instrument. iBorescope is a unique instrument that can wirelessly stream high-quality video from a camera at the tip of a long probe to the screen of a nearby iPhone ®... -
Page 4: Safety Instructions
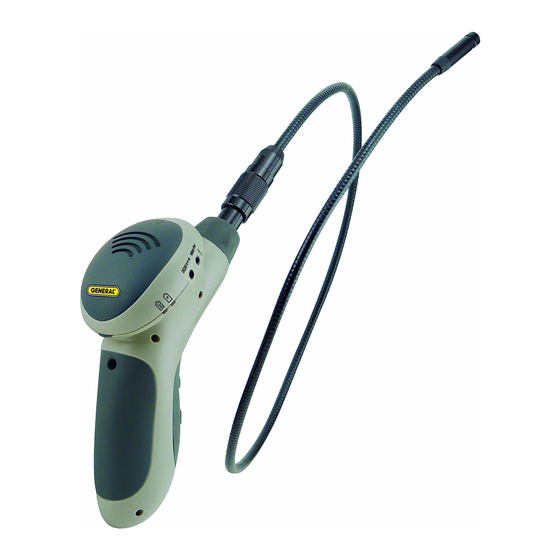
• Non-replaceable Li-ion battery charges through included USB cable (compatible with iPhone/iPad/Android Power Adapter and all computers). Full charge is good for three hours of operation. • Thumbwheel on pistol grip controls camera lighting • Apple app allows adjustment of video attributes (brightness, contrast, hue, saturation);... - Page 5 Fig. 1. The controls, indicators and physical features of iBorescope 1. WiFi status light: Red = Preparing hot spot; Green = Hot spot available 2. Video Out jack 3. DC5V charging jack (Charging) light: Orange = Charging; Off = Fully charged 5.
-
Page 6: Setup Instructions
SETUP INSTRUCTIONS CHARGE THE BATTERY To charge iBorescope’s battery, insert the USB plug end of the provided charging cable into the charging port on your iPad Power Adapter or iPhone/Android Power Adapter (see figures below). Insert the other end of the cable into the DC5V jack (Fig. -
Page 7: Download The App (Apple Ios And Android Devices)
DOWNLOAD THE APP (APPLE iOS AND ANDROID DEVICES) To download the free Apple app that enables iBorescope (the instrument), first make sure that your iPhone or iPad is connected to the Internet. Then touch the App Store icon to visit the Apple App Store. Then enter “iBorescope” in the Search box. -
Page 8: Operating Instructions-Apple Ios Platform
OPERATING INSTRUCTIONS— APPLE iOS PLATFORM VIEWING LIVE VIDEO 1. Turn on iBorescope by rolling the power switch/brightness adjustment thumbwheel (Fig. 1, Callout 6) to the right until you hear a click. The WiFi status light on top of the unit will glow red for 30 seconds while iBorescope prepares to generate an ad hoc hot spot (without Internet connectivity). -
Page 9: Taking And Viewing Photos
TAKING AND VIEWING PHOTOS 1. To save a still image (also called a screen grab) of live video or paused video, touch the SNAP SHOT soft button at the bottom of the app. The familiar sound of a camera shutter confirms that a picture was taken. Pictures are stored as .jpg files in the Camera Roll subfolder of the Photos folder of your iPhone/iPad. - Page 10 To play back a video clip, touch its line. To delete a video clip: 1.Touch the Delete button in File Manager 2. Apply a minus sign to the clip to be deleted 3. Touch the Trash button that appears 4. Touch the Delete button again to return to normal view in File Manager Another way to delete a video is to quickly swipe your finger over its listing with a motion from the right edge of the screen toward the center.
-
Page 11: Advanced Settings
ADVANCED SETTINGS To change the iBORESCOPE iOS app’s advanced settings, touch the Setting button at the upper right of the app. The screen at right will appear. As the screen shot shows, you can change the app’s WiFi Service Set Identifier (SSID) or password or adjust its video settings while watching live video in the Preview... -
Page 12: Taking And Viewing Photos
4. Touch the left side of the Wi-Fi row to enter the Wi-Fi Networks screen. iBorescope’s hot spot should appear in the list of available networks. Touch the iBORESCOPE row, and then the Connect soft button at the right of the next screen. -
Page 13: Recording And Playing Back Videos
RECORDING AND PLAYING BACK VIDEOS To record a clip of live probe video appearing on the screen of your Android device, touch the soft (RECORD) button on the right side of the app window. Pressing the button 1) causes a red button to appear in the lower left corner of the screen, 2) superimposes the message, Video Recording starts. -
Page 14: Advanced Settings
ADVANCED SETTINGS To change the iBORESCOPE Android app’s advanced settings, touch the (SETTING) button at the upper right of the app. The following screen will appear. Touching the Wi-Fi Setting row produces the following screen. Using this screen, you can change either the default WiFi Service Set Identifier (SSID) of iBORESCOPE or password of 12345678 to any string of at least eight letters from A to Z and numbers from 0 to 9. - Page 15 Touching the Video Setting row of the initial Setting screen produces the screen at right. Note that although the app’s default video recording resolution is QVGA (320 x 240 pixels), the pulldown on the Current Profile line gives you the option to increase the resolution to VGA (640 x 480 pixels).
- Page 16 Select 25 fps to maximize the quality of your video clips. The only reason to record video clips at the lower, 15 fps frame rate is to produce smaller clips that require less memory space to store and less bandwidth to share via e-mail.
-
Page 17: Using The Probe
USING THE PROBE If you are unfamiliar with video borescopes, be aware that professional users like contractors and technicians typically insert a borescope probe into an orifice (a hole in a wall or an engine’s cylinder, for example) or into an inaccessible or hazardous area (the back or an equipment rack or an engine compartment, for example) to view components or environments that would otherwise be invisible. -
Page 18: Specifications
3. Squeeze the clasp until you hear a click (see right photos on previous page), indicating that the two halves have joined. To detach an accessory: 1. Use the nail of your index finger to unhook the clasp, opening it up. 2. -
Page 19: Operating & Maintenance Tips
WARRANTY INFORMATION General Tools & Instruments’ (General’s) DCiS1 iBorescope is warranted to the original purchaser to be free from defects in material and workmanship for a period of one year. Subject to certain restrictions, General will repair or replace this instrument if, after examination, the company determines it to be defective in material or workmanship. -
Page 20: Return For Repair Policy
FAX (212) 431-6499 TOLL FREE (800) 697-8665 e-mail: sales@generaltools.com www.generaltools.com DCiS1 User’s Manual Specifications subject to change without notice ©2015 GENERAL TOOLS & INSTRUMENTS NOTICE - WE ARE NOT RESPONSIBLE FOR TYPOGRAPHICAL ERRORS. MAN #DCiS1 012215 GeneralToolsNYC General Tools & Instruments...
Need help?
Do you have a question about the iBORESCOPE DCiS1 and is the answer not in the manual?
Questions and answers