Advertisement
Quick Links
5.
If the working range of the remote transmitter falls and/or the LED on the
remote dims noticeably when a button is pressed, it's likely the remote battery
is running low. To access and replace the battery (a single cell of type A27,
12V) remove the plastic back cover of the transmitter (via three screws), as
shown below. Ensure the new battery is oriented correctly.
27A 12V Battery
Troubleshooting
If the input supply voltage drops below 9V then the receiver will cease to
function. Ensure that the power supply (or battery) used can handle the
load current and is adequately charged otherwise such a voltage drop
may occur.
If the receiver stops responding to the transmitter it may be out of range or
the transmitter battery may be low, try bringing the transmitter closer to
the receiver and if that doesn't help try replacing the transmitter battery via
removing its back cover (see section 5). Be aware that the effective
operation range will be reduced significantly by large metal objects
between the transmitter and receiver (as these shield against radio
waves)
Ensure that the input and output leads do not get tugged hard, if this
happens the screw terminals that they are connected to on the control
board may become loose.
For any product issues or questions not covered in this guide please contact us
either by email at
support@gimsonrobotics.com
or via the website at
www.gimsonrobotics.co.uk/contact.html
Transmitter with the
rear cover removed
(accessed via three
cross-head screws)
GLA-CU-X2
Actuator & DC Motor Remote Control Unit
Set-up Guide
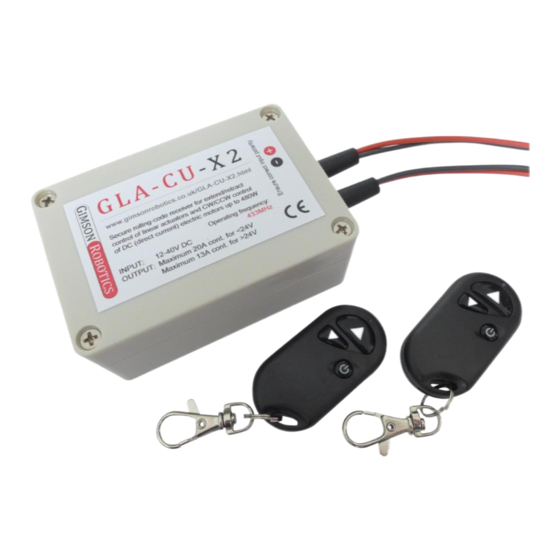
1.
Each GLA-CU-X2 unit is supplied with two small 'keyfob' transmitters (the
items labelled #2 in the below image) and a rectangular receiver unit (item
labelled #1). The remote transmitter is able to send encrypted instructions to the
receiver which then decodes them and switches a connected actuator or DC
motor in either one direction, the opposite direction, or off.
To get started you should connect the two input leads (those with a white tag
marked 'INPUT') to a DC (direct current) supply between 12V and 36V (absolute
limits 9V to 40V). Ensure that the red lead is connected to the positive (+) of the
supply and that the black lead is connected to negative (-). Each unit is supplied
with the included keyfob remote(s) memorised, meaning that if you press the up
and down buttons after having applied power to the receiver you should hear a
'clicking' noise as the internal relay switches are activated. If this is the case you
may skip to section 3 of this guide, otherwise use the 'learning' procedure
detailed in section 2.
#1 Receiver
01/2016
#2 Transmitters
Advertisement

Subscribe to Our Youtube Channel
Related Manuals for Gimson Robotics GLA-CU-X2

Summary of Contents for Gimson Robotics GLA-CU-X2
- Page 1 (accessed via three 27A 12V Battery Each GLA-CU-X2 unit is supplied with two small ‘keyfob’ transmitters (the cross-head screws) items labelled #2 in the below image) and a rectangular receiver unit (item labelled #1). The remote transmitter is able to send encrypted instructions to the receiver which then decodes them and switches a connected actuator or DC motor in either one direction, the opposite direction, or off.
- Page 2 To erase the memory of previously learnt remotes press and hold any white The receiver unit is able to selectively memorise which remote transmitters button on the board for a long time (around 10 seconds), the red LED should turn to respond to;...
Need help?
Do you have a question about the GLA-CU-X2 and is the answer not in the manual?
Questions and answers