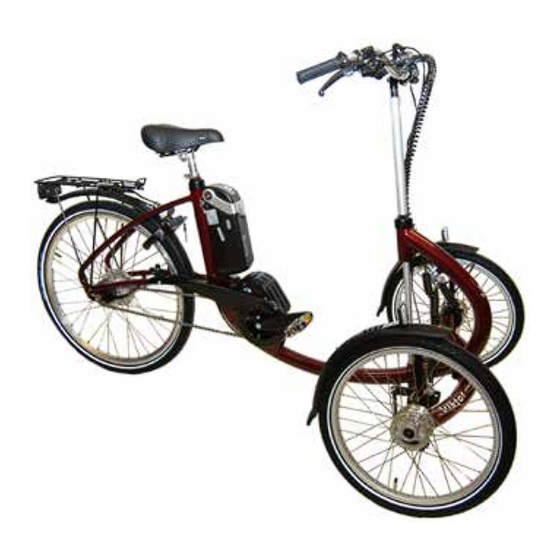

Summary of Contents for Jørn Iversen Viktoria
- Page 1 User Manual Viktoria/Viktor Power MPF Jørn Iversen Rødekro ApS Hydevadvej 48 DK-6230 Rødekro Tlf: +45 74 66 92 42 iversen@ji.dk www.ji.dk...
-
Page 2: Table Of Contents
Contents General directions..........Before you go your first trip......Your first trip............. Adjusting your tricycle........Lock..............Adjusting the handlebars....... 10 Handbrake............Adjusting the handbrake cable..... Adjusting the chain........Gear..............Adjusting the gear lever and cable....Cleaning the bike.......... MPF DRIVE System......... MPF DRIVE speed Sensor...... -
Page 3: General Directions
Congratulations on your new tricycle! We hope you will have many positive adventures with your tricycle. And that it will be a long and trouble-free experience. General directions The tricycle is at delivery assembled and ready for use, adjusted to the individual user. -
Page 4: Before You Go Your First Trip
Before you go your first trip there are a few things you need to know. When you have become confident with the tricycle, it will fell very comfortable to drive. This is not a bicycle and it is not driven like a bicycle! A tricycle is always dependent on the surface. -
Page 5: Your First Trip
Warning • Never turn the tricycle when at full speed; it may overturn. • Never block the brakes when at full speed because the tricycle might overturn. • Never use the tricycle for transport of other people. • Remember that free wheel equal no foot brake. Your first trip Pull your tricycle to an area where there is no traffic and the surface is as even as possible. - Page 6 Practise making U-turns. Drive close to the curb and stop. Then look over your shoulder. If there is no traffic, then turn the handlebars as much as you can and start pedalling. When this is practised several times and you feel comfortable making turns, you can start practicing going straight up and down curbs.
- Page 7 For optimal use of the bike, it’s important to get it properly adjusted. For further information please contact us at tel. (+45) 74 66 92 42 Jørn Iversen Rødekro Aps. - Hydevadvej 48 - Hydevad - DK-6230 Rødekro Tel.: +45 74669242 - Fax.: +45 74669294 - E-mail.: iversen@ji.dk - Web.: www.ji.dk...
-
Page 8: Adjusting Your Tricycle
Adjusting your tricycle In order to obtain the best use of your tricycle it is important it is adjusted correctly according to your needs. Adjusting the saddle The height is adjusted by loosening the Allen screw using an Allen key. Then the saddle post can be pulled up or pushed down to the desired height. -
Page 9: Lock
Warning The saddle can get very hot when your tricycle is parked directly in the sun. There must always remain 5 cm of the saddle post in the tricycle frame. Lock 1. To lock your tricycle, turn the key clockwise and push the locking lever all the way down. -
Page 10: Adjusting The Handlebars
Adjusting the handlebars Standard and hanger handlebars height and angle can be adjusted. Distance between handlebar and saddle is changed by changing the angle of the handlebar stem. If the distance from handlebar to handlebar stem needs to be shorter, turn the handlebar stem backwards. - Page 11 The stem points backwards. The stem points forwards. This This position gives a shorter position gives a longer distance distance to the handlebars. to the handlebars. Warning • When climbing the tricycle, all your weight is put on the handlebars. Therefore they must be tight- ened completely.
-
Page 12: Handbrake
Handbrake Tricycle is mounted with a combined hand and parking brake that activates the drum brakes on the front wheels. Activate the parking brake by pulling the handbrake handle towards the handlebars, and at the same time activate and hold the hand- brake lock. -
Page 13: Adjusting The Handbrake Cable
Adjusting the handbrake cable The brake should brake equally much on each of the front wheels. If not, the cables need adjusting. The adjusting screw is placed at each front wheel at the end of the black brake cable. If the handbrake is slack, turn counter-clockwise. If the brake is too tight (i.e. -
Page 14: Adjusting The Chain
Adjusting the chain Loosen the nuts holding the rear wheel so the rear wheel can be moved. Use the two 6mm nuts in the rear to tighten or losen the chain, until the chain can be moved ½ cm up and down in the middle between the crank wheel and the rear gear wheel, be at the same time aware of the wheel must be centered, tighten the two main nuts again. -
Page 15: Gear
Gear Viktoria Power MPF and Viktor Power MPF is equipped with 7 gears. When shifting gears up or down, do not apply the gear lever when treading the pedals. The gear lever can be mounted on ei- ther the left or the right hand side of the handlebars... - Page 16 Pull out the adjusting Turn the gear lever to 4th gear. screw, ca. 0.5 cm before adjusting the cable. The rear wheel The two yellow markings, are level, the gear cable is adjusted correctly. Jørn Iversen Rødekro Aps. - Hydevadvej 48 - Hydevad - DK-6230 Rødekro Tel.: +45 74669242 - Fax.: +45 74669294 - E-mail.: iversen@ji.dk - Web.: www.ji.dk...
- Page 17 Warning • Remember that children can hurt their fingers by playing with the chain or cogwheel. Maintenance of the bike Monthly Check the air pressure in all three tyres. Rinse the chain in hot water, oil the chain. Check that all cables to the brakes and the gear work freely. If necessary, put a drop of oil into the cable housing.
-
Page 18: Mpf Drive System
MPF DRIVE System Viktor Power and Viktoria Power is fitted with a MPF DRIVE motor. MPF DRIVE system ensures that the cycling becomes a lot easier for you. The electric motor makes Viktor Power and Viktoria Power to a different bike to cycle, than tricycles without engine. - Page 19 How to turn on the motor To turn on the motor, you first have to push the blue button on the front of the battery, then push the ON/OFF button on the display, so the display is turned on. Know you are reday to go riding on your bycicle.
-
Page 20: Mpf Drive Speed Sensor
MPF DRIVE speed Sensor With help from the speed sensor, the computer display figure out how much help the MPF DRIVE engine must provide. Speed sensor Jørn Iversen Rødekro Aps. - Hydevadvej 48 - Hydevad - DK-6230 Rødekro Tel.: +45 74669242 - Fax.: +45 74669294 - E-mail.: iversen@ji.dk - Web.: www.ji.dk... -
Page 21: Mpf Drive Display
MPF DRIVE display The display inform the cyclist with the necessary information from the rest of the MPF DRIVE system. The many features allow the rider more opportunities, and the ergonomic small design, makes sure that all buttons are in range. Before you turn on the display, be sure to press the blue button on the front of the battery. -
Page 22: Mpf Drive Battery
MPF DRIVE battery The very modern MPF Juice battery is designed to adapt to the new electronic bicycles. The functionality is great in the sense that you can fold the handle out and walk around with it. The integrated locking mechanism is extremely safe. -
Page 23: How To Charg The Battery
How to charg the Battery Remove the battery and take it to the charger. Conect the battery to the charger. Jørn Iversen Rødekro Aps. - Hydevadvej 48 - Hydevad - DK-6230 Rødekro Tel.: +45 74669242 - Fax.: +45 74669294 - E-mail.: iversen@ji.dk - Web.: www.ji.dk... - Page 24 Turn on the charger by pressing the button on the back of the charger. If LED 1 on the front of the charger lights up red, and the fan is started, then charging is started. When the battery is charged, the LED 2, on the front, lights green.
-
Page 25: The Battery
Warning • It is important that the original battery charger is used. • The charger is cooled by an internal fan. Only use the charger in ventilated, dry and dust-free area. The use in damp, dusty or poor ventilated environment can damage the battery and / or charger. -
Page 26: Managing The Display
Managing the Display Frontpage Left-Button is used to Right-Button is used set the settings up. to set, the settings down. Menu button, scroll through the menu by pressing this. Backsite ON/OFF button Jørn Iversen Rødekro Aps. - Hydevadvej 48 - Hydevad - DK-6230 Rødekro Tel.: +45 74669242 - Fax.: +45 74669294 - E-mail.: iversen@ji.dk - Web.: www.ji.dk... - Page 27 Warning • Do not operate the display while driving Modes To switch between the different modes, press the Menu button. “CADENCE” “CLOCK” “DISTANCE” Revolutions Shows the The distance are made with time. cycled since pedal per the last reset. minute. Jørn Iversen Rødekro Aps.
- Page 28 “RIDETIME” “AVERAGE” “MAXIMUM” The time that Average speed Max speed is cycled on since the last since last reset. the bike since reset. last reset. “ODOMETER” “BOOST” “RESET” The total The bike runs Resets the distance cycled. by itself while Distance, Ride the left button Time,...
-
Page 29: Additional Information
Additional information The bar shows how much battery is left in the battery. “E” means empty and “F” means full. “KPH“ How many KM/H bicycling. “SUPPORT LEVEL” The auxiliary engine provider. Press L - button to increase the help. Press R - button to lower the help. Jørn Iversen Rødekro Aps. -
Page 30: Display
Changing the battery in display On the back is 4 screws they should be unscrewed. The top should be taken off and then turn the plug to the left to unlock. Jørn Iversen Rødekro Aps. - Hydevadvej 48 - Hydevad - DK-6230 Rødekro Tel.: +45 74669242 - Fax.: +45 74669294 - E-mail.: iversen@ji.dk - Web.: www.ji.dk... - Page 31 Remove the plug and the battery is visible. Then, replace the battery. Jørn Iversen Rødekro Aps. - Hydevadvej 48 - Hydevad - DK-6230 Rødekro Tel.: +45 74669242 - Fax.: +45 74669294 - E-mail.: iversen@ji.dk - Web.: www.ji.dk...
-
Page 32: Ekstra Information
Ekstra information Battery model: CR2032 The 4 screws USB Port: for charging the mobile or something else. The power is drawn from the battery. Jørn Iversen Rødekro Aps. - Hydevadvej 48 - Hydevad - DK-6230 Rødekro Tel.: +45 74669242 - Fax.: +45 74669294 - E-mail.: iversen@ji.dk - Web.: www.ji.dk... -
Page 33: Accessories
Accessories There is a large variety of accessories to give you a more comfortable ride. Ask your dealer for advice on accessories, or visit us at www.ji.dk. Unionpedal with side Oval handlebar support Jørn Iversen Rødekro Aps. - Hydevadvej 48 - Hydevad - DK-6230 Rødekro Tel.: +45 74669242 - Fax.: +45 74669294 - E-mail.: iversen@ji.dk - Web.: www.ji.dk... - Page 34 Air cushioned seat Side mirror Basket behind Crutch holder Jørn Iversen Rødekro Aps. - Hydevadvej 48 - Hydevad - DK-6230 Rødekro Tel.: +45 74669242 - Fax.: +45 74669294 - E-mail.: iversen@ji.dk - Web.: www.ji.dk...
- Page 35 Unionpedal with velcro Unionseat with braket Shopping Bag with 4 Step plate compartments Visit our website www.ji.dk and find more accessories Jørn Iversen Rødekro Aps. - Hydevadvej 48 - Hydevad - DK-6230 Rødekro Tel.: +45 74669242 - Fax.: +45 74669294 - E-mail.: iversen@ji.dk - Web.: www.ji.dk...
- Page 36 Warning • Be careful if your body is fixed to a body support. Because the centre of gravity is shifted you might overturn when turning at high speed. Always drive extra carefully when you are strapped on to the tricycle. •...
-
Page 37: Periodic Inspection Of Your Bike
Periodic inspection of your bike Date: Assistive no .: model: Chassis no .: Performed by: We recommend that the bike shall be checked every 6 months, depending on how much it is used. Checked Changed Test drive with bike Check if the bike move easily Check the directional stability Check the foot brake and rear brakes. - Page 38 Checked Changed Brakes Check if the front brake brakes. Check if the brakes release entirely Check if the parking brake is holding the bike Check if the rear brakes brake Check the cables; lubricate if needed Chain Check for wear on chain Check if the chain needs adjustments Gear Check the cable...
- Page 39 Always remember to bring your key to the battery when you hand over your bike to repair. Jørn Iversen Rødekro Aps. - Hydevadvej 48 - Hydevad - DK-6230 Rødekro Tel.: +45 74669242 - Fax.: +45 74669294 - E-mail.: iversen@ji.dk - Web.: www.ji.dk...
- Page 40 EC-declaration of conformity Council Directive 93/42/EØF Manufacturer: Jørn Iversen Rødekro ApS Address: Hydevadvej 48, Hydevad, DK-6230 Rødekro Phone: +45 74 66 92 42 E-mail: iversen@ji.dk Declares that: Bike brand: Jørn Iversen Rødekro ApS Type: __________________________ Serial number: __________________________ In accordance with the Interior and Health Order no. 409 of 27th of May 2003 “Bekendtgørelse om medicinsk udstyr“.
Need help?
Do you have a question about the Viktoria and is the answer not in the manual?
Questions and answers