
Summary of Contents for Life Smart LS1002HH13
- Page 1 INFRARED ZONE HEATING SYSTEM OWNER’S MANUAL Model No.LS1002HH13 WARNING: READ THIS ENTIRE OWNER’S MANUAL CAREFULLY BEFORE USE.
- Page 2 Thank you for choosing aLIFESMART Infrared Zone Heating System. This owner’s manual will provide you with valuable information necessary for the proper care and maintenance of your new product. Please take a few moments to thoroughly read the instructions and familiarize yourself with all the operational aspects of your new heater.
-
Page 3: Customer Service And Support
Customer Service and Support To Obtain Warranty Support or Advice, Please Complete These Easy Steps: Contact LIFESMART PRODUCTS Technical Support 1-866-484-2066 or 1-214-614-2509 Phone Warranty@lifesmartproducts.com E-mail Visit us: www.lifesmartproducts.com You will need to provide the unit's model number, serial number (located on the heater’s front panel, rear panel, or on the box), date of purchase, retailer of... -
Page 4: Important Safety Instructions
IMPORTANT S AFETY I NSTRUCTIONS READ A ND U NDERSTAND A LL I NSTRUCTIONS, S AFETY W ARNINGS, AND F AQ’s B EFORE U SING T HE H EATER ... - Page 5 9. This heater is not intended for use in bathrooms, laundry areas and similar indoor locations, nor any locations that use GFCI outlets. 10. Never place heater where it may fall into a bathtub or other water receptacles. 11. Do not run cord under carpet. Do not cover cord with throw rugs, runners, or similar coverings.
-
Page 6: Frequently Asked Questions (Faqs)
FREQUENTLY ASKED QUESTIONS (FAQ’S) My heater emits a “strange” odor when I first open the box/when I turn the heater on for the first time. Why is this happening? This is normal. This heater is treated with a special heat safe/resistant coating. This odor will sometimes be present when the box is opened, and may be compared to a heaters version of “new car smell.”... - Page 7 I don’t have a grounded outlet; can I use adapters, a 2-prong power strip, or remove the ground prong from the cord? Definitely NOT! If you don’t have a grounded outlet, contact a certified electrician for advice. Removing or altering any part of the heater’s original design or intent (including the power cord) will not only void the warranty, but will make you liable for any unexpected or hazardous results.
- Page 8 I want to make sure my warranty is registered. What do I send to make sure it is registered? Where do I send it? The heater comes with an automatic 1 year limited manufacturer’s warranty at the time of purchase. Your receipt is considered your proof of purchase and registration. Keep it in a safe place.
-
Page 9: Specifications
SPECIFICATIONS Voltage Rating 120 V (60Hz) Power Consumption 1500W Unit Size 11.4 in. (W) x 14.5in. (D) x 15 in. (H) Unit Weight 14.3lbs SAFETY FEATURES Tip-Over Safety Feature This heater is equipped with a tip-over safety feature. Once the heater is tipped over, an internal switch will automatically shut the heater off. -
Page 10: Product Diagram
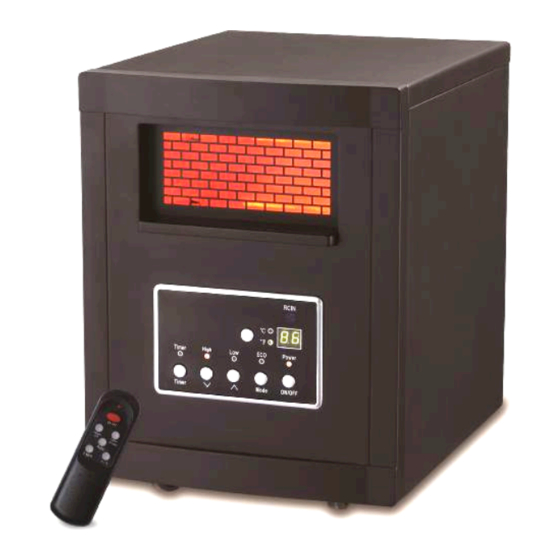
Air Intake Cord Clamp Air Outlet Remote Control Control Panel IN THE BOX ·INFRARED ZONE HEATING SYSTEM Wheels Master Power Switch ·REMOTE CONTROL(2 AAA batteries not Included) Temp Sensor ·INSTRUCTION BOOKLET PRODUCT DIAGRAM... - Page 11 Control Panel 13 14 15 1. Remote control signal sensor 2. Digital display: Indicatesset desired room temperature 3. Power indicatorlight: Indicates that the heater is receiving power from outlet. Will flash when powered “ON’ 4. ON/OFF button: Powers the display on and off 5.
-
Page 12: Remote Control
Temp up button: To increase desired temperature Mode button: Used for mode selection Battery compartment (rear of remote) Timer button: Used to engage timer mode and to set hour value for the timer Remote Control ON/OFF button: Powers the display on and off Temp down button: to make set temperature decline Battery compartment cover ℃/℉button: Button for alternating between Fahrenheit and Celsius... -
Page 13: Operating Instructions
OPERATING INSTRUCTIONS 1. Power the Display On/Off and Select Desired Mode Turn the heater on by pressing the ON/OFF button on the control panel or by pressing the Power button on the supplied remote control. Note: Powering off the heater will stop the heating process only. - Page 14 3.Setting the POWER OFF TIMER Function Note: The Power-Off-Timer Function will allow for the heater to power OFF after a certain set time, and can only be set while the heater’s display is in the “On” position. Turn the heater to the “On” position. Press the Timer button on the heater’s control panel or the remote.
- Page 15 The Electro Lock can help avoid the heater from being accidentally engaged by children. The locking mechanism can be set in both the ON and OFF modes. Press Temp Up and Temp Down buttons at the same time for 3 seconds. Locking is complete when you hear a beep. When locked, the functions of the control panel and remote will be locked for use.
-
Page 16: Maintenance
The unit Battery Cover 1) Remove bracket screws (4X) 2) Remove Air filter MAINTENANCE 1. Turn off the power switch in the rear of the unit. PUSH 2. Unplug the unit and let it cool completely. 3. To keep the heater clean, the outer shell may be cleaned with a soft, damp cloth. You may use a mild detergent if necessary. -
Page 17: Basic Troubleshooting
original packaging to repack the unit. BASIC TROUBLESHOOTING If the heater will not operate, please check the following before seeking repair advice: 1. Check if the power cord is plugged into an electrical outlet, if not, plug in. 2. Check if electricity to the main power switch (in the back) is working. 3. -
Page 18: Manufacturer Warranty
receipt showing the date of purchase of the product is your proof of purchase. Keep it in a safe place for future reference. Manufacturer Warranty All LIFESMART products are manufactured with the highest quality materials and are warranted to be free from defects in material and workmanship at the time of purchase. -
Page 19: Legal Remedies
Specifications are subject to change without notice or obligation. Legal Remedies This limited warranty gives the original purchaser specific legal rights. Other rights may vary from state to state. LS1002HH13 Rev 1 Printed In China... -
Page 20: Manuel Du Propriétaire
SYSTÈME DE CHAUFFAGE SECTIONNEL INFRAROUGE MANUEL DU PROPRIÉTAIRE de modèle LS1002HH13 AVERTISSEMENT : VEUILLEZ LIRE ATTENTIVEMENT ET ENTIER CE MANUEL DU PROPRIÉTAIRE AVANT TOUTE UTILISATION. - Page 21 Merci d'avoir choisi le système de chauffage sectionnelinfrarouge LIFESMART.Ce manuel du propriétaire contient de l’information importante et nécessaire pour l’entretien adéquat et approprié de votre nouveau produit. Veuillez prendre quelques minutes de votre temps pour lire ces instructions en entier et vous familiariser avec tous les aspects opérationnels de votre nouveau système de chauffage.
- Page 22 Service à la clientèle et Soutien Pour obtenir du soutien ou avis concernant la garantie, veuillez compléter ces deux étapes simples : Contactez le Soutien technique de LIFESMART PRODUCTS 1-866-484-2066 ou 1-214-614-2509 Téléphone Warranty@lifesmartproducts.com Courriel Site: www.lifesmartproducts.com Vous devrez fournir le numéro de modèle de l’unité, le numéro de série (situé sur le panneau avant du radiateur, le panneau arrière ou sur la boîte), la date d’achat, le détaillant de l’achat, un numéro de téléphone le jour et possiblement une copie de votre reçu.
-
Page 23: Instructions De Sécurité Importantes
INSTRUCTIONS D E S ÉCURITÉ I MPORTANTES LIRE E T C OMPRENDRE T OUTES L ES I NSTRUCTIONS, AVERTISSEMENTS D E S ÉCURITÉ E T F AQ A VANT D ’UTILISER L E RADIATEUR ... - Page 24 25. Ne pas opérer tout radiateur avec un cordon ou une fiche endommagé ou après que le radiateur ait mal fonctionné, ait été échappé ou endommagé de quelque manière que ce soit. Contactez le fabricant pour des solutions. 26. Ne pas utiliser à l’extérieur. Une e xposition a ux é léments e xtérieurs t elle l a p luie, l a n eige, l e soleil, ...
-
Page 25: Foire Aux Questions (Faq)
FOIRE AUX QUESTIONS (FAQ) Mon r adiateur a é mis u ne o deur « é trange » l orsque j ’ai o uvert l a b oîte i nitialement/lorsque j ’ai mis ... - Page 26 Une f ois l ’unité b ranchée e t m ise e n m arche, c ombien d e t emps c ela p rendra-‐t-‐il p our r échauffer ma ...
- Page 27 Pourquoi l e v entilateur d e m on r adiateur c ontinu-‐t-‐il d e f onctionner m ême a près q ue l a température r églée s oit a tteinte o u q ue l e c ourant e st d ébranché? C’est normal.
- Page 28 J’ai a cheté m on r adiateur p our d iminuer m es c oûts d e c hauffage, m ais m a f acture d ’électricité a augmentée. ...
-
Page 29: Dispositifs De Sécurité
SPECIFICATIONS Tension nominale 120 V (60Hz) Consommation 1500W Dimension de 11.4 in. (W) x 14.5in. (D) x 15 in. (H) l’appareil Poids de l’appareil 6.486 kg DISPOSITIFS DE SÉCURITÉ Dispositif de sécurité pour le chavirement Ce système de chauffage est pourvu d’un dispositif de sécurité pour le chavirement. Lorsque le système de chauffage est renversé, un interrupteur interne éteint automatiquement celui-ci. -
Page 30: Schéma Du Produit
Entrée d’ air Pince pour cordon Sortie d’ air Télécommande Panneau de commande DANS LA BOÎTE • SYSTÈME DE CHAUFFAGE SECTIONNEL INFRAROUGE • TÉLÉCOMMANDE (2 piles AAA non incluses) • LIVRET D’INSTRUCTIONS Roue Interrupteur principal Sonde temp SCHÉMA DU PRODUIT... -
Page 31: Panneau De Commande
Panneau de 13 14 15 commande 1. Capteur de signal de la télécommande. 2. Affichage numérique : indique la température désirée préétablie pour la pièce. 3. Lampe témoin d’alimentation : indique que le système de chauffage est alimenté par la prise murale. 4. - Page 32 Bouton Aug. Temp. : augmenter la température au réglage désiré Compartiment à piles (à l’arrière du dispositif de commande) Bouton Mode: utilisé pour la sélection du mode Bouton Minuterie : utilisé pour activer le mode minuterie et pour régler l’heure de Télécommande Bouton MARCHE/ARRÊT : allume ou éteint l'affichage celle-ci...
-
Page 33: Consignes D'utilisation
CONSIGNES D’UTILISATION Allumer l’affichage Marche/Arrêt et sélectionner le mode désiré Allumer ou éteindre le système de chauffage en appuyant sur le bouton MARCHE/ARRÊT situé sur le panneau de commande ou en appuyant sur le bouton Mise en marche de la télécommande. Éteindre le système de chauffage en appuyant sur le bouton MARCHE/ARRÊT (on/off) du panneau de commande ou en appuyant sur le bouton MISE EN ROUTE (power) de la... - Page 34 Appuyer sur le bouton℃/℉pour modifier l’affichage de la température entre Fahrenheit et Celsius. Le témoin à DEL Fahrenheit s’allume lorsque la température est affichée en Fahrenheit. Le témoin à DEL Celsius s’allume lorsque la température est affichée en Celsius. MISE HORS TENSION DE LA MINUTERIE 3.
- Page 35 12 heures (par intervalle de 1 heure). La lampe témoin de la minuterie demeurera allumée tant que la minuterie sera activée. Le système de chauffage s’allumera lorsque le décompte interne du système de chauffage sera terminé. Réglage du verrouillage Electro Lock La fonction Electro Lock peut aider à...
-
Page 36: Entretien
L’appareil Grille d’admission d’air Retirez les vis de support (4X) ENTRETIEN Débrancher l’appareil de la prise mural et le laisser entièrement refroidir Pour que votre système de chauffage soit toujours propre, le boîtier extérieur peut être nettoyé à l'aide d'un linge doux propre et humide. Après le nettoyage, sécher l’appareil à l’aide d’un linge doux et sec. - Page 37 PUSH Piles Compartiment à piles ENTREPOSAGE Entreposer le système de chauffage dans un endroit frais et sec lorsqu’il n’est pas utilisé.Pour éviter toute accumulation de poussière et de saleté, utiliser l’emballage d'origine lorsque vous entreposez l'appareil. DIAGNOSTIC DE BASE Si le système de chauffage ne fonctionne pas, veuillez effectuer les vérifications suivantes avant de faire effectuer une réparation : 4.
-
Page 38: Garantie Limitée Du Fabricant
Garantie limitée du fabricant Garantie limitée de 1 ans :LIFESMART garantit ce radiateur contre tous défauts de matériaux ou de main d’œuvre sur les pièces fonctionnelles, pour une période de 3 ans à partir de la date d’achat originale. Votre reçu de vente qui montre la date d’achat du produit est votre preuve d’achat. -
Page 39: Limitations De La Garantie
Toute garantie implicite aura une durée équivalente à la garantie applicable décrite ci-dessus. Les spécifications sont sujettes à changement sans préavis ou obligation. Recours judiciaires Cette garantie limitée confère à l’acheteur original des droits légaux spécifiques.D’autres droits peuvent varier d’une province à l’autre. LS1002HH13 Rev 1 Printed In China...
Need help?
Do you have a question about the LS1002HH13 and is the answer not in the manual?
Questions and answers
What is the part number for the heating element