Table of Contents
Advertisement
Advertisement
Table of Contents

Summary of Contents for Hills HSMX-200
- Page 1 - 0 -...
-
Page 2: Table Of Contents
Table of Contents Safety Instruction Trademark Information Introduction Package Contents Features Product Overview Front Panel Rear Panel Remote Control System Installation Setting for Person with Impairments (Hearing & Visual) Aspect Ratio Setting Switching on for the First Time Manual Scan / Retune Viewing Channels Freeview EPG: Electronic Progamme Guide Record TV Programmes... -
Page 3: Safety Instruction
Safety Instruction Please review the following safety precautions. If this is your first time to use a satellite receiver, then read this manual before installing or using this receiver. If the receiver is not functioning properly, please contact your local distributor or system installer. Please read the safety instructions carefully. -
Page 4: Trademark Information
Also follow these precautions: Ventilation: Do not block the ventilation slots on the receiver, or place any heavy object on top of it. Blocking the airflow could damage the receiver. Arrange components so that air can flow freely around the receiver. Ensure that there is adequate ventilation if the receiver is placed in a stand. -
Page 5: Introduction
Introduction The Hills HSMX-200 Set-Top-Box is an MPEG-2 compliant Standard Definition (SD) receiver, capable of receiving and recording standard definition (SD) TV programs from free-to-air satellite broadcasts (DVB-S) in accordance with the FREEVIEW specification phase two. The user friendly On-Screen-Display (OSD) allows you to setup your receiver to enjoy standard definition channels with crystal clear picture and stereo sound quality. -
Page 6: Features
Features USB Record/Playback Record or playback your favorite programs from an external USB Storage Drive (not included) On Screen Display (OSD) Easy to use Menu system displays key information on screen Remote Control Fully functional Remote Control MHEG5 Electronic Program Guide (EPG) 8 days Freeview Electronic Program Guide. -
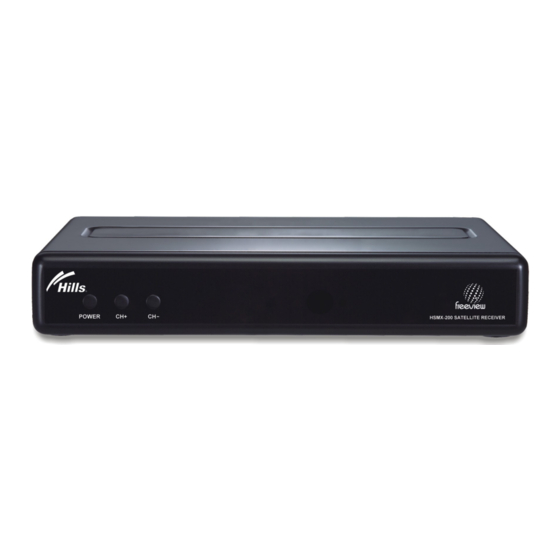
Page 7: Product Overview
Product Overview Front Panel POWER button Toggles the HSMX-200 between power-on (green LED) and standby (red LED) modes. Channel + + + + button Switch to the next channel. Channel - - - - button Switch to the previous channel. -
Page 8: Rear Panel
Rear Panel RF In / RF Out: RF Input for an external antenna/RF Out (loop through) for an external device. Video Out: Composite Video (CVBS): For Standard Definition Televisions - Connect the Composite Video cable to the yellow coloured video jack. Audio Out: L/R: One pair is provided for use with the Composite Video outputs. -
Page 9: Remote Control
Remote Control The remote control provides easy access to all of the receiver’s functions, including selecting channels and using the menus. It uses infrared signals, and must be operated within seven meters of the receiver. When using the remote control, make sure there is a direct line of sight to the receiver. Although the receiver can be operated from the buttons on the front panel, many of the receiver’s functions can only be accessed using the remote control. - Page 10 Remote Control STANDBY: Switch the Set-Top Box OFF/ON. MUTE: Disable and enable MUTE on the current programme. FAV: Open Favorite Channel List window. AUDIO: Switch between different languages or audio types if available (MPEG / AC3). SUBT: For DVB subtitle if available. TTX: Switch Teletext ON.
- Page 11 : Previous channel. : Next channel. VOL + + + + : Volume up. VOL - - - - : Volume down. COLOUR BUTTONS: Perform various functions which are shown in the menu. A. RATIO: Switch Aspect Ratio between 16:9 / 4:3 / Pan and Scan. PICTURE: Adjust picture setup (brightness, contrast, saturation, Channel Change Mode).
-
Page 12: System Installation
System Installation Connecting to TV Monitor and Audio & Video Devices - 11 -... -
Page 13: Setting For Person With Impairments (Hearing & Visual)
Setting for Person with Impairments (Hearing & Visual) Enter Menu – Press Menu on Remote Move to Settings using right arrow The following list should be visible on the left Audio – Set the Defaults for what is Viewed (Visually Impaired) OSD –... - Page 14 OSD – For those with Hearing Impairments For People who need Captions Setting the following ensures that Captions are present at all times. (Note a Factory Reset will clear this) In Menu Option Settings Arrow down to OSD and Press Enter Arrow down to Subtitle and Press Enter Right Arrow to Change OFF to ON Press Menu to Save and exit this option...
- Page 15 Audio – For those with Visual Impairments For People who want additional narration (Audio Description) Setting the following ensures that Audio Description is present at all times (Note a Factory Reset will clear this) For Freeview Satellite (DTH) viewers, the digital satellite receiver must be set to Auckland as the location.
- Page 16 Customer Manual Selection of Hearing and Visual Options Buttons on Remote for normal customer use are AUDIO and SUBT How to change these options. At top of Remote AUDIO – Allows for Choice of Sound Track Use Arrows and Enter to choose from option box Normally will be English, additional language tracks show Italian –...
-
Page 17: Aspect Ratio Setting
Aspect Ratio Setting Digital TV broadcasts carry a mixture of picture sizes, widescreen (16:9) and standard (4:3) format. The HSMX-200 offers the following options through the A.Ratio (aspect ratio) button on the remote control: 16:9 Pan and Scan Recognizing that viewers may not always be satisfied with the broadcaster's recommended... -
Page 18: Switching On For The First Time
HSMX-200 will start in Auto Scan mode. 1. Turn on your TV set. 2. Turn on the HSMX-200 by pressing the power key on the front panel or pressing STANDBY on the remote control. The green ON LED will light up. -
Page 19: Manual Scan / Retune
Manual Scan / Retune Manual Scan / Retune How to complete a rescan of your Satellite Channels ■ All programmes booked for recording will be deleted. NOTE Press MENU. Select SETUP using the directional keys ◄ and ►. Press arrow down ▼ to highlight Antenna Setup then press ENTER. Default PIN is 0000. -
Page 20: Viewing Channels
Viewing Channels Use the channel number, CH button or arrow buttons on the remote control to change channels. The Information Plate (or I-Plate) The I-Plate appears at the bottom of the screen whenever a channel is changed or when called up by pressing INFO. -
Page 21: Viewing Teletext
Viewing Teletext Some channels carry Teletext (TTX) which is provided by the broadcaster. Press TTX to view the Teletext page. Multiple pages will be displayed as numbers along the bottom. Use left and right arrows to access the sub page. To Exit Teletext press the EXIT button. -
Page 22: Selecting Subtitles
Selecting Subtitles Some programmes are broadcast with subtitles in one or more languages. Press SUBT, the subtitle menu will display on your screen. Use arrow up or down buttons to select a subtitle track, then press the ENTER button, the subtitle will be displayed. SUBT default is OFF or as set under OSD in Menu. -
Page 23: Freeview Epg: Electronic Progamme Guide
Freeview EPG: Electronic Progamme Guide This HSMX-200 comes with an 8-day Freeview Electronic Programme Guide (EPG). Please follow the following instructions in your navigation throughout the EPG: You can use the direction keys (▲, ▼, ◄ and ►) to move around the interface. -
Page 24: Record Tv Programmes
Recording TV Programmes The HSMX-200 can record television programmes onto a USB mass storage drive. The storage drive must be formatted exclusively by the HSMX-200 before it can be used to store recorded content.. NOTE The size of the storage drive must be at least 16GB with a minimum 100MB of space remaining on the drive. -
Page 25: Schedule Recording
Schedule Recording Scheduled Recording allows you to book preferred programmes in advance. To access the Record Schedule Menu press MENU then select “Recording List” from the “Channels” menu. Press the Green Coloured button to create a Timer (Time to record). - 24 -... - Page 26 Use the Numbers to type in the new times and dates or left and right arrows to change details. Use the up and down arrows to move between the options. Press the REC button (bottom left on remote) to save. The Record Schedule Menu The Recording List tables the schedule of recordings for your favourite TV programmes.
- Page 27 Starting (Scheduled) Recording When the scheduled record time comes “Start Recording” displays and recording starts. Viewing Recordings PLAY ► to display the Playlist To select the recording to view use Arrow buttons ( ▲, ▼) to highlight, then press ENTER to begin playing.
- Page 28 Playback Display Play Press PLAY ► to begin playback of or restart a recorded program. Pause Press PAUSE II to pause the recorded program. Forward (FWD) Press FWD repeatedly to forward the recorded program by 2X, 8X and up to 32X forward speed.
-
Page 29: Main Menu Map
Main Menu Map Main Menu Channels Channels Edit File Menu Play List Recording List Settings Parental Rate Audio Video Time Setup Antenna Setup City Format HDD System Password Information Set Default Software update - 28 -... -
Page 30: Main Menu
Main Menu Press MENU to display the Main Menu screen. Use the directional keys ▲, ▼, ◄ and ► to move through the menu and press ENTER to select the chosen option. Channel Channel Edit Channel Edit allows you to manage your favorite channels. Use the ▲... -
Page 31: Settings
Settings Parental Rating Allows you to set a parental rating for the receiver to prevent your children from viewing sensitive channels or programmes. Once you set the parental rating, the particular channel programme will be locked, if the parental rating transmitted with the channels programme is higher than the parental lock rating. A pop-up message will show that the channel is locked. - Page 32 Audio The Audio menu allows you to setup the following options. Preferred Audio Language (English by default) Audio track to be used. Second Audio Language (Maori by default). Audio Preference: Allows you to choose between stereo or mono as preference. Supplementary Audio (Closed by default) Audio Description.
- Page 33 Video The Video menu allows you to setup the following formats. Aspect Ratio:16:9, 4:3, Pan and Scan. Picture Setup: Brightness, Contrast, Saturation, CH Change Mode. Time The Local Time Setup menu allows you to setup the following local time format - 32 -...
- Page 34 On Screen Display (OSD) The OSD Setting Menu allows you to set the viewed features from the following I-Plate: The I-Plate is shown every time the channel changes or after pressing INFO. Select to adjust the timeout period. Subtitle: Enabling this setting, automatically shows subtitles in programs when available. Hearing Impaired: Enabling this setting automatically shows sound subtitles for the hearing impaired when available.
-
Page 35: Setup
Setup NOTE: default PIN code of this receiver is 0000. Antenna Setup On the “Setup” menu, highlight “Antenna Setup” and press ENTER to select, enter the PIN, then the four sub-menus are: Satellite list editor Tuner configuration Transponder list editor Scan City Under the “City”... -
Page 36: System
System Password The Password (PIN) Code setting menu allows you to change the 4 digit PIN Code for the HSMX-200 using the numeric keys (0-9). Enter the Current PIN Code. Enter the New PIN Code. Confirm the new PIN Code. - Page 37 Information Select to view the System Information menu showing the current hardware version (H/W), software version (S/W) of the HSMX-200. Set Defaults Select to restore the factory default settings. All current settings and data including recordings scheduled will be eliminated. The USB Storage Data remains unchanged.
-
Page 38: Software Upgrade
Software Upgrade The software for the HSMX-200 may be upgraded in future. Please contact your local distributor or visit the website; www.hillsantenna.co.nz for latest information. USB Upgrade Copy the software file to the root folder of a USB Storage Drive (Only USB Hard Drives, USB Flash Drives or USB Single SD Card Readers are supported. - Page 39 Select USB Upgrade Select the file from the disk and press ENTER. - 38 -...
- Page 40 Wait until reading of the file is done and when the message “Do you want to update?” appears, select “yes”. Please wait until “Erasing Flash” and “Programming Flash” is completed. Note: Do not switch off the power or remove the USB Storage Drive during this process. - 39 -...
-
Page 41: Ota Software Upgrade
The Auto Upgrade function is enabled from default. When there is a new SW available through OTA (Over the Air), the HSMX-200 will implement it automatically when it is in standby mode. OTA Software Upgrade (SSU Upgrade – check now) 1. -
Page 42: Troubleshooting
Make sure the receiver is switched to the correct Audio mode. a. Check the video connectors are correctly and firmly connected to the No video HSMX-200 and the TV. a. Make sure the channel you are watching carries Teletext information. No Teletext a. - Page 43 Weather related Signal problems Natural calamities can affect signal reception. If the satellite broadcast is severely affected by bad weather conditions, there are a few basic steps you can take to improve reception: Make sure your dish is correctly aimed to receive the strongest possible signal. If this does not solve the problem, you may consider installing a larger dish.
-
Page 44: Glossary
Glossary Aspect Ratio It is the ratio of the width of the screen to the height. The two relevant digital TV formats are 16:9 (wide screen) or 4:3 (the traditional screen ratio). 16:9 is ergonomically more suitable for the human eye. Composite There are three elements of the video system: First - the "active video"... -
Page 45: Specification
Specifications Mechanical: Size (W x H x D)mm 190mm x 34mm x 126.7mm PCB Construction 4 Layers Power: Input Voltage DC 12V 1.5A Input Consumption 18W Max Front End: Input Frequency 950MHz~2150MHz / F Type Standard / Demodulation DVB-S Constellation QPSK Roll-off factors 0.20, 0.25, 0.35.
Need help?
Do you have a question about the HSMX-200 and is the answer not in the manual?
Questions and answers