Table of Contents
Advertisement
Available languages
Available languages
Advertisement
Table of Contents

Subscribe to Our Youtube Channel
Related Manuals for AudioSonic CL-1460

Summary of Contents for AudioSonic CL-1460
- Page 1 Instruction Manual Gebruiksaanwijzing Mode d’emploi Bedienungsanleitung Manual de instrucciones Manual de Instruções Instrukcje użytkowania Istruzioni per l’uso Användare Clock Radio CL-1460 iPhone / iPod docking...
-
Page 3: Setting Time Using Iphone/Ipod Time Sync
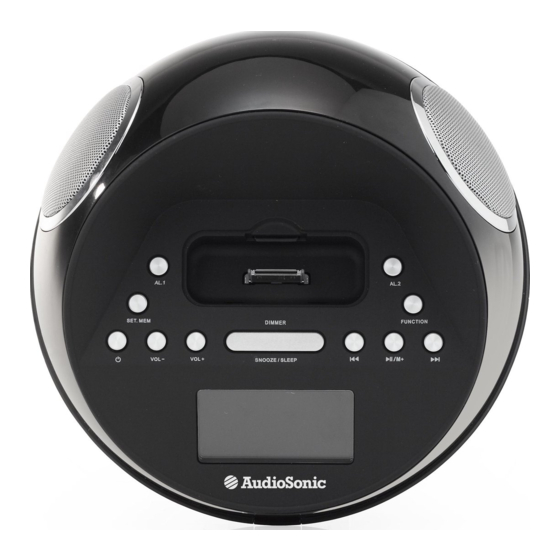
Instruction Manual LOCATION OF CONTROLS PREPARATION FOR USE 1. On/off button • This unit designed specifically to work with your docking iPhone / iPod. Please 2. Clock set/memory button read this instruction book carefully before operating the unit. 3. Alarm 1 button • AC-DC adaptor connection : The clock radio unit can be powered by an external 4. -
Page 4: Setting Clock/Alarm Time
Instruction Manual • iPhone time is automatically updated to the correct time via cell phone towers, the Note : To wake to iPhone / iPod, your iPhone / iPod must be properly docked and off time on you iPod is accurate only to the time on the computer the last time the or no alarm will sound. - Page 5 Instruction Manual Sleep Operation 10. Disconnect device warning: Main plug is used as the connection, so it should • When listening to radio or iPhone / iPod, press SNOOZE button to enter sleep always remain ready operate. mode. You can just adjust the sleep timer from 90 mins to 10 mins by pressing the SNOOZE button.
-
Page 6: Voorbereiding Voor Gebruik
Gebruiksaanwijzing PLAATS VAN DE BEDIENINGSELEMENTEN VOORBEREIDING VOOR GEBRUIK 1. Aan/Uit-knop • Dit apparaat is specifiek ontworpen voor gebruik met uw iPhone / iPod 2. Klok instellen/geheugen-knop gekoppeld. Lees deze handleiding zorgvuldig vóór het apparaat te gebruiken. 3. Alarm 1-knop • AC-DC-adapterverbinding: De klokradio-eenheid kan met een externe AC-DC- 4. - Page 7 Gebruiksaanwijzing • De tijd van de iPhone wordt via mobiele telefoontorens automatisch op de • Als u het afgaan van het alarm op de volgende dag wilt stoppen, houdt de juiste tijd bijgewerkt, de tijd op uw iPod is alleen nauwkeurig met de tijd op “ALARM”-knop ingedrukt om het uit te schakelen.
- Page 8 Gebruiksaanwijzing stellen. Herhaal stap 2 tot en met 4 om meer voorinstellingen in te stellen. 4. De ventilatie mag niet worden belemmerd door het bedekken van • Het apparaat kan totaal 20 FM-stations vooraf instellen. ventilatieopeningen met voorwerpen zoals kranten, tafelkleden, gordijnen enz. • Wanneer “P01-P20”...
-
Page 9: Emplacement Des Commandes
Mode d’emploi EMPLACEMENT DES COMMANDES PRÉPARATION À UTILISATION 1. Bouton On/off • Cet appareil est conçu spécialement pour fonctionner avec votre station d’accueil 2. Bouton RÉGLAGE DE L’HEURE/MÉMOIRE iPhone/iPod. 3. Bouton Alarme 1 • Veuillez lire attentivement ce mode d’emploi avant d’utiliser l’appareil. 4. - Page 10 Mode d’emploi 2. Une fois la synchronisation effectuée, l’heure actualisée s’affichera. • Pour différer l’alarme, appuyez sur SNOOZE. Elle retentira à nouveau dans 9 minutes 3. Si la synchronisation a échoué, dans ce cas, réessayez avec un autre iPhone/iPod environ. Vous pouvez répéter ce cycle plusieurs fois pendant le cycle de l’alarme. si nécessaire.
- Page 11 Mode d’emploi AVERTISSEMENT Régler/Rappeler les stations de radio préréglées • Appuyez sur le bouton On/off pour allumer l’appareil. • Appuyez sur le bouton FONCTION pour sélectionner le mode Radio. 1. Aucune source de flammes nue telle que des bougies allumées ne doit être • Utilisez le bouton Réglage HAUT ou Réglage BAS pour sélectionner la station FM placée sur l’appareil.
-
Page 12: Anordnung Der Bedienelemente
Bedienungsanleitung ANORDNUNG DER BEDIENELEMENTE VORBEREITUNG DER INBETRIEBNAHME 1. Ein-/Aus-Taste • Dieses Gerät ist speziell für die Verwendung mit Ihrem iPhone/iPod mit Dock- 2. Uhrzeit-Einstellung/Speicher-Taste Anschluss gebaut. Bitte lesen Sie diese Bedienungsanleitung sorgfältig durch, 3. Wecker 1-Taste bevor Sie das Gerät in Betrieb nehmen. 4. - Page 13 Bedienungsanleitung 2. Sobald die Synchronisation beendet ist, erscheint “time updated” auf dem Display. • Um die Weckzeit zu verzögern, drücken Sie SNOOZE. In etwa 9 Minuten geht 3. Wenn die Synchronisation nicht erfolgreich war: Falls dies passiert, versuchen Sie der Wecker erneut an. Sie können dies mehrmals innerhalb des Weckzeitraums es bitte erneut, wenn nötig, mit einem anderen iPhone / iPod.
- Page 14 Bedienungsanleitung WARNUNG • Wählen Sie mit der Sendersuchlauf vor- oder rückwärts-Taste den gewünschten UKW-Sender. • Drücken Sie die Uhrzeit-Einstellung-/Speichertaste; “P01” blinkt auf dem Display. 1. Stellen Sie keine offenen Feuerquellen, wie z.B. brennende Kerzen, auf das Gerät. • Drücken Sie die Uhrzeit-Einstellung/Speichertaste erneut, um den Sender zu 2.
-
Page 15: Descripción De Los Controles
Manual de instrucciones DESCRIPCIÓN DE LOS CONTROLES PREPARACIÓN PARA EL USO 1. Botón de encendido/apagado • Esta unidad se ha diseñado específicamente para funcionar como un dock para 2. Botón para programar el reloj/memoria iPhone/iPod. Lea este manual de instrucciones atentamente antes de utilizar la 3. - Page 16 Manual de instrucciones 1. Conecte el cable del adaptador de CA en el enchufe apropiado, situado en la • Pulse el botón de ALARMA de Nuevo y los dígitos de los minutos parpadearán. parte posterior de la unidad, sincronización de tiempo parpadeará en la parte Pulse el botón de sincronizar hacia una frecuencia más elevada o sincronizar hacia inferior de la pantalla.
- Page 17 Manual de instrucciones • Pulse el botón de sincronizar hacia una frecuencia más elevada o sincronizar hacia Nota: Esta unidad no proporciona una señal de grabación desde la entrada una frecuencia más baja para seleccionar la emisora de FM deseada. Si mantiene de AUXILIAR al iPhone / iPod.
-
Page 18: Localização Dos Controlos
Manual de Instruções LOCALIZAÇÃO DOS CONTROLOS PREPARAÇÃO PARA UTILIZAÇÃO 1. Botão Ligar/Desligar • Esta unidade foi concebida especificamente para funcionar com o seu iPhone®/ 2. Botão memória/definição do relógio iPod® com suporte. Leia cuidadosamente este livro de instruções antes de colocar 3. - Page 19 Manual de Instruções 1. Ligue o cabo do adaptador CA na tomada do adaptador CA que se encontra na • Prima Sintonização PARA CIMA ou Sintonização PARA BAIXO para escolher um parte posterior da unidade, “Time sync” começa a piscar na parte inferior do ecrã. modo de som diferente.
- Page 20 Manual de Instruções AVISO Para Definir/Reactivar as predefinições do rádio • Prima o botão Ligar/Desligar para ligar a unidade. • Prima o botão FUNÇÃO para seleccionar o Modo de Rádio. 1. Não deve colocar velas acesas no aparelho. • Utilize o botão Sintonização PARA CIMA ou Sintonização PARA BAIXO para 2.
-
Page 21: Lokalizacja Kontrolek
Instrukcje użytkowania LOKALIZACJA KONTROLEK PRZYGOTOWANIE DO UŻYTKU 1. Wyłącznik • To urządzenie jest przystosowane do współpracy z iPhonem / iPodem. Przed 2. Ustawienia zegara/pamięc przystąpieniem do użytkowania, należy uważnie przeczytać instrukcję. 3. Przycisk Alarm 1 • Podłączenie zasilacza AC-DC: Urządzenie może być zasilane za pomocą 4. - Page 22 Instrukcje użytkowania • Godzina na iPhonie jest aktualizowana automatycznie przez przekaźniki telefonii • Aby odłożyć alarm, wcisnąć przycisk drzemki. Alarm włączy się ponownie po komórkowej. Godzina wyświetlana na iPodzie jest zgodna tylko z godziną upływie ok. 9 minut. Opóźnienie alarmu można włączać wielokrotnie. Aby podawaną...
- Page 23 Instrukcje użytkowania OSTRZEŻENIE • Wcisnąć przycisk ustawień zegara/pamięci. Na wyświetlaczu miga komunikat „P01”. • Ponownie wcisnąć przycisk ustawień zegara/pamięci, aby zapamiętać stację. 1. Na urządzeniu nie wolno umieszczać żadnych źródeł ognia, jak np. płonące Powtarzać kroki 2-4, aby zapamiętać więcej stacji. świece.
-
Page 24: Posizione Dei Comandi
Istruzioni per l’uso POSIZIONE DEI COMANDI PREPARAZIONE ALL’USO 1. Pulsante On/off • Questo apparecchio è progettato specificatamente per funzionare con l’attacco 2. Pulsante Imposta orologio/memoria del vostro iPhone / iPod. Si prega di leggere attentamente questo libretto di 3. Pulsante Sveglia 1 istruzioni prima di utilizzare l’apparecchio. - Page 25 Istruzioni per l’uso 2. Una volta che la sincronizzazione è completata, sul display compare l’orario ag- • Per ritardare la sveglia, premere SNOOZE. Suonerà di nuovo dopo circa 9 minuti. giornato. Potete ripetere questa funzione più volte durante il ciclo della sveglia. Per 3.
- Page 26 Istruzioni per l’uso AVVERTENZA • Premere il pulsante imposta orologio/memoria. Sul display lampeggia la dicitura “P01”. • Premere nuovamente il pulsante imposta orologio/memoria per memorizzare la 1. Non collocare sull’apparecchio alcuna sorgente di fiamma libera, come una stazione. Ripetere i passi da 2 a 4 per memorizzare altre stazioni. candele accesa.
-
Page 27: Före Användning
Användare KONTROLLPLACERING FÖRE ANVÄNDNING 1. Knapp till/från • Denna enhet är speciellt designad för att fungera tillsammans med din 2. Knapp för inställning/minne klocka dockningsstation för iPhone / iPod. Läs denna instruktion noggrant innan du 3. Knapp alarm 1 använder enheten. 4. - Page 28 Användare iPhone tid uppdateras automatiskt till rätt tid via mobiltelefonstorn. Tiden på din iPod Observera : För att vakna till iPhone/iPod, ska din iPhone/iPod vara korrekt dockad är bara korrekt till tiden på din dator sista gången den synkroniserades till denna. En och avstängd annars ljuder inget alarm.
- Page 29 Användare Sleep funktion 10. Avskiljningsenhet varning: Huvudkontakten används för anslutning varför den • När du lyssnar till radio eller iPhone/iPod, tryck SNOOZE knappen för att gå över alltid ska vara tillgänglig. i sleep läge. Du kanjustera sleep tiden från 90 minuter till 10 minuter genom att trycka SNOOZE knappen.
- Page 32 CL-1460 Tristar Europe B.V., Jules Verneweg 87, 5015 BH Tilburg, The Netherlands , www.tristar.eu...
Need help?
Do you have a question about the CL-1460 and is the answer not in the manual?
Questions and answers