Table of Contents
Advertisement
Quick Links
Download this manual
See also:
User Manual
Advertisement
Table of Contents

Related Manuals for Neurona AX821

Summary of Contents for Neurona AX821
- Page 1 AX821 ConnectedLife AX821 ConnectedLife Wi-Fi Booster Fi Booster User's Manual User's Manual...
-
Page 2: Table Of Contents
Table of Content 1. IMPORTANT INFORMATION ................... 1 1.1.................... 1 MPORTANT AFETY OTES 2. INTRODUCTION ....................... 2 2.1....................... 3 ACKAGE ONTENT 2.2..................... 4 RODUCT VERVIEW 2.3..................... 4 UTTONS AND 3. HARDWARE INSTALLATION ..................5 3.1. 1 – W .............. - Page 3 5.4.3 .................. 19 ONFIGURATION ....................20 NTERNET ETTINGS 5.5.1 LAN (L ) ..............20 OCAL ETWORK ETTINGS ....................21 IRELESS ETTINGS 5.6.1 ) ................ 21 ASIC ASIC IRELESS ETTINGS 5.6.2 ) ............22 DVANCED DVANCE IRELESS ETTINGS 5.6.3 ) ......... 23 ECURITY IRELESS ECURITY...
-
Page 4: Important Information
1. Important Information 1.1. Important Safety Notes This device is intended for connection to the AC power line. For installation instructions, refer to the Installation section. The following precautions should be taken when using this product: Please read all instructions before installing and operating this product. •... -
Page 5: Introduction
Wi-Fi enabled Smart TVs and Blue-Ray player devices that stream video in the home, the demand for speedy Wi-Fi is growing. The AX821 is designed to be a flexible, easy-to-install device that can deliver high-performance Wi-Fi connectivity anywhere in the home. -
Page 6: Package Content
Before starting the installation of the d the device, please make sure the package contains the following , please make sure the package contains the following items: AX821 AX821 AX821-BX (Bundle) BX (Bundle) Device AX821 ConnectedLife AX821 ConnectedLife AX821 ConnectedLife... -
Page 7: Product Overview
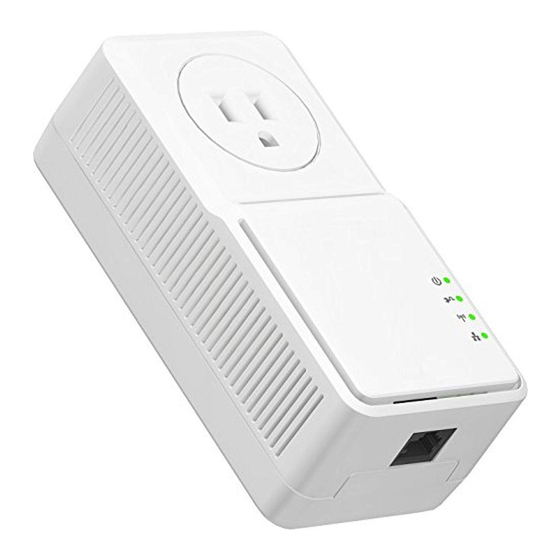
2.2. Product Overview AX821 ConnectedLife Wi-Fi Booster Fi Booster AC Pass-through Socket through Socket Ethernet Port 2.3. Buttons and LEDs Image Label ON: Power on and ready. : Power on and ready. Blinking Blinking: PLC group pairing. OFF: Power off. -
Page 8: Hardware Installation
The AX821, when connected to this router over a simple Ethernet connection, can operate in the AX821, when connected to this router over a simple Ethernet connection, can operate in the... - Page 9 AX821 is placed in a remote location within the home where Wi AX821 is placed in a remote location within the home where Wi-Fi coverage from Fi coverage from the existing router is poor or non is poor or non-existent. The AX821's EasyConnect feature...
-
Page 10: Application 2 - Full H Y -F I Networking
Full Hy-Fi Networking The AX821, when combined with a second AX821 (i.e. AX821 The AX821, when combined with a second AX821 (i.e. AX821-BX Bundle) will create the most BX Bundle) will create the most robust home networking solution in the industry due to... - Page 11 If you have a pair of Powerline device owerline devices, either one in the pair can be “device A” or “device B”. By , either one in the pair can be “device A” or “device B”. By pressing the GROUP button for more than 10 seconds, for more than 10 seconds, it will generate a random network group it will generate a random network group (different from HomePlug AV).
-
Page 12: Remove Device From An Existing Network Group
4.2. Remove Device from an Existing Network Group If you would like to remove Powerline device from an existing network group, generate a new group name (referring to Step I) to stop communication with an existing network group. 4.3. Create Additional Encrypted Network If you want to create an additional private network for your power line devices that co-exist with your existing Powerline private network group, please repeat Steps 1-2 to generate a new private network group for selected Powerline devices. -
Page 13: Advanced Wi-Fi Settings Via Web Browser
5. Advanced Wi-Fi Settings via WEB Browser 5.1. Getting Started To set up advanced Wi-Fi features such as an SSID or password, please connect to AX821 via Ethernet or wireless connection, and log in to the setting page through a web browser. - Page 14 Enter IP address such as 192.168.1.XXX (XXX can be set from 1-128) and click OK Go to "Settings" - "Wi-Fi" - "Selected SSID" - "Advanced settings", then click on "Static" to enter IP address such as 192.168.1.XXX. (XXX can be set from 1-128) and Subnet Mask 255.255.255.0 Go to "Settings"...
-
Page 15: Log In To The Setting Page
(the IP of this device). password fields. Note: you can change user name and Step 3 The AX821 setting page will be displayed after a successful login. Then, you can start configuring all necessary settings from here. Note: After completing all necessary configurations, DO NOT forget to change the PC or... -
Page 16: Home
5.3. Home For configuration in the home, take the following steps: For configuration in the home, take the following steps: 5.3.1. Select Language Currently, English is only the available is only the available option in the language setting. 5.3.2. Setup Wizard The setup Wizard assists you in setting up in setting up the device with the minimum amount of amount of required... -
Page 17: Operation Mode
5.3.3. Operation Mode This device supports five operation modes for the IP network. Click to select one from the following options and then click the “Apply” button. AP Mode The device acts as Wireless Access Point (AP) for wireless clients, and provides connections to Ethernet and PLC. - Page 18 wireless clients can survey the device. WDS Mode WDS is used to create a network of APs that can be used as one single “virtual” AP. To do so, the device forwards the packets to another AP with WDS functionality. When this mode is selected, all wireless clients cannot survey or connect to the device.
-
Page 19: H Y -F I Networking Settings
5.4. Hy-Fi Networking Settings Fi Networking Settings 5.4.1. Hybrid Network Setting 5.4.1.1. Hybrid Auto Configuration 5.4.1.1. Hybrid Auto Configuration Qualcomm Hy-Fi Auto Configuration is enabled by default. Auto Configuration is enabled by default. Under this mode, devices Under this mode, devices automatically configure themselves into a automatically configure themselves into an Hy-Fi Router(HR), Hy-Fi Client(HC) or Hy Fi Client(HC) or Hy-Fi Range... -
Page 20: Hybrid Manual Configuration
Figure 5-1: Hybrid Auto Configuration - Enable 5.4.1.2 Hybrid Manual Configuration You can also assign the device as an HR, HC or HRE manually when Hybrid Auto Configuration mode is disabled by setting Hybrid Auto Configuration to Disable. Please refer to Figure 5-2 for the setting. - Page 21 Figure 5-5: Wireless Security/Encryption Settings Figure 5-6: Powerline Settings 2. If the “Hybrid Client” option is selected click “Next”. You will be asked to do the following configurations as shown from Figure 5-7 to Figure 5-8. Once done, click “Finish”. It will take about 40 seconds to reboot the device.
-
Page 22: Powerline Settings
Figure 5-9: IEEE 1905.1 Security Settings Figure 5-10: LAN Settings Figure 5-11: Powerline Settings 5.4.2 Powerline Settings Network Password: HomePlugAV. You can specify a new value if you’d like your powerline network to be separate from other powerline networks. “Save” the configuration for it to take effect. 5.4.3 Hy-Fi Auto-Configuration This feature, enabled by default, automatically conveys IEEE 802.11 parameters from a registrar to an AP enrollee to set up the initial configuration or renew an existing configuration of an IEEE... -
Page 23: Internet Settings
seamless roaming of wireless clients in the network. Hy-Fi Auto-Configuration functions as follows: Devices start up as a HC. • HR, HRE, and HC all have the same firmware, but the one directly connected to • gateway (i.e. home router running a DHCP server) via its Ethernet will turn itself into an HR, acting as the AP Auto-Configuration registrar. -
Page 24: Wireless Settings
Wireless Settings 5.6.1 Basic (Basic Wireless Settings) Wireless Network Item Description Radio On/Off Click to enable/disable wireless function. The available options are 11b, 11g, 11g/n HT20, 11g/n HT40 PLUS (default), 11 Network Mode g/n HT40 MINUS. The SSID, which is also called ESSID, is a unique identifier that wireless Network Name (SSID) networking devices use in order to establish and maintain wireless connectivity. -
Page 25: Advanced (Advance Wireless Settings)
(A-MSDU) apply this function and reduce the network congestion. Aggregation technique which prevents sending ACK in the communication to Auto Block ACK increase the throughput. If this option is enabled, the device will activate this function when transmitting massive data. 5.6.2 Advanced (Advance Wireless Settings) Advanced Wireless Item... -
Page 26: Security (Wireless Security/Encryption Settings)
Item Description WMM Capable Choose “Enable” to apply WMM function. Turn on this feature so this device can detect whether the connecting wireless APSD Capable client device has turned on the power saving feature. If yes, this device will send packets with power saving tags accordingly. - Page 27 Authentication Type: OPEN, SHARED and WEPAUTO. When selecting “OPEN” or • “SHARED”, all clients must select the same authentication to associate with the AP. If selecting “WEPAUTO”, the clients don’t have to use the same “OPEN” or “SHARED” authentication. They can choose either one for authentication. Default Key: Select the “Key ID”...
- Page 28 A pre-shared key must be entered. If the same key is not entered into each wireless client in your wireless network, communication will not be established. You can specify Pass Phrase with the key value containing 8-63 ACSII characters. o Key Renewal Interval: The WPA Algorithm will regroup the key for a period.
-
Page 29: Wps (Wi-Fi Protected Setup)
5.6.4 WPS (Wi-Fi Protected Setup) This function helps establish the Wi-Fi security. WPS modes include PIN (Personal Identification Number) and PBC (Push Button Configuration). Before starting the WPS process, the WLAN security must be set up. Start with the Security Mode with one value from the options of WPAPSK, WPA2PSK, WPA/WPA2PSK to begin the WPS process. - Page 30 WPS can only be performed between an AP and a client. If not, notification messages will appear. NOTE:WPS will be available only under the following conditions: 1. Security Mode, WPA-PSK, WPA2-PSK or WPA/WPA2-PSK, is set. 2. Hidden SSID is disabled. 3.
-
Page 31: Station List
5.6.5 Station list The station list displays Information on associated clients. 5.6.6 Site Survey (AP Mode Site Survey) Site survey shows information of available APs in the vicinity. Choose one AP from the list to make connection. 5.6.7 MAC Filter MAC filtering allows the user to limit specific MAC addresses from associating with the AP. -
Page 32: Ap Clone
5.6.8 AP Clone With this function, the security configuration (i.e. SSID, pass phrase) from a source AP will be copied and configured automatically on the target client – (an AP or another client) - helping to establish Wi-Fi security. The AP Clone process can be executed through either the Web UI or the physical WPS button. This enables seamless roaming of wireless clients in the network. -
Page 33: Administration
Administration 5.7.1 Management (System Management) Administrator Settings Item Description Account Enter the name for login. The default name is “root”. Password Enter the password for login. The default password is “root”. Confirm Password Enter the password again. 5.7.2 Upgrade firmware This page provides the firmware upgrade function. -
Page 34: Status
5.7.4 Status The page shows system status information. -
Page 35: Statistics
5.7.5 Statistics Administrator Settings Item Description Memory total This is the total memory size for this device. Memory left This displays the available memory size. All interfaces The “Rx Packet”, “Rx Byte”, “Tx Packet” and “Tx Byte” show the status of all interfaces, including “Ethernet and Wireless”. -
Page 36: Channel Number
Channel Number 5.8.1 The following table lists the available frequencies (in MHz) for the 2.4 GHz radio. Channel No. Frequency Region Domain 2412 Americas, Taiwan, EMEA, Japan, Australia and China 2417 Americas, Taiwan, EMEA, Japan, Australia and China 2422 Americas, Taiwan, EMEA, Japan, Australia and China 2427 Americas, Taiwan, EMEA, Japan, Australia and China 2432... - Page 37 5640 5660 5680 5700 5745 5760 5785 5805 5825...
-
Page 38: Enhance Plc Performance
Enhance PLC Performance Since the Powerline device delivers data over the existing electrical wiring in the house, the actual performance may be affected by several factors such as electrical noises or wiring length. To improve PLC performance, please refer to below recommendations: AC outlets connection Avoid connecting the PLC device to an uninterruptible power supply (UPS) or backup power supply device. - Page 39 Connection via Power Strip If the user intends to connect the PLC device with a power strip, make sure the power strip does not support a noise filter or a surge protector. Electrical Interference Some household appliances may produce noise emission. If noise emission is spread over the electrical wiring, it will affect the PLC’s performance.
-
Page 40: Specifications
Specifications Neurona AX821 ConnectedLife Wi-Fi Booster Standards WLAN: IEEE 802.11 b/g, IEEE 802.11n LAN: IEEE 802.3, IEEE 802.3u Powerline: HomePlug AV 1.0 Maximum Throughput WLAN to Ethernet: up to 93 Mbps (Under 802.11n 40MHz) Powerline to Ethernet: TCP: 92 Mbps Frequency band WLAN: 2.4~2.4835GHz... - Page 41 LEDs POWER LED (Green); PLC Link/Activity LED (Green); Wireless & Security LED (dual color); Ethernet (Green) Buttons GROUP/Pairing Power on/off RESET PLC PHY Rate 500 Mbps PLC Modulation OFDM (QAM 8/16/64/256/1024/4096, BPSK, QPSK, ROBO) AC Wire : up to 300 meters PLC Distance Max.
- Page 42 PLC Standard IEEE 1901 compliant /HomePlug AV1.1 Computer OS OS independent Max. dev in a network Group 8 Active/ 16 Total Support for IPv4/IGMP v1,v2,v3 snooping IGMP Support for IPv6 and MLD v1,v2 snooping Encryption 128-bit AES Link Encryption with key management LEDs Power(green), PLC Link/Activity(green), Ethernet Link/Activity (green) Operating: 0~40 ℃;...
Need help?
Do you have a question about the AX821 and is the answer not in the manual?
Questions and answers