Advertisement
AQUAH
®
4002422
Electric Tankless Water Heater
Models: AQE-12, AQE-15, AQE-18, AQE-21, AQE-24, AQE-27
Installation and Instructions Manual
_________________________________________________________________________________________________________
Keep this Instructions Manual in a safe place once your unit is installed. You
may need to refer to it for general instructions or future maintenance.
Advertisement

Related Manuals for AQUAH AQE-12

Summary of Contents for AQUAH AQE-12
- Page 1 AQUAH ® 4002422 Electric Tankless Water Heater Models: AQE-12, AQE-15, AQE-18, AQE-21, AQE-24, AQE-27 Installation and Instructions Manual _________________________________________________________________________________________________________ Keep this Instructions Manual in a safe place once your unit is installed. You may need to refer to it for general instructions or future maintenance.
-
Page 2: Table Of Contents
Thank you for purchasing AQUAH electric tankless water heater. To enjoy your hot water for life at its best, please take time to read this manual thoroughly and keep it handy for future reference. CONTENTS Important Safety Instructions --------------------------------------------------------------------------------------- 2... -
Page 3: Important Safety Instructions
This is not a do-it-yourself project. Failure to have this appliance installed by a licensed plumber and electrician will void all warranties. Under no circumstances should you attempt to install, repair or disassemble the AQUAH electric tankless water heater without first shutting off all power to the unit directly at the circuit breaker box. -
Page 4: Product Features
■Product Features The AQUAH electric tankless water heaters are incorporated with China national patent technology (Patent No. ZL 2008 2 0081568.0) with multiple safety devices. Besides, the unit has the following features. 1. Tankless, instantaneous heating for on demand hot water, no pre-heating, no stand-by heating loss, and energy-saving. -
Page 5: Technical Data
■Technical Data Model AQE-12 AQE-15 AQE-18 AQE-21 AQE-24 AQE-27 Phase Voltage Wattage Max. Amp. load 112.5 Min. required circuit breaker 2 X 40 2 X 40 3 X 40 3 X 40 3 X 40 Min. wire size AWG cooper... - Page 6 codes. 1. Make sure the appliance is intact and the fittings are complete. 2. Please make sure the main power supply, water pressure, grounding condition, ammeter and wire meet the installation requirements. 3. The appliance must be connected to dedicated and properly grounded branch circuits of proper voltage rating. Ground must be connected to the “ground”...
- Page 7 Fig 4 Hold the back bracket hanger in position against the wall and mark the three mounting holes. Drill three holes of 6.00mm diameter. The distance between every two holes is 100mm. (Insert plastic anchor into the hole, mount the bracket on the wall, and secure the hanger using the screws supplied or other appropriate alternatives.) Fig 5 Uninstall screws on appliance to remove the front cover.
- Page 8 Fasten the appliance to the bracket which has been screwed to the wall. Make sure to mount the unit bracket onto the back metal hanger correctly Fig 7 Connect the cable to the terminal blocks following the guide logo below the terminal blocks. AQE-12...
- Page 9 shall be connected to one circuit breaker. AQE-15 and AQE-18 shall be connected to two circuit breakers. AQE-21, AQE-24, AQE-27 shall be connected to three circuit breakers. Fig 8 Connect the LED screen cable plug and mount the front cover back on appliance. Then tighten the screws to secure the front cover.
-
Page 10: Operation
3. The unit should be connected directly to the main water supply. Flush pipe with water to remove any debris or loose particles 4. It is required that 1/2” NPT water connectors be used for the models of AQE-12, and 3/4” NPT water connectors for the models of AQE-15, AQE-18 , AQE-21, AQE-24 and AQE-27. -
Page 11: Trouble-Shooting
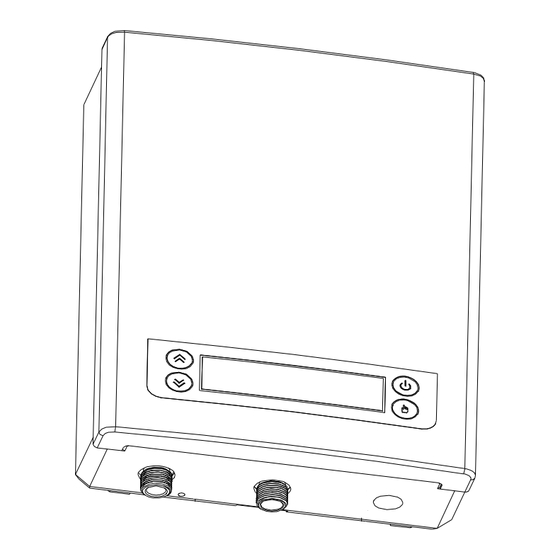
3. Press “ ” to turn ON/OFF the appliance. When the unit is ON, LED screen will display the actual output water temperature. When the appliance stops working, the LED screen will switch to screen saver in 5 seconds and the LED will black out. -
Page 12: Warranty
1. Periodically remove scale and dirt that may build up at the aerator of the faucet or in the shower head. 2. There is a built-in filter screen at the tip of the water inlet which should be cleaned from time to time. Please turn off water supply before servicing ■Warranty Heat Exchanger...
Need help?
Do you have a question about the AQE-12 and is the answer not in the manual?
Questions and answers