Table of Contents
Advertisement
Quick Links
Advertisement
Table of Contents

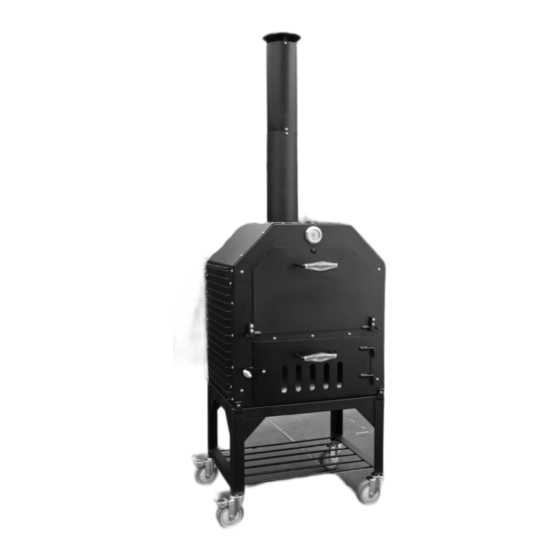
Summary of Contents for Hark HK0510
- Page 1 Pizzeria Wood Fired Oven...
- Page 2 DANGER DANGER DANGER DANGER - The Hark Pizzeria is for OUTDOOR USE ONLY. - The oven is HOT while in use and after use. Always wear protective gloves or mitts when operating - Never operate the oven unattended the oven. Avoid touching hot surfaces at all times.
-
Page 3: Prior To Assembly
1. PRIOR TO ASSEMBLY Read all safeguards and instructions before assembling and operating your oven. In order to properly assemble your oven, you will need the following tools (not included): Phillips head screwdriver Pliers or 3/8’ & 7/16” wrench You will also need the help of three to four able-bodied persons to lift the unit once the stand is attached to the oven. - Page 4 2. ASSEMBLY STEP 1: ATTACH WHEELS TO STAND Open the box marked “Stand” . Carefully remove all packaging material and lay out all the parts for easy access and identification. Do not discard the carton or packaging until your oven is fully assembled and operating to your satisfaction.
- Page 5 STEP 4: ATTACH OVEN DOOR HANDLE & HINGES Attach the oven door handle. Use 2 pieces of M8 nuts to secure the handle onto the oven door. Slide the hinges onto the oven door support brack- ets. The support brackets are already in place and are welded onto the oven door.
- Page 6 STEP 6b: ATTACH FIREBOX LATCH AND HANDLE ONTO THE FIREBOX DOOR Attach the firebox handle through the firebox and the damper, securing with 2 pieces of M8 nuts to fasten. Attach Firebox latch onto the firebox door with 1 piece of M6-18 screws and 1 piece of M6 nut.
- Page 7 STEP 9: ADD FIRE BRICKS Place the fire bricks into the fire box. Place 3 pieces at the back, 2 pieces to the right side, 2 pieces to the left side and 10 pieces on the base of the fire box. Figure 9 STEP 10: ADD PIZZA STONES...
- Page 8 STEP 12: ATTACH FLUE TO OVEN UNIT Attach flue stack onto body with 4 pieces of M6-12 screws. Figure 12 STEP 13: ATTACH TEMPERATURE GAUGE The temperature gauge is supplied with a wing nut to lock it into place on the Pizzeria oven. Place the thermometer probe through the hole in front of the oven and secure from inside the oven with the wing nut.
-
Page 9: Lighting The Oven
3. OPERATION – BEFORE USE LIGHTING THE OVEN When you are ready to use the Pizzeria oven for cooking, please follow the instructions set out below: - Always wear a BBQ mitt or protective fireproof gloves when lighting and operating your oven. - Make sure that you have removed any packaging that maybe left over in both the oven and firebox chamber. -
Page 10: Cooking Guide
It is possible to use two cooking services in the Hark Pizzeria oven - the pizza stone at the base of the oven, as well as the adjustable roast rack above. In order to avoid staining the oven with... -
Page 11: Troubleshooting
Refer to our range of recipe ideas for the Hark Pizzeria Oven located on our website − You will know the pizza is ready when the base is crispy and the pizza topping has melted and www.hark.com.au. -
Page 12: Pizza Recipes
4.3 RECIPE IDEAS Ingredients Refer to our range of recipe ideas for the Hark Pizzeria Oven located on our website 225g (1 1/2 cups) Plain Flour, sifted www.hark.com.au. - Page 13 3 Garlic Cloves, crushed 4.3 RECIPE IDEAS 2 Tbsp Basil Leaves, chopped Refer to our range of recipe ideas for the Hark Pizzeria Oven located on our website www.hark.com.au. Method − Score crossed into the base of the tomatoes. Place in a large bowl, pour over enough boiling water to cover and set aside for 1 minute.
-
Page 14: Maintenance
5.4 STORING THE PIZZA OVEN - Once the Hark Pizzeria has cooled, it is advisable to store the oven in a sheltered position where the unit will remain completely dry. It is strongly recommended that the oven is further protected by securely fastening the Hark Pizzeria Cover over the entire unit.
Need help?
Do you have a question about the HK0510 and is the answer not in the manual?
Questions and answers