
Summary of Contents for VDigi VD-i
- Page 1 VD-i 使 使 使 使 用 用 用 用 手 手 手 手 冊 冊 冊 冊 使 使 使 使 用 用 用 用 手 手 手 手 冊 冊 冊 冊 Winning Perfect Limited...
- Page 2 安 全 須 知 Manufactured under license from Dolby Laboratories. Dolby and the double-D symbol are trademarks of Dolby Laboratories.
- Page 3 目 目 目 目 錄 錄 錄 錄 1 1 1 1 產 品 介 紹 產 品 介 紹 產 品 介 紹 ....... . 產...
- Page 4 3 . 1 4 L E D ......... 1 5 4 4 4 4 使...
- Page 5 8 . 8 A u d i o C o n n e c t i o n ..........4 8 8 .
- Page 7 1 1 1 1 產品介紹 產品介紹 產品介紹 產品介紹 VD-i DMB-TH www.vdigi.com.hk 1.1 產品規格 產品規格 產品規格 產品規格 100-240V AC <24W PAL/NTSC ±30° 0 40 ℃ 5 90% 20 70 ℃ 0 98% 300 220 58 mm 1900g...
- Page 8 1.2 包裝內容 包裝內容 包裝內容 包裝內容 VD-i 100V-240VAC...
- Page 9 2 2 2 2 設置介紹 設置介紹 設置介紹 設置介紹 2.1 前面板 前面板 前面板 前面板 USB2.0 2.5” SATA 1...
- Page 10 POWER...
- Page 11 2.2 後面板 後面板 後面板 後面板 DMB-TH RF IN DMB-TH RF OUT YPbPr Video/ L/ R S-VIDEO S-VIDEO S/PDIF COAXIAL OPTICAL HDMI 10/100M Base-T MHEG-5 USB2.0 12V DC IN...
- Page 12 2.3 遙控器 遙控器 遙控器 遙控器...
- Page 13 POWER MUTE (0-9) HDTV ASPECT CH / VOL / AUDIO BACK / / / MENU INFO MHEG-5 TEXT...
- Page 14 LIVE TV HDD LIST 部 分 按 鍵 功 能 依 賴 於 部 分 按 鍵 功 能 依 賴 於 運 營 商 提 供 的 業 務 運 營 商 提 供 的 業 務 。 。 。 。 如 果 在 使 用 遙 控 器 時 使 用 這 些 按 鍵 無 如...
- Page 15 3 3 3 3 接收器的安裝 接收器的安裝 接收器的安裝 接收器的安裝 3.1 電源連接 電源連接 電源連接 電源連接 VD-i 3.2 天線連接 天線連接 天線連接 天線連接 VD-i RF IN...
- Page 16 3.3 天線環路輸出連接 天線環路輸出連接 天線環路輸出連接 天線環路輸出連接 VD-i VD-i VD-i RF OUT 3.4 連接高清電視機 連接高清電視機 連接高清電視機- - - - HDMI 連接高清電視機 HDMI( ( ( ( 視頻及音頻 視頻及音頻 視頻及音頻) ) ) ) 視頻及音頻 HDMI HDMI VD i HDMI VD-i HDMI HDMI (HDMI VD-i...
- Page 17 連接電視機- - - - 複合視頻連接 連接電視機 複合視頻連接 複合視頻連接( ( ( ( 視頻及音頻 複合視頻連接 視頻及音頻 視頻及音頻) ) ) ) 視頻及音頻 HDMI VD-i V/L/R V/L/R 3.6 連接高清電視機 連接高清電視機- - - - 分量視頻連接 分量視頻連接( ( ( ( 視頻 視頻) ) ) ) 連接高清電視機 連接高清電視機 分量視頻連接...
- Page 18 3.7 S S S S 端子連接 端子連接( ( ( ( 視頻 視頻) ) ) ) 端子連接 端子連接 視頻 視頻 S-Video VD-i S-Video S-Video 3.8 連接音頻 連接音頻 連接音頻 連接音頻 (L/R) VD-i 3.9 連接擴音機 連接擴音機 連接擴音機- - - - 同軸 連接擴音機 同軸...
- Page 19 3.10 連接擴音機 連接擴音機 連接擴音機 連接擴音機- - - - 光纖 光纖 光纖( ( ( ( 音頻 光纖 音頻 音頻) ) ) ) 音頻 3.10 3.10 3.10 VD-i 3.11 網路連接 網路連接 網路連接 網路連接 3.11 3.11 3.11 VD-i...
- Page 20 3.12 硬碟安裝 硬碟安裝 硬碟安裝 硬碟安裝 3.12 3.12 3.12 VD-i 2.5” SATA I 上 下 ” ” 2.5” SATA I VD-i 請 勿 在 本 機 通 電 的 狀 況 下 插 入 或 取 出 內 置 硬 碟 否 則 會 造 成 本 機 及 硬 碟 損 壞...
- Page 21 3.13 3.13 3.13 VD-i 連 接 電 視 連 接 電 視 機 時 機 時 機 時 機 時 , , , , 請 選 擇 上 述 視 頻 輸 出 請 選 擇 上 述 視 頻 輸 出 、 、 、 、 分 量 輸 出...
- Page 22 4 4 4 4 使用簡介 使用簡介 使用簡介 使用簡介 VD-i “ ” “ ” 4.1 本機設定 本機設定 本機設定 本機設定 MENU OK CH+ CH- MENU CH+ CH- MENU 4.1.1. 設定介面...
- Page 23 4.1.2. 輸出設定 HDMI HDMI 1080p_25Hz HDMI HDMI S/PDIF S/PDIF...
-
Page 24: Pass Through
S/PDIF S/PDIF PASS-THROUGH PASS-THROUGH YPbPr YPbPr... - Page 25 NTSC” PAL” 480P” 576P” 720P_60Hz” 720P_50Hz” 1080I_60Hz” 1080I_50Hz” 1080P_25Hz”...
- Page 26 4.1.3. 圖像設定...
- Page 28 4.1.4. 頻道設定 搜 搜 474 MHz...
- Page 29 482MHz 546 MHz 562 MHz 586 MHz 602 MHz 626 MHz 650 MHz 682 MHz 802 MHz...
- Page 30 4.1.5. 系統設定 BOOT...
- Page 33 HTTP HTTP&FTP 索...
-
Page 34: Program List
EPG 電子節目指南 電子節目指南 電子節目指南 電子節目指南 4.2 EPG Channel List Program List Program List... - Page 35 4.3 錄影功能 錄影功能 錄影功能 錄影功能 fat32 ext2 ext3 fat32 VD-i...
- Page 37 VD-i VD-i...
- Page 38 VD-I 4.4 其他功能 其他功能 其他功能 其他功能 NTSC” PAL” 480P” 576P” 720P_60Hz” 720P_50Hz” 1080I_60Hz” 1080I_50Hz” 1080P_25Hz”...
- Page 40 第 台 1 ) 1 1 1 6 8 1 8 4 1 1 ( 港 台 ) 1 6 ( 台 ) 8 1 ( 翡 翠 台 ) 8 4 ( 珠 台 ) 2 ) 8 2 8 3 8 5 8 2 ( J 2 台...
- Page 41 極 負 極 負 極 靈 VD-i 7 VD-i 障 礙 物 如 果 您 參 照 上 述 方 法 仍 然 無 法 消 除 故 障 如 果 您 參 照 上 述 方 法 仍 然 無 法 消 除 故 障 , , , , 或 者 您 遇 到 的 故 障 情 況 不 在 上 述 故 障...
- Page 42 S a f e t y W a r n i n g S a f e t y W a r n i n g S a f e t y W a r n i n g S a f e t y W a r n i n g Please read the user manual before operation and pay attention to the following items: Make sure the Power adapter has been disconnected before cleaning...
- Page 43 VD-i is an upgraded version of receiver/recorder which can support national standard of territorial digital DMB-TH. Software of VD-i can be upgraded via USB or Network to add more powerful functions and enjoy high-quality after-sales service. For more information of software upgrade and new features, please visit www.vdigi.com.hk.
-
Page 44: Package Information
Package Information Package Information Package Information Package Information N O . N a m e VD-i Receiver Remote Control User Manual 100V-240VAC Power Adapter AV Cable Component video Cable RF antenna extension cable AAA Battery X 2 Warranty Card Hard disk plastic case and two backup screws (installed in receiver) -
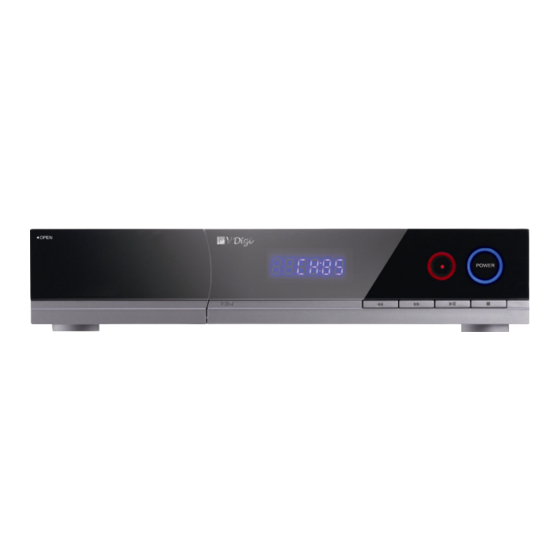
Page 45: Front Panel
7 7 7 7 Configuration Introduction Configuration Introduction Configuration Introduction Configuration Introduction 7.1 Front Panel Front Panel Front Panel Front Panel N o . N a m e F u n c t i o n D e s c r i p t i o n USB2.0 port, used for updating receiver or adding external USB hard disk or other USB memory... - Page 46 When R ecord key is pressed once, “ ” receiver will record program until s top “ ” key is press. If R ecord key is pressed “ ” Record twice, recording will stop after 30 minutes. If the key is press three times, recording will stop after 60 minutes, and so on.
-
Page 47: Rear Panel
7.2 Rear Panel Rear Panel Rear Panel Rear Panel Name Description RF IN DMB-TH Antenna input RF OUT DMB-TH Antenna bypass output YPbPr Component video output Video/ L/ R Composite video and stereo audio output S-VIDEO S-VIDEO output COAXIAL Coaxial digital audio output, OPTICAL Optical digital audio output HDMI... -
Page 48: Remote Control
7.3 Remote Control Remote Control Remote Control Remote Control... - Page 49 Function Description POWER Switch between working and standby status MUTE Turn on/off audio Digit Key (0-9) Press to select channel Switch to the last channel HDTV Select HDTV standard Select language of subtitle ASPECT Adjust image display proportion CH / Change channel VOL / Change sound volume...
- Page 50 Fast backward Skip backwards Skip program backwards 5 minutes Skip forwards Skip program forwards 5 minutes Video recording Enter program recording set menu Enter/exit from Time Shifting mode, operate with LIVE TV play/pause/REW/FF keys Show information of program saved on internal hard HDD LIST disk Show information of program saved on USB...
- Page 51 8 8 8 8 Receiver I Receiver Installation nstallation Receiver I Receiver I nstallation nstallation 8.1 Power Power C C C C onnection onnection Power Power onnection onnection Plug the pin head of the Power adapter into power supply socket, then the other end the receiver, do not connect power before other connections are completed.
- Page 52 Connectio put Connection n n n put Connectio Support antenna bypass output. Connected VD-i PF OUT with RF IN port of your own TV or other equipment, you can watch program while reserve the function of an analog TV.
-
Page 53: Audio Connection.
Component Video Component Video Connect VD-i YPbPr output ports with TV YPbPr input ports if there is no HDMI ports on your high definition TV. You also need to connect audio cable with your TV, please refer 3.8 or 3.9 or 3.10 Audio Connection. - Page 54 TV. 8.8 Audio Connection Audio Connection Audio Connection Audio Connection Use audio cable to connect VD-i audio output ports (L/R) with audio input ports (L/R) of your TV. 8.9 Connect Connect with with amplifiers amplifiers - - - - Coaxial (audio)
-
Page 55: Network Connection
Use optical fiber cable to connect VD-i optical output port with amplifier’s fiber input port. 8.11 8.11 Network Connection 8.11 8.11 Network Connection Network Connection Network Connection Use Ethernet cable to connect Ethernet port of VD-i to the Ethernet port of device of your internet service provider. - Page 56 VD-i supports insert/remove 2.5” SATA I hard disk to record/share program, please refer above picture to insert/remove hard disk: make sure the disk interface side up and slot it into the framework, then use two screw to fix the disk, last slot in...
-
Page 57: I Mportant Notice
Notice mportant Notice mportant Notice Please only use the Power adapter provided in the VD-i package, and finish other cable connection before connect VD-i to power supply, and disconnect power supply first before remove any other cable connection. Pleas select one of above mentioned method to connect video/audio output of the receiver to correspondent input of your TV, e.g. -
Page 58: Receiver Configuration
9 9 9 9 Operation Introduction Operation Introduction Operation Introduction Operation Introduction You can control the receiver by remote control or the keys on front panel of the receiver. Please note the followings: Each key may have different function under different mode. The TV screen will offer a similar “key”... - Page 59 4.1.6. Configuration Menu 4.1.6. Configuration Menu 4.1.6. 4.1.6. Configuration Menu Configuration Menu Press to enter into Main Menu’s setting menu (pic1), which is a typical menu. The Blue area on the left shows all options. The white area on the right shows details of each option.
- Page 60 Select “HDMI-Audio” (pic3) in the “Output” in menu (pic2), then the current HDMI set will display on the right, e.g. “PCM”. Press back to the previous menu. Select “S/PDIF” (pic4) “Output” menu (pic2), the current S/PDIF set will display on the right, e.g.
- Page 61 (PASS-THROUGH supports 5.1 Dolby Digital audio output). Select “Color Space” (pic6) in the “Output” menu (pic2), current component video output set will display on the right. Select “Color Space” (pic6) in the “Output” setting menu (pic6), press enter into it, press to select one, e.g.
- Page 62 Select “Video Format” (pic8) on the “output” setting menu (pic2), then the current Video Format set display on the right, e.g. “PAL”. Select “Video Format ” (pic9) o “Output” menu (pic2), press to enter, press select one, e.g. “NTSC”, “PAL”, “480P”, “576P”, “720P_60Hz”,...
- Page 63 4.1.8. Pi Pi Pi Picture 4.1.8. cture Setting Setting 4.1.8. 4.1.8. cture cture Setting Setting Select “Picture” (pic10) in main menu (pic1), current “Brightness”, “Contrast”, “Hue” , “Saturation” & “Aspect Ratio” will display on the right. Press to enter into “Picture” setting menu (pic11).
- Page 64 Select “Brightness” “Picture” setting menu (pic11), press enter into “Brightness” setting menu (pic12), press adjusting the brightness, press back to the previous menu. “Contrast”, “Hue”, “Saturation” setting method is the same to the “Brightness”. Select “Aspect Ratio” on the Picture setting menu (pic11), press to enter into Aspect Ratio setting menu (pic13), press...
- Page 65 4.1.9. 4.1.9. Search 4.1.9. 4.1.9. Search Search Search Channel Channel Channel Channel Select “Search” on the main setting menu (pic1), press enter (pic17), press to enter “Search” menu (pic18). There are searching methods: Auto, Manual, Quick. Press back to the previous menu.
- Page 66 Select “Auto” on the channel “Searching” menu (pic19), then press to enter, the receiver will automatically search channel from 474MHz 858MHz frequency point, and show signal strength and quality of the current frequency point. Channel list will automatically display. Press to turn pages to show the entire channel list.
- Page 67 Select “Manual” on the channel “Searching” menu, press enter (pic19), press to set the start or stop frequency point, receiver will automatically search channel and display signal strength quality of the current frequency point. Channel list will automatically display. Press to turn pages to show the entire channel list.
- Page 68 Press back to the previous menu Select “ProductInfo” “System” menu, press enter, choose “Hardware” (pic23) or “Software” (pic24) for more information. Press back to the previous menu. (The last two number of “Boot” is the current firmware of VD-i)
- Page 69 Select “Interface” setting (pic22) on the “System” menu (pic25). Press back to the previous menu. Select “Language” “Interface” menu (pic25), press to enter to it (pic26), and press to select “Chinese” or “English”. Press to complete. Press back to the previous menu. Select “Menu Time Out”...
- Page 70 Select “Transparency” on the “Interface” menu (pic25), press to enter into it (pic28), press key to adjust the transparency of the menu. Select “Network” setting on the “System” menu (pic22), current network setting will display on the right area (pic29). Select “Upgrade”...
- Page 71 Select “USB” on the “Upgrade” setting menu (pic30), press enter into it(pic31), select “YES” or “NO” , press to confirm setting. Press back into the previous menu. Select “Network” “Upgrade” menu (pic30), press to enter (pic32), choose ” NO”, “HTTP” or HTTP&FTP , press to complete.
-
Page 72: Epg Digital Program Guide
9.2 EPG EPG Digital Program Guide Digital Program Guide Digital Program Guide Digital Program Guide When watching program, press enter Menu (pic34), check program schedule next days. Press the red key shift between Channel List Program List Multi-page channel list: press to go to Next page / Last page. -
Page 73: Video Recording Function
9.3 Video Recording Function Video Recording Function Video Recording Function Video Recording Function If you are going to use a new USB Hard Disk (with self-power supply) to record TV program, the hard disk must be formatted by the USB format function. Press to enter into “Video setting”... - Page 74 record setting” menu (pic38), select “stop the current video recording”, press to stop. Select “Video management” on the “video setting” menu (pic35), press to enter (pic39), press to choose one recorded video. Press turn over pages, press green key to add a record task, press red key to delete a task, or press yellow key to delete all tasks.
- Page 75 In the “Setting Manage” menu, press the green key to enter into “Schedule Recording setting” (pic40), press choose input box, input your info. Press to enter into “Type Recording Setting” (pic41), press back to the previous menu. Press to enter into next step: 1.
- Page 76 After the video recording setting is completed, the receiver will show successful. If the new record task setting is contradict with existed one, the screen will display a notice page, you can either choose renew the record task or resume the existed task then press to confirm.
-
Page 77: Other Feature
You can also add record task in EPG page. Press to enter into “EPG” menu (pic45), press the red key to display channel list, select one program, press to add record task, there will be an icon displaying next to the time of the program. - Page 78 When watching TV program, press to enter into “HD TV” menu (pic47), choose appropriate standard of: “NTSC”, “PAL”, “480P”, “576P”, “720P_60Hz”, “720P_50Hz”, “1080I_60Hz”, “1080I_50Hz”, “1080P_25Hz”, press confirm. When watching TV program, press to enter “Subtitles” menu, choose appropriate one. Press to confirm.
- Page 79 VD-i supports dual program recording within any two frequencies and watch another program under these two frequencies. There are three frequencies of DTV: There are three frequencies of DTV: There are three frequencies of DTV: There are three frequencies of DTV:...
-
Page 80: Power Key
10 10 10 10 T T T T roubleshooting roubleshooting roubleshooting roubleshooting P r o b l e m s P o s s i b l e M e a s u r e Front panel indicator is off and receiver does not Check if the power supply is connected properly. - Page 81 香 港 九 龍 長 沙 灣 道 號 長 沙 灣 廣 場 二 期 室 Room 506, Tower 2, Cheung Sha Wan Plaza, 833 Cheung Sha Wan Road, Kowloon, Hong Kong Tel: 852-28611109 Fax: 852-83437386 Email: info@vdigi.com.hk Web site: www.vdigi.com.hk...
Need help?
Do you have a question about the VD-i and is the answer not in the manual?
Questions and answers