
Summary of Contents for MBQuart WR1-CD
- Page 1 Operation and Installation Manual OPEN SUB.W MUTE SETUP LOUD DIR/CAT S-MOD MONO DISP MODE MENU IPOD MENU WR1-CD AM / FM Stereo Receiver with CD Player...
- Page 2 Please carefully read all of the information in this manual. Familiarity with operation and installation proce- dures will help you obtain the best possible performance from your new AM/FM Stereo Receiver with CD Player. CAUTION! THIS MARINE CD PLAYER IS A CLASS DO NOT OPEN COVERS AND DO NOT REPAIR 1 LASER PRODUCT.
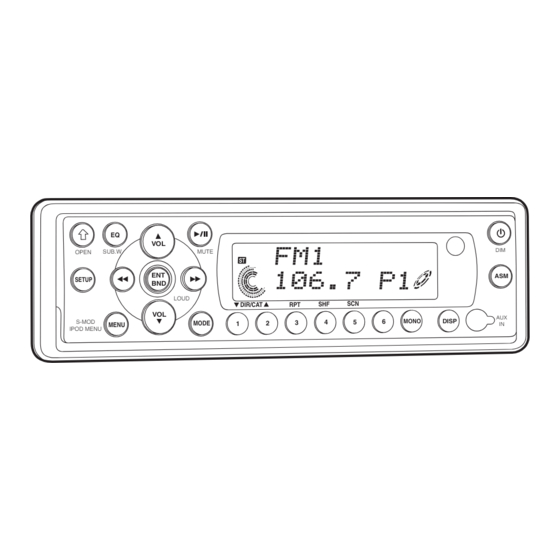
- Page 3 SUB.W MU E OPEN SETUP LOUD DIR/CAT S-MOD MONO DISP MODE MENU IPOD MENU 1. Power On/Off and Display Dimmer: Press to turn the unit On or Off. Press and hold to dim the dis- play. Press and hold again to restore display’s illumination. 2.
- Page 4 21. Mono/Stereo Button: Changes FM radio reception from Mono to Stereo. 22. Audio Input Jack: Plug in a device with a 3.5mm audio/input plug. The WR1-CD will not control the device, it just allows the audio to be played through the system.
- Page 5 14. Multi-Function Button #4: Radio Mode: Press and hold until a beep is heard to store a radio station into memory #4 (CH4). Press and release when recalling pre- set radio station #4. MODE MUTE CD Mode: Press to play all the tracks on the LOUD CD in random order.
- Page 6 Power On/Off: Press the button to turn the unit On and Off. O EN SUB W MUTE SETUP D R/CAT S-MOD MONO DISP MODE MENU I OD MENU Selecting a Play Source: To select a play source, press the MODE button until the desired source appears in the display: MUTE O EN...
- Page 7 Manually Tuning in a Radio Station: Press and hold either the button until SUB W MUTE O EN “MANUAL” appears in the display then release. SETUP Then press the again until the desired DIR/CAT radio station appears in the display. MONO D SP I OD...
- Page 8 Automatically Store Radio Stations: 1. Press the ENT BND button to select either the FM1, FM2, FM3, AM1 or AM2 radio band. 2. Press and hold the ASM button until “AST” appears in the display. The tuner will search O EN SUB W MUTE for the strongest stations and store them into...
- Page 9 Treble: 1. Select the Treble mode (TRE) by pressing the SETUP button. Increase MUTE 2. Increase the Treble by pressing the button. SETUP DIR/CAT Decrease the Treble by pressing the button. Decrease MONO D SP MODE 3. Control reverts back to volume control after 5 seconds.
- Page 10 Subwoofer Cutoff Frequency (SWF): 1. Select the Subwoofer Cutoff Frequency mode (SWF) by pressing the SETUP button. 2. To adjust the Subwoofer Cutoff Frequency press the button. Higher MUTE SWF 160 = Low Pass 160Hz SETUP SWF 120 = Low Pass 120Hz D R CAT Lower MONO...
- Page 11 Disc Formats Supported by this Player: Label side up 12cm disc Do not touch 12cm disc the underside Disc Handling: of the disc • Dirt, dust, scratches and warping disc will cause non operation. Do not bend • Do not place stickers on disc or scratch disc. •...
- Page 12 CD Track Selection: Press the button to select a lower track. MUTE O EN SUB W Press the button to select a higher track. SETUP The track number will appear in the display. DIR/CAT D SP I OD Lower Higher Track Track Track...
-
Page 13: General Operations
Random CD Track Play Order: Press the SHF button until “SHF” appears in the SUB W MUTE O EN display. The tracks on the disc will play in a ran- SETUP dom order. To cancel this feature press the SHF D R/CAT S-MOD DISP... - Page 14 Pausing a Disc: Press the button to pause the disc. Press it O EN SUB W MUTE again to resume play. SETUP DIR/CAT S-MOD MONO D SP MODE MENU I OD MENU Ejecting a Disc: Press the button to fold down the front panel to access the disc slot.
- Page 15 Pausing a CD: Press the button to pause the disc. Press it again to resume play. O EN SUB W MUTE SETUP DIR/CAT S-MOD MONO D SP MODE MENU I OD MENU Repeating a CD Track or Disc: Select the desired track to be repeated. Then press the RPT button and “RPT”...
- Page 16 Note: If your Sirius tuner is not activated, call 1-888-539-7474 to activate. The Sirius Tuner ID Number (ESN) is required during the activation process. Following the instructions below to access the Sirius Tuner ID Number (ESN): Accessing your Sirius Tuner ID Number (ESN): Press the MODE button until “SIR1 RADIO”...
- Page 17 Manual Tuning: Press the button until the desired channel appears in the display. O EN SUB W MUTE SE UP DIR CAT D SP MONO I OD M Lower Higher Channel Channel Channel Number Direct Tuning: 1. Press the MENU button until “DIR - - -” appears in the display.
-
Page 18: Switching The Display
Category Tuning: 1. Press the MENU button and “CATEGORY” starts flashing in the display. SUB W MUTE O EN SETUP D R/CAT S-MOD MONO DISP MODE MENU I OD MENU Category Mode “Flashes” 2. Press the DISP button until only a flashing “CATEGORY”... - Page 19 Memorizing a Preset Channel: Preset Channel Sirius Band 1. Press the ENT BND button to select either the SIRIUS 1, SIRIUS 2 or SIRIUS 3 Sirius band. Each band can memorize 6 channels for a O EN SUB W MUTE total of 18 channels.
- Page 20 MENU I OD MENU 3. The unit will automatically switch to the IPOD mode and start playing. Note: The IPOD controls will become inoperable, and the WR1-CD now controls the IPOD. IPOD Mode Button Location and Functions: OPEN SUB.W MUTE...
- Page 21 Browse for a Song: 1. Press the MENU button until PLAYLIST SUB W MUTE appears in the display. O EN SETUP DIR CAT S MOD MONO D SP MODE MENU I OD 2. Press the button to select the “SONGS” menu. O EN SUB W MUTE...
- Page 22 I OD MENU 3. Refer to the audio device’s owners manual for proper operation. Note 1: The WR1-CD will not control the auxiliary source, but it can adjust the sound controls. Note 2: Only connect ONE auxiliary input source to either the front 3.5mm or the rear RCA inputs.
- Page 23 Button Beep On and Off Confirmation: Follow the instructions below to turn On or Off the button when pressed beep confirmation. MUTE O EN SUB W 1. Press and hold the SETUP button approxi- ETUP DIR CAT mately 10 seconds until “BEEP ON” appears in S-MOD MONO D SP...
- Page 24 Metal Strap Sheet Metal Screw Dashboard Washer Mounting Sleeve Trim Removing the Unit from Dashboard Ring 1. Remove the metal strap holding the back of the radio chassis. 2. Remove trim ring from radio. Removal 3. Insert the removal keys into the small Keys slots on the left and right side of chassis panel.
- Page 25 Left Front Speaker Right Front Speaker Gray/Black Wire White/Black Wire Gray Wire White Wire Left Right Rear Speaker Rear Speaker Violet/Black Wire Green/Black Wire Green Wire Violet Wire Powered Subwoofer (Optional Model: LS-SUB-75) Subwoofer Output (Mono) Green Cable This unit for use only with a 12 Volt DC power source with a negative ground. Red Wire (+) to 12 Volt Ignition Yellow Wire (+) to 12 Volt Constant Black Wire Ground...
- Page 26 Sirius Antenna (Optional) Sirius Receiver (Optional) IPOD (Optional) iPod Cable (Optional) Rear Auxiliary Audio Input Yellow Cable External Audio Source WARNING! Only connect ONE Auxiliary Audio Input source to (Optional) either the front 3.5mm or the rear RCA inputs. DO NOT connect an auxiliary source to both the front and rear inputs.
- Page 27 External Automotive Type Antenna (Optional) Infrared Remote Eye (Optional) Wired Remote Controller (Optional Model: WRC-P1, WRC-S1, WRC-S2)
-
Page 28: Limited Warranty
If a problem develops during or after the Limited Warranty Period; or if you have any questions regard- ing the operation of the product, you should contact TriStar Distributing warranty department. TriStar Distributing 58263 Charlotte Avenue Elkhart, Indiana 46517 800-621-2278 WR1-CD-UM Rev. B © Copyright 2008 MB Quart 6-25-08 Patent No.: US D554,595...
Need help?
Do you have a question about the WR1-CD and is the answer not in the manual?
Questions and answers