
Subscribe to Our Youtube Channel
Summary of Contents for Targa TAG-6900
-
Page 1: Instruction Manual
TAG-6900 INSTRUCTION MANUAL Car Stereo CD/CD-R/CD-RW/MP3 Player with PLL AM/FM Stereo Radio Detachable Front Panel System... -
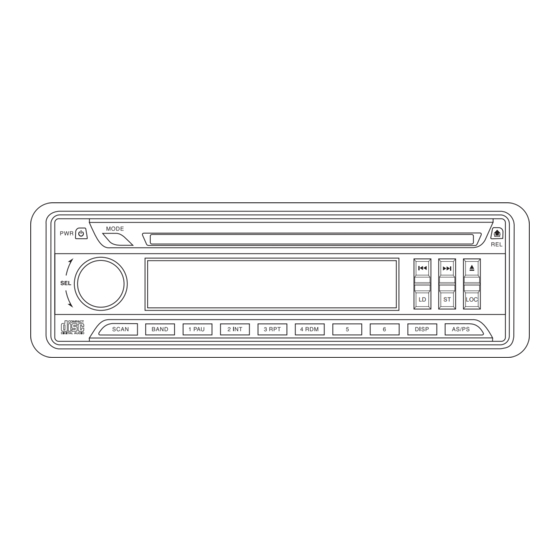
Page 2: Locations Of Controls
LOCATIONS OF CONTROLS (1-6) 1. POWER ON/OFF 2. FUNCTION SELECT BUTTON: BASS/TREBLE/BALANCE/ ENTER POWER MODE FADER / AUDIO DSP/BEEP/SEEK/VOL LAST (SEL) 3. VOL UP/VOL DOWN FOR BASS/TREBLE/BALANCE/FADER TUNE/SEEK 4. PRESET STATIONS (1,2,3,4,5,6) BAND DISPLAY 5. STEREO/MONO BUTTON (ST) 6. LOUDNESS BUTTON (LD) PAUSE AS/PS 7. - Page 3 INSTALLATION PRECAUTIONS • Choose the mounting location carefully so that the unit will not interfere with the normal driving functions of the driver. • Avoid installing the unit where it would be subject to high temperatures, such as from direct sunlight or hot air from the heater, or where it would be subject to dust, dirt or excessive vibration.
- Page 4 1. UNIT TO SUPPORT THE UNIT 2. RELEASE CASE 3. DASH BOARD 4. HEX NUT 5. LOCK WASHER Dashboard 6. PLAIN WASHER 7. CAR BODY 8. REAR SUPPORT STRAP 9. TAPPING SCREW 10. M5 X 15 HEX BOLT ISO CONNECTOR RCA Jack Line Out (Gray) : Red (right) : White (left)
-
Page 5: Operating Instructions
OPERATING INSTRUCTIONS 1. POWER ON/OFF Insert the front panel in the unit and push Power button in order to switch on the unit. Push button newly in order to switch off the unit and push REL button (15) to release the front panel. - Page 6 4. PRESET STATIONS (1,2,3,4,5,6) (A) RADIO MODE: 1. Press BAND to select the desired band, FM1, FM2, FM3, AM1, AM2. 2. Tune in the desired station by using Automatic Tuning or Manual Tuning. 3. Keep the desired preset number buttons (4) pressed until the radio bleeps (2 seconds). 4.
- Page 7 13. ‘SCAN’ AUTOMATIC TUNING CONTROL (SCN) This key is operated as RADIO SCAN The operation is similar as normal search but different thing is holding 5 seconds on every station detected in RADIO SCAN mode. 14. LCD DISPLAY The Liquid Crystal Display will display the current state of the unit. CD/MP3 CONTROL LOCATION OF PARTS 11.
- Page 8 3. Searching Character: • Press “A/PS” 3 times, then character search mode is activated. • Press enter “SEL” button, then “A” character is displayed. • With “ ” knob, you can select the letter you want. • Press enter “SEL” key longer than 2 sec. •...
-
Page 9: Manual De Instrucciones
TAG-6900 MANUAL DE INSTRUCCIONES Reproductor estéreo de CD/CD-R/CD-RW/MP3 para automóvil con Radio estéreo AM/ FM PLL Sistema de panel frontal desmontable... - Page 10 Ubicación de Controles (1-6) 1 ENCENDIDO/ APAGADO 2 BOTÓN SELECTOR DE FUNCIÓN: GRAVES/ AGUDOS/ ENTER POWER MODE BALANCE/ FADER/ AUDIO DSP/ BEEP/ BÚSQUEDA/ VOL LAST (SEL) TUNE/SEEK 3 CONTROL DE VOLUMEN PARA GRAVES/ AGUDOS/ BAND DISPLAY BALANCE/ FADER 4 ESTACIONES PRE-PROGRAMABLES. (1, 2, 3, 4, 5, 6) PAUSE AS/PS 5 BOTÓN ESTÉREO/ MONO (ST)
- Page 11 INSTALACIÓN PRECAUCIONES • Elija el lugar donde se va a instalar el equipo cuidadosamente para que la unidad no interfiera con las funciones de operación normales. • Evite instalar la unidad donde se encuentre sujeta a altas temperaturas tales como luz directa del sol o aire caliente proveniente de estufas, o donde haya polvo, suciedad o vibraciones excesivas.
- Page 12 1. Unidad SOPORTE DE LA UNIDAD 2. Compartimiento de extracción 3. Tablero 4. Tuerca 5. Arandela de fijación 6. Arandela plana 7. Cuerpo del automóvil 8. Correa trasera de soporte 9. Tornillo 10. Perno M5 X 15 CONECTOR ISO Salida de Conector RCA (Gris) : Rojo (derecha) : Blanco (izquierda) Entrada de conector RCA (Negro)
- Page 13 INSTRUCCIONES DE OPERACIÓN 1. ENCENDIDO/ APAGADO Inserte el panel frontal en la unidad y presione el botón de encendido para encender la unidad. Presione el botón nuevamente para apagar la unidad y presione el botón REL (15) para extraer el panel frontal. Nota: Nunca extraiga el panel frontal cuando la unidad esté...
- Page 14 4. ESTACIONES PRE-PROGRAMABLES (1, 2, 3, 4, 5, 6) (A) MODO RADIO: 1. Presione BAND para seleccionar la banda deseada: FM1, FM2, FM3, AM1, AM2. 2. Sintonice la estación deseada utilizando el sintonizador automático o manual. 3. Mantenga presionado el botón numeral deseado (4) hasta que la radio emita un sonido (2 segundos) 4.
- Page 15 Al presionarlo por más de 1 segundo, se pre-programarán en los botones numerales correspondientes las 6 estaciones con señales de mayor potencia. Al finalizar el funcionamiento AS, la radio ejecutará el recorrido de las estaciones preprogramadas. 13. CONTROL DE SINTONIZACIÓN AUTOMÁTICA “SCAN” (SCN) Esta tecla funciona como RADIO SCAN.
- Page 16 2. Búsqueda de Nombres de Archivos: • Presione dos veces “A/ PS” y se activará la búsqueda de archivos. • Presione “SEL” y se mostrará el primer directorio. • Con la perilla “ ” seleccione el directorio deseado. • Presione “SEL” nuevamente para confirmar el directorio y se mostrará el nombre del primer archivo.
- Page 17 TAG-6900 MANUAL DE INSTRUÇÕES Reprodutor de CD/ CD-R/ CD-RW/MP3 Radio estéreo AM/FM PLL Sistema de Painel Frontal Desmontável...
- Page 18 Diagrama dos controles (1-6) 1. LIGAR / DESLIGAR ENTER POWER MODE 2. BOTÃO SELETOR DE FUNÇÃO: GRAVES/ AGUDOS/ BALANCE/ FADER/ AUDIO DSP/ ESP/ BEEP/ BUSCA/ VOL TUNE/SEEK LAST (SEL) BAND DISP 3. CONTROLE DE VOLUME PARA GRAVES/ AGUDOS/ BALANCE/ FADER PAUSE AS/PS 4.
- Page 19 INSTALAÇÃO PRECAUÇÕES • Escolha cuidadosamente o local onde vai instalar o aparelho para que a unidade não interfira com as funções normais de operação. • Evite instalar a unidade onde podem ocorrer altas temperaturas tais como luz direta do sol ou ar quente proveniente de aquecedores, ou onde haja pó, sujeira ou vibrações em excesso.
- Page 20 1. AUTO-RÁDIO INSTALAÇÃO DO APARELHO 2. SUPORTE DE ENCAIXE 3. PAINEL DE BORDO 4. PORCA SEXTAVADA 5. ANILHA DENTADA PAINEL DE BORDO 6. ANILHA PLANA 7. CARROÇARIA 8. CANTONEIRA DE FIXAÇÃO 9. PARAFUSO DE CHAPA 10. PERNO SEXTAVADO M5X 15 CONECTOR ISO Saída para pino RCA: Vermelho (direita)
- Page 21 INSTRUÇÕES PARA A OPERAÇÃO 1. LIGAR / DESLIGAR Insira o painel frontal na unidade e aperte o botão de ligar para acender a unidade. Aperte mais uma vez o botão para desligar a unidade, e puxe o botão REL (15) para tirar o painel frontal. Nota: Nunca tire o painel frontal quando o equipamento estiver ligado.
- Page 22 VOLUME ÚLTIMO: O último nível de volume ajustado pelo usuário se escolhe quando ligar (ON) ou desligar (OFF) o aparelho. AJUSTE DE VOLUME: O nível de volume inicial (que o usuário pode ajustar) se escolhe sempre que ligar (ON) ou desligar (OFF) o equipamento. 4.
- Page 23 12. SINTONIZADOR DE BUSCA AUTOMÁTICA (AS/PS) Se pressionar este botão brevemente, o rádio busca as emissoras pre-programadas. Quanto o nível de potência do campo for maior que o nível de freqüência de detenção, o rádio manterá esse número pre-programado durante 5 segundos com o MUTE, e depois voltará a fazer a busca.
- Page 24 • Com o botão “ ”escolha o segundo e o terceiro dígito. • Em seguida se reproduzirá automaticamente a canção desejada. 2. Busca de nomes de arquivos: • Pressione duas vezes “A/PS” e se ativará a busca de arquivos. • Pressione “SEL” e aparecerá o primeiro diretório. ”...
Need help?
Do you have a question about the TAG-6900 and is the answer not in the manual?
Questions and answers