Table of Contents
Advertisement
Quick Links
Advertisement
Table of Contents

Summary of Contents for Promag UHF860
- Page 1 UHF860 Reader User Guide TM970180 - 01 October 11, 2013...
-
Page 2: Table Of Contents
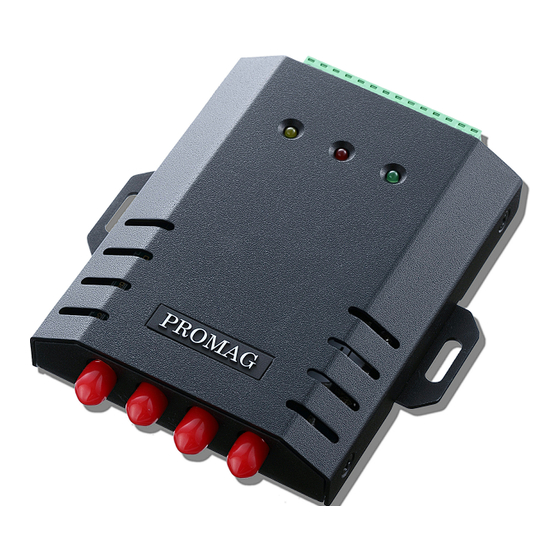
............................7 Reader ....................................7 Connecting through USB232B Converter ..................................9 Connecting through USB485A Converter ..................................11 Connecting through USB485A Converter for Multiple UHF860 Readers ..................................12 Connecting through Wiegand ..................................15 Antenna ....................................17 Antenna & Accessories ..................................18 Antenna Portal .................................. - Page 3 Introduction to UHF860 Reader A 4-port Ultra High Frequency RFID Reader UHF860 Reader is a compact RFID reader with ports to connect four antennas and has a reading range of 5 mtrs. The reader is ideal for inventory control, cargo tracking, warehouse management, shop floor management, class management and other applications.
-
Page 4: Copyright Information
Copyright Information UHF860 Reader User Guide © 2013 GIGA-TMS Inc. All rights reserved. No parts of this work may be reproduced in any form or by any means - graphic, electronic, or mechanical, including photocopying, recording, taping, or information storage and retrieval systems - without the written permission of the publisher. -
Page 5: Safety Certification
Safety Certifications UHF860 Reader User Guide Has been tested in accordance to essential protection requirements of the R&TTE Directive 1999/5/EC on the approximation of the laws of the Member States relating to Radio Spectrum Matters and found the test results... - Page 6 Part...
-
Page 7: Part I Installation
Installation UHF860 Reader User Guide Installation This part of the user guide contains description of - package contents - hardware installation - software installation and - configuration Package Contents UHF860 Reader standard package: ITEM QUANTITY UHF860 Reader Pack of fasteners 1 set CD Disk No. -
Page 8: Hardware Installation
Installation UHF860 Reader User Guide Hardware Installation 1.2.1 Reader 1. The reader has 4 coaxial connectors (with red safety caps) for 4 antennas. Please refer the diagram below for channel numbers of the ports. © 2013 GIGA-TMS Inc. - Page 9 Installation UHF860 Reader User Guide Antenna channel port indication 14 pin terminal 3.5mm - SMA type connectors 2. The rear side of the reader has a green terminal board with 14 data input/output terminals of 3.5mm size. I/O Connection to PC...
-
Page 10: Connecting Through Usb232B Converter
Installation UHF860 Reader User Guide 1.2.1.1 Connecting through USB232B Converter Wiring diagram for connecting the reader to computer through USB232B converter 1. If your computer has an RS232 comport use an RS232 cable to connect to the computer. If not use a USB232B converter. - Page 11 8. Follow instructions under Software to install UHF860 Reader Utility software and configure the reader. Set ''Interface'' to USB232/RS485 on the Device Setting/Basic page of the software. Note: The computer may install the driver automatically on insertion of the USB232B cable. If there is a driver installation error message on the computer, run the CD supplied with the converter on the computers's CD/DVD ROM, open the driver file and follow onscreen instructions to install the driver.
-
Page 12: Connecting Through Usb485A Converter
5. Yellow and green LED's will light up on the reader. 6. Follow instructions under Software to install UHF860 Reader Utility software and configure the reader. Set ''Interface'' to USB232/RS485 on the Device Setting/Basic page of the software. © 2013 GIGA-TMS Inc. -
Page 13: Connecting Through Usb485A Converter For Multiple Uhf860 Readers
CD/DVD ROM, open the driver file and follow onscreen instructions to install the driver. Then reinsert the converter's USB cable and the computer will display message for successful installation. 1.2.1.3 Connecting through USB485A Converter for Multiple UHF860 Readers Wiring diagram for connecting multiple readers through USB485A Converters © 2013 GIGA-TMS Inc. - Page 14 Installation UHF860 Reader User Guide © 2013 GIGA-TMS Inc.
- Page 15 Device ID for each and set 'Interface' to Multi RS485 on Device Setting/Basic page of the software. 2. Referring to the wiring diagram above connect all UHF860 readers. Connect with wires the +/- terminals of USB485A Converter to UHF860’s I/O RS485 +/- terminals. Add a 120 ohm resistor across the + /- wires.
-
Page 16: Connecting Through Wiegand
Installation UHF860 Reader User Guide 1.2.1.4 Connecting through Wiegand Wiring diagram for connecting the reader to computer through Wiegand converter © 2013 GIGA-TMS Inc. - Page 17 Set ''Interface'' to Wiegand on the Device Setting/Basic page of the software. 2. Connect UHF860 Input/Output pins DO1 and DO2 to controller's DO and DI terminals of the reader. It is suggested that you add a pull - high resistor on DO & D1 as shown in the illustration below.
-
Page 18: Antenna
Installation UHF860 Reader User Guide 1.2.2 Antenna ANT800 is a slim and compact UHF antenna suitable for UHF860 Reader. © 2013 GIGA-TMS Inc. -
Page 19: Antenna & Accessories
Installation UHF860 Reader User Guide 1.2.2.1 Antenna & Accessories Optional Items 1. Bracket for wall mounting x1 2. Screws for wall mounting bracket x4 3. Bracket for antenna x1 4. Screws for antenna bracket x4 5. Washers for antenna screws x4... - Page 20 Installation UHF860 Reader User Guide 1. Using screws fasten the antenna mounting bracket to the antenna. 2. Connect coaxial cable. © 2013 GIGA-TMS Inc.
- Page 21 Installation UHF860 Reader User Guide 3. Assemble wall mounting bracket to the antenna. 4. Completed antenna assembly. © 2013 GIGA-TMS Inc.
-
Page 22: Antenna Portal
1. Mount the antennas ANT800 on either side of the tag position and at equal distance from it. 2. Connect each of the antennas through coaxial cables to ports of UHF860 Reader. 3. UHF860 Reader should preferably be located midway between the antennas and ideally at the top center. -
Page 23: Software Installation
Installation UHF860 Reader User Guide Software Installation Before installing software... 1. Please complete hardware installation. (Refer previous chapter.) 2. Start a computer with operating system Windows XP/Vista/7 (host). Insert CD Disk No. 5460 supplied with the product into CD/DVD ROM drive of the host computer. -
Page 24: Configuration
Installation UHF860 Reader User Guide Configuration 1. Click open Start>All Programs>GIGA-TMS>UHF Reader Utility 2. Click 'Scan'. Reader icon will be displayed on the utility window. If there is an error message - 'Device is not found' - check the connections between reader and computer and retry. - Page 25 Installation UHF860 Reader User Guide 3. Next click the 'Enter' button. © 2013 GIGA-TMS Inc.
-
Page 26: Device Setting
Installation UHF860 Reader User Guide 1.4.1 Device Setting User can do Basic and Advance settings. However it is not advisable to change 'Advance' settings unless experienced. Please contact customer care for assistance. 1.4.1.1 Basic Click open Device Setting tab and then click 'Basic'... - Page 27 Default value is 115200 but other values can be chosen by integration expert. Device ID Default value is 255. You may select any other device ID. This feature is to distinguish multiple UHF860's in a LAN. Active Mode Select Command Mode / Auto Mode / Auto + Event + Check Scan Channel When Live Demo is in Auto Mode it scans the channels selected here.
-
Page 28: Advance
It can be set to 2400 bps, 4800 bps, 9600 bps, 19,200 bps, 38,400 bps, 57,600 bps, 1,15,200 bps. Device ID You may choose a device Id. The device ID setting on Basic page will automatically change. This feature is to distinguish multiple UHF860's in a LAN. © 2013 GIGA-TMS Inc. - Page 29 Installation UHF860 Reader User Guide Function Description Active Mode Reader's active mode. It can be set to Command Mode, Auto Mode or Auto + Check Mode. Time to If the tag doesn't give response to reader within specified time, it will be removed Remove from the list even if it is physically still present.
-
Page 30: Save/Load Settings
Installation UHF860 Reader User Guide Function Description Profile Region/country can be selected from the drop down list. Frequency Start and end frequencies for selected profile and default incremental frequency will be displayed. You may also enter other start and end frequencies or single frequency you may select after Environment Tuning for selected profile by Reflect Power Radar. -
Page 31: Environment Tuning
Installation UHF860 Reader User Guide 1.4.2 Environment Tuning The best operating frequency or range of frequencies and settings of power and sensitivity can be found from Environment Tuning. 1.4.2.1 Reflect Power Best operating frequency or range of frequencies can be detected from Reflect Power Radar. - Page 32 Installation UHF860 Reader User Guide 4. Green points below the red line are better frequencies to operate the antenna. The values are also displayed on the table on the right - numerals in blue are better values and those in red, if any, are not recommended.
-
Page 33: Scan
Installation UHF860 Reader User Guide 1.4.2.1.2 Scan Better frequency/range of frequencies for each channel can also be found manually. 1. Open Environment Tuning > Reflect Power. 2. Enter the value of the frequency to be checked. It should be within the frequency band specified for your region. -
Page 34: Power/Sensitivity Auto Tune
Installation UHF860 Reader User Guide 1.4.2.2 Power/Sensitivity Auto Tune 1. Enter the frequency range values. Here for illustration 865.700 to 867.500 MHz has been selected. 2. Select channel. Here channel 1 has been selected. 3. Click 'Start'. 4. The following instruction will display. Place tags and click OK. - Page 35 Installation UHF860 Reader User Guide 5. Auto tuning will start. Frequency, power, sensitivity and RSSI values will be displayed on the right. 6. When the Frequency, Output level and Sensitivity values in blue (on the left under 'Tuning') reach the end values and tuning is complete, click 'Save' to file the readings.
-
Page 36: Tagging
Installation UHF860 Reader User Guide 1.4.3 Tagging 1.4.3.1 Read/Write Memory Bank Data 1. To read/write a tag, double click the tag information display on the Live Demo page. 2. Read/Write window will open. © 2013 GIGA-TMS Inc. -
Page 37: Labeling
Installation UHF860 Reader User Guide Notes : Selected tag's EPC is displayed - on top and also below - as a grid where each part can be clicked and edited by clicking 'Write tag' button. Similarly memory bank for 'User' can be selected and edited from the 'Memory Bank' drop down list at the bottom. - Page 38 Installation UHF860 Reader User Guide © 2013 GIGA-TMS Inc.
- Page 39 Installation UHF860 Reader User Guide Source: Texas Instruments © 2013 GIGA-TMS Inc.
-
Page 40: Reading
Installation UHF860 Reader User Guide 1.4.3.3 Reading © 2013 GIGA-TMS Inc. - Page 41 Installation UHF860 Reader User Guide Source: Texas Instruments © 2013 GIGA-TMS Inc.
-
Page 42: I/O Testing
Installation UHF860 Reader User Guide 1.4.4 I/O Testing Input and Output ports can be tested from this software feature. 1. Click open the tab I/O Setting on the software and then click I/O Testing. DO stands for digital output. DI stands for digital input Next click DO1 and DO2. -
Page 43: Live Demo Setting
Installation UHF860 Reader User Guide 1.4.5 Live Demo Setting Function Description Menu/Re-scan Return to the start screen and rescans device. Logs Display logs in real time. Logs can be saved to default folder. Exit Exit software Remove tag(s) Unread tag(s) will be removed from the tag list after the set time. - Page 44 Installation UHF860 Reader User Guide Function Description AUTO channels selected on the 'Basic' page of Device Setting page. Auto Read Read the selected channels - single or multiple, individually or sequentially - depending on channel setting on Device Setting. Read Single Read the tag for a preset number of times that was entered on 'Read Single Count' space on the top.
- Page 45 Part...
-
Page 46: Part Ii Operation
Operation UHF860 Reader User Guide Operation Please ensure that the antennas, reader and the software are installed and configured as instructed in Part 1 of this user guide. 1. Select Live Demo > Logs > Auto Save to File 2. Stay in default Command Mode (CMD) or Click Auto Mode. Allow tagged packages to pass through the antenna portal. - Page 47 Part...
-
Page 48: Part Iii Appendix
Appendix UHF860 Reader User Guide Appendix A. Tag Memory Glossary Memory Bank Data Reserved: Reserved memory. It contains Kill or Access passwords. Kill password shall be stored at memory addresses 00 to 1F; Access password shall be stored at memory addresses 20 to 3F. - Page 49 Appendix UHF860 Reader User Guide Scan Tag Mode © 2013 GIGA-TMS Inc.
- Page 50 Appendix UHF860 Reader User Guide TID (Tag ID) About TID information, please refer to the following screen: © 2013 GIGA-TMS Inc.
-
Page 51: Antenna Specifications
Appendix UHF860 Reader User Guide B. Antenna Specifications Input Impedance 50 ohms VSWR Voltage Standing Wave Ratio Antenna Gain 9 dBi +/- 0.5 Axial Ratio Under 3dB Frequency Range 865-869 MHz , 902-928 MHz or Customizable Cable Length (N-TYPE TO SMA) -
Page 52: Uhf Reader Specifications
Appendix UHF860 Reader User Guide C. UHF Reader Specifications Operational Standard UHF860 ISO 18000-6C, EPC Class1 Gen2 Connectivity Standard Frequency 840~960 MHz Output Power Max 27dbm (0.5W) SYS Spec. Interface Format RS232: 115200 bps (8, N, 1) RS485: 115200 bps (8, N, 1) Power Input 7.5VDC, Limit Current 1.7A... -
Page 53: Reader Led Status Indication
Appendix UHF860 Reader User Guide D. Reader LED status Indication Status/Color Yellow Red (Tag) Green (Mode) (Power) Power on (Auto mode) Standby (Auto mode) Normal read Blink once (Every active ID reading) Tags in sensing field Blink once (Communication mode) - Page 54 Part...
-
Page 55: Part Iv Faq
UHF860 Reader User Guide Q1. I cannot find UHF860 reader after running UHF Reader Utility? 1. Check if the Yellow and Green LED's are lit up on the UHF860. 2. Check if the cables and power supply are connected correctly. - Page 56 UHF860 Reader User Guide Q5. How to connect UHF860 with PC through DS100? Please connect the devices as per the pin diagram below: Note: Connect push button and alarm if you want to additionally monitor digital input/output for applications. Please follow the screen settings below: Tibbo DS Manager Setting: ©...
- Page 57 UHF860 Reader User Guide © 2013 GIGA-TMS Inc.
- Page 58 UHF860 Reader User Guide Tibbo VSP Manager Setting: © 2013 GIGA-TMS Inc.
- Page 59 UHF860 Reader User Guide © 2013 GIGA-TMS Inc.
- Page 60 UHF860 Reader User Guide © 2013 GIGA-TMS Inc.
- Page 61 UHF860 Reader User Guide Q6. I am getting the following error on ROM manager on downloading the firmware: Read File... ROM Name = ROM-T1343 Error ROM Settings in the File Read File NG ISP Size Error Note the file or format errors, please contact your dealer for assistance Q7.
- Page 62 UHF860 Reader User Guide Q10. What’s the radiation pattern of the antenna? © 2013 GIGA-TMS Inc.
- Page 63 UHF860 Reader User Guide Q11. What’s the ideal relative position of tag and antenna for the best performance? The best relative position of tag and antenna are illustrated below: © 2013 GIGA-TMS Inc.
- Page 64 Q13. Can UHF860 be used in Auto Mode? Yes. Q14. Can I use UHF860 under RS232 and RS485 interface? The Interface is set by default to RS232/RS485. You may use one of the two. © 2013 GIGA-TMS Inc.
- Page 65 UHF860 Reader User Guide CONTACT US at: GIGA-TM S INC. 8F, NO. 31, Lane 169, Hsi - Chih Dist, New Taipei City, Taiwan Telephone: (02) 26954214 Fax: (02) 26954213 Official Website: www.gigatms.com.tw Email: Product information: promag@gigatms.com.tw Technical Support : support@gigatms.com.tw...
Need help?
Do you have a question about the UHF860 and is the answer not in the manual?
Questions and answers