
Summary of Contents for omnikine K11
- Page 1 USER’S MANUAL This product is only a driving assistance system. Any accident while using K11 shall not be the responsibility of the manufacturer. Please drive safely and follow all traffic laws for your area.
-
Page 2: Table Of Contents
TABLE OF CONTENTS 1. Sa fety advice --------------------------------------- -- 3~4P 2. Product introdu ction --------------------------- ----- ---- 3. N am e and fun ctions of each part of the product 6~7P 4. Comp onents --------------------- ----------------------- 5. In stallation instru ction ------------------------------ 9~15P 6. -
Page 3: Safety Advice
1. Safety advice This is to guide the driver to use this product appropriately and safely to prevent possible accidents or risks. So make sure to follow the safety advice. We may not be held responsibility for the incorrect installation or misuse of the product. W arn in gs : For the cases that incorrect/misuse of the product can lead serious damage or accident. - Page 4 1. Safety advice Cautions prior to use • Note In the conditions below, the product may not operate correctly. Make sure to follow correctly the user’s manual. If not, the manuf acturer shall not hold any responsibility for any accident or malfun ction. —...
-
Page 5: Product Introduction
By receiving GPS signals, K11 can set its operating speed and store the time and location of an accident. So in places where GPS signal reception is not possible, such as underground, tunnels, overpasses, skyscrapers, or forests, the product may not operate correctly. -
Page 6: Name And Functions Of Each Part Of The Product
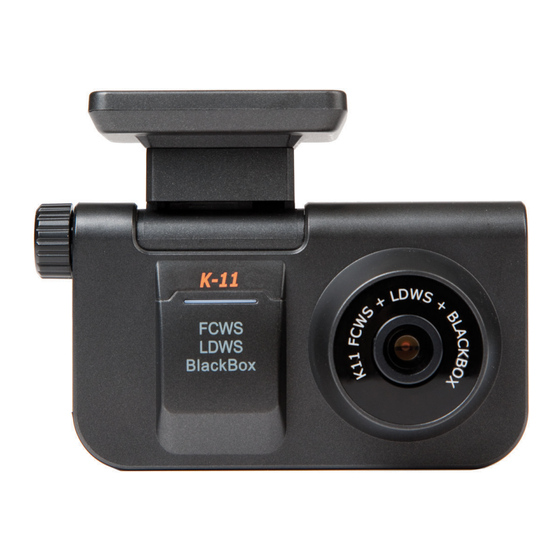
3. Name and functions of each part of the product Bracket: It holds K11 after being attached to the front windshield of the car. Angle adjusting bolt: It adjust the angle between the main body and the bracket. You can set an optimal angle according your car conditions. - Page 7 3. Name and functions of each part of the product DC input port: It connects the power cable enclosed in the kit. USB type turn signal connection port: It connects the turn signal cable and video out cable provided in the kit. enclosed in the kit is inserted in the slot.
-
Page 8: Components
4. Components Please check if the components shown in the picture are included in your package. If any item is missing or incorrect item is included, please contact the store where you purchased the product. Turn Signal, Turn Signal, Power Cable Device Romte Power Cable... - Page 9 • Please check the necessary components enclosed in the product kit and follow the installation instruction step by step. • This manual describes how to install K11 in a car by car type: passenger car, SUV, bus, and truck. For buses and trucks, except for the installation position, the procedures are similar with those for For buses and trucks, except for the installation position, the procedures are similar with those for passenger cars.
-
Page 10: In Stallation Instru Ction
5. Installation instruction and calibration Installation (how to attach/where to attach/angle) for passenger cars and SUVs For perfect installation of K11 please make sure to follow the details of this manual step by step. Install this product with the car’s engine turned off. - Page 11 5. Installation instruction and calibration 5. First, plug the provided 6. Arrange the power cord neatly power cable in the cigar jack. alongside of the windshield and door pillar trim. Use the provided wire splice clips. 8. When connecting the turn signal 7.
- Page 12 Check if the monitor connected on the monitor, basic installation of K11 is for video-out function is normally working. completed.
- Page 13 WHITE BLACK K11 is designed to connect TV-OUT/turn signal cables by USB connectors. The TV-OUT cable is ended with an RCA port, with which it can be connected to a screen to monitor the video image. If it is to be connected to a navigation system, the system should have a AV IN port.
- Page 14 5. Installation instruction and calibration 13. Outdoor installation: First park the car in 12. Indoor installation: As shown in the picture, an even, open place with no big obstacles place the product so that the blue line on such as tall buildings. As shown in the the monitor is placed at the point where the picture, place the product so that the blue virtual red lines cross and fix it with the angle...
- Page 15 5. Installation instruction and calibration 17. If there is no screen device to monitor the video image, install the product with the vertical and horizontal balance as shown in the picture below. Then start the engine, drive outdoors and wait for GPS reception.
-
Page 16: Installation Position By Car Type
6. Installation position by car type The USER’S Manual describes how to install K11 according to four car types and you can set your car type on the remote control. 1. Passenger car : 2. SUV & VAN : Attach the bracket on the front... - Page 17 For trucks and buses, do not forget to install a power stabilization cable (a 24V to 12V adapter). K11 can be operable in the voltage range of DC 12V to 24V but it doesn’t necessarily mean that the product can operates in all buses and trucks. Please ask advice from the store where you bought your K11 for the use in a truck or a bus.
-
Page 18: Features Of The Product
When there is a risk of a collision with the car in front, K11 gives a warning to the driver in advance. ... - Page 19 LD WS (Lane D eparture Warnin g System ) K11 is a driving assistance device that detects forward collision and lane deviation risks by obtaining the image of the road in front of the car through its internal camera and analyzing the data real time, and gives warnings to prevent any possible accident that can be caused by the driver’s reckless or drowsy driving.
- Page 20 During driving, K11 constantly records the image at any event and the driver can check it through a program. K11 has a Micro SD card slot (the memory is flexible on your choice). K11 support a PC viewer program so that you can check the recorded images on a desktop or a laptop.
- Page 21 A security warning LED of K11 blinks when it detects a motion, giving a warning that the image is being recorded. For this, K11 should be provided with constant power. Car battery discharge caused by this shall not be the responsibility of the manufacturer.
- Page 22 8. Setting You can set all the functions and modes of K11 with the remote control enclosed in the package. CT(Car Type) : Type of the car where this product will be installed How to set the CT : 1. Press the CT button(CT) A voice message will say “Car type.”...
- Page 23 8. Setting FCWS TTC (Time To Collision) : 1. This is to calculate predicted time to collision and give an alarm in advance. Press button the you will hear “time to collision setting”. 2. Adjust the time the button Every time the button is pressed, the voice message changes as follows: “half a second”...
- Page 24 8. Setting LDWS LWT(Left Warning Time) : alarm timing for left line deviation This is to set the timing of an alarm for a left line deviation. If you feel that the timing of the alarm is too fast or late, you can change the alarm timing for every 10cm.
- Page 25 8. Setting LDWS RWT(Right Warning Time) : alarm timing for right line deviation 1. This is to set the timing of an alarm for a right line deviation. If you feel that the timing of the alarm is too fast or late, you can change the alarm timing for every 10cm.
- Page 26 8. Setting LDWS CR(Calibration Reset) : 1. If K11 operates incorrectly while FCWS and LDWS, you can start recalibration by pressing button You will hear “calibration reset”. WS(Working Speed) : 1. This is to set the working speed of Lane Departure Warning 2.
- Page 27 8. Setting Black Box G(G-sensor shock): 1. This is to set the impact level that a G-sensor installed in K11 detects. Press button then you will hear “impact level setting”. 2. You can change the setting with button Every time the button is pressed, the voice message changes as follows: “sensitive detection”...
- Page 28 ② After booting, K11 starts operating with the recorded message “Hello. Please fasten your seat belt. Voice instruction starts.” ③ Use the remote control to turn K11 on or off once power is supplied. Or you can unplug the power cable from the product.
- Page 29 9. Function description (3) Manual recording ① Briefly press the REC button to start manual recording. The red LED will keep blinking until the recorded video file is stored. ② The file is stored in the “EVENT” folder in the Micro SD card. ③...
- Page 30 9. Function description (5) Constant recording ① In this mode, once power on, K11 keeps recording and the files are stored in the “INFINITE” folder in the Micro SD card. (6) Video-out and turn signal connection (the cable can be offered at a cost.) With the Video -out function, you can check video images real time on a screen device by connecting K11 USB port and the import port of the screen via the Video -out cable additionally provided on your option.
- Page 31 Please make sure insert the SD card before connecting the poser cable. Second, if the Micro SD card is removed from K11, intentionally or by an impact, while power on, blue LED is blinking. Unplug the power cable and insert the SD card. Then reconnect the cable.
- Page 32 First, reset the product by pressing the reset button. Second, if it still doesn’t work after format, please upgrade firmware. Third, get K11 repaired if the first and second steps don’t work. ⑥ Both red and blue LED off : First, check if the power cable is well connected.
- Page 33 ③ For normal recording operation, K11 automatically maintain at least 80MB empty. If the user stores other files on another device, K11 may not be able to secure the spare memory. Please make sure not to store other files than K11 recording filee and PC Viewer files in the Micro SD card.
- Page 34 K11 Back side K11 receives GPS time data in regular interval and synchronize its time with the received time in order to record exact time of any event. Therefore, once time is set, the RTC function makes K11 work in accordance real time.
-
Page 35: Firmware Upgrade
Please read carefully the instruction. (2) If K11 starts booting during upgrade or red and blue LED are not turned off for more than 2 minutes, unplug the power cable and format the Micro SD card on your PC (FAT file system). And re - download the upgrade file and follow the upgrade sequence again. -
Page 36: Use For Viewer Program
11. Use for Viewer program (1) Use for Viewer Program 1. Remove SD card from the product. 2. Insert SD card with card adapter or card reader into your computer. 3. Open your SD card and Copy the Viewer program “K11_PCViewer.exe” into your computer screen. And Click “K11_PCViewer.exe”... - Page 37 11. Use for Viewer program (3) Explanation for GUI Close Viewer Minimize Viewer Open the map Open file list File name which is playing Codec down load web link button Folder selection button Information from GPS Information from GPS Screen with connected Google map Speed data Play &...
-
Page 38: Q&A - Frequently Asked Questions
12. Q&A – frequently asked questions FCWS 1. How long it will take to boot? The FCWS function starts as soon as GPS reception is completed. 2. Alarms sound too often. Change alarm conditions by pressing the TTC button. You can change it to o.5 second. 3. - Page 39 1. First, copy the firmware upgrade file in the Micro SD card. Then insert the memory card to K11. 2. Supply power and push the left button on the rear side of K11 until the blue LED is on. 3. Wait for about 1 minute. When upgrade is completed, K11 automatically starts operating with voice instruction.
-
Page 40: Technical Specifications
13. Technical specifications Camera Color CMOS View angle ° Resolution 720*480 Operating Temp. ~ 60 ℃ ℃ Storage Temp. ~ 70 ℃ ℃ ※ Design and specifications of this product can change for improvement of the product quality without prior Input Voltage DC12V ~ DC24V notice. -
Page 41: Warranty
Warranty Warranty contents 1) Warranty period for this product is 1 year. Damage caused during normal use within the period is subject to free repair service. But accessories (e.g. the power cable) are covered for 6 months. 2) Repairs for the following cases will cause costs for technicians and components * Damage caused by the user’s reckless use * Damage caused by misuse of power * Damage caused by misuse of power... - Page 42 www.omnikine.co.kr...
Need help?
Do you have a question about the K11 and is the answer not in the manual?
Questions and answers