Table of Contents
Advertisement
Advertisement
Table of Contents

Related Manuals for Izzo swami

Summary of Contents for Izzo swami
- Page 1 User Manual...
-
Page 2: Table Of Contents
TABLE OF CONTENTS Thank You for Choosing Swami GT ..................2 Warranty/Video.........................2-3 1. General..........................4 Screen Display/Button Description ..............4 Basic Specifications ..................5 Accessories List ....................6 Charging Instructions ..................7 Getting Started ........................8 Set Up ......................8 Main Menu .......................8 Pairing Clubs ....................9 On the Golf Course ......................10... - Page 3 REGISTER YOUR SWAMI GT FILL OUT THE INFORMATION BELOW OR GO TO WWW.SWAMIGPS.COM/REGISTRATION Name: _____________________________________________ ADDRESS: __________________________________________ ___________________________________________________ Email: _____________________________________________ Phone: ( ) ________________________________ Date purchased: ________ /_________ /_______________...
-
Page 4: Thank You For Choosing Swami Gt
Swami GT. Warranty / Return Policy SWAMI is warranted to be free from defects for up to (1) year from your purchase date. Software updates are free of charge. IZZO cannot refund your purchase. IZZO will replace any defective unit within the warranty period. - Page 5 Recommended: Prior to using your SWAMI GT, please watch the instructional video by visiting www.swamiGPS.com/swami-gt Video...
-
Page 6: General
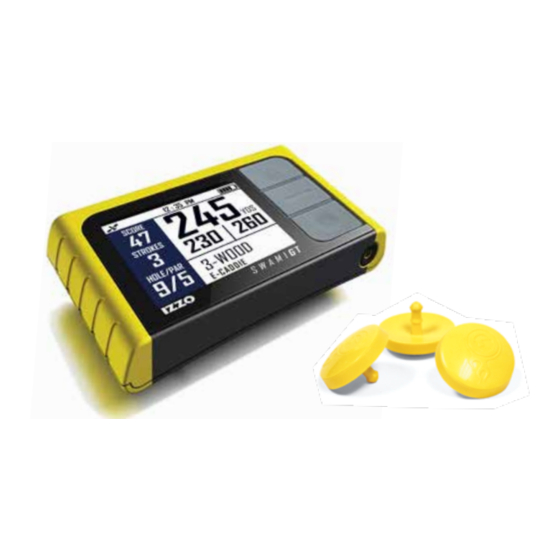
General Screen Display/Button Description Time Micro USB Port for Battery Level Charging/Data Transfer Satellite Signal [Up] Button Total Score [Enter] Button/ Hole Score Sensor [Down] Button Hole Number/Par [Power] Button Button Description: • [Power] Button: Hold for a few seconds to power on/off. •... -
Page 7: 1.2 Basic Specifications
1.2 Basic Specifications Number of courses stored 30,000 Worldwide Battery Type Rechargeable Lithium-Ion Battery Battery Life About 6-8 hours Charging Time About 3-5 hours Dimensions Length 4” x width 2.2” x thickness .6” Weight 3.52 oz Display Size 2.5 inches Water Resistent General Description of Hardware... -
Page 8: Accessories List
Accessories List Thank you for purchasing the SWAMI GT. Please confirm whether your Swami GT contains the following items: Micro USB Cord 14 Club Tags * Should any item above be missing, please contact IZZO Golf. IZZO Golf 1635 Commons Parkway Macedon, NY 14502 www.izzo.com... -
Page 9: Charging Instructions
Plug the other end of the USB cord into a PC or AC adapter (not included). • The Swami GT can be used for about 6-8 hours after a full charge. • Battery can be charged before being completely drained, but please do not charge it excessively. -
Page 10: Getting Started
Getting Started Set Up 1. Attach Club Tags to the end of the grip for each club by firmly pressing down and twisting to tighten. 2. Hold Power button for 3 seconds to power device on and then proceed to Pair Clubs (see page 9). Main Menu 1. -
Page 11: Pairing Clubs
11. To re-assign a Club Tag to a different club, repeat steps 1-4 using the same Club Tag. You will be asked if you wish to re-assign the Club Tag. Select Yes, then proceed with steps 5-7. Using Swami on the Course Getting Started... -
Page 12: On The Golf Course
(depending on which Feedback option is selected in Settings See section 4.6 on page 15). 2. Hit shot and travel to ball. 3. Hold Club Tag for upcoming shot near Sensor before hitting each shot, until reaching green. Using Swami on the Course... -
Page 13: Advancing Holes
3. If, after three rounds logged, a shot does not travel at least 75% of your avg. distance for that particular club, it will not be used in calculating your avg. distance for that club. Using Swami on the Course... -
Page 14: Hazard Screen
• End Round: Select to end your round and view round data. • Add Putt: Use if you forgot to register a putt or if you were “given” a putt (see Special Scenarios, page 13). Using Swami on the Course... -
Page 15: Special Scenarios
[OK] button to confirm. 3. Chip in, hole out, or hole-in-one: Any time that a putt is not registered (or added). The device must be manually advanced to the next hole (see Advancing Holes, page 11). Using Swami on the Course... -
Page 16: End Round
Use the [Up/Down] buttons to scroll to End Round, then press [OK] button to confirm. 2. Use the [Up/Down] buttons to scroll and view the data from your round. 3. Hold the [OK] button to exit and return to the Main Menu. Using Swami on the Course... -
Page 17: Settings
Settings • To return to the Main Menu, hold the [OK] button for 3 seconds, or use the [Down] button to scroll down and select Back. 1. Score Display: Choose if you want your total score to be displayed numerically or relative to par (+1, E, -1). -
Page 18: Online Portal
5. Windows .NET Framework 4.0 or above installed 6. Minimum of 1024x768 screen resolution Note: Online Portal is not yet fully compatible with Windows 8 and 10. Please check www.swamigps.com/swami-gt for Windows 8 and 10 compatibility updates. Not compatible with MAC (ios) operating systems. Settings/Online Portal... - Page 19 1. Plug Swami GT into PC via USB cable. Device must be powered on and on the Main Menu Screen. 2. Go to www.swamigps.com and click GT Portal at the top of the page. 3. Register a new account or Log-In with your existing account.
- Page 20 Installation 1. When using the online portal for the first time, you will have to install the Swami Helper Application to allow the portal to communicate with your Swami GT. 1. Click Download 2. Click Run For Internet Explorer: •...
- Page 21 For Firefox: Click Save File. • • Then go to Downloads (top right corner of Browser Window) • Click Run. For Chrome: • Click on the downloaded program (lower left corner of Browser window). • Click Run. Online Portal...
- Page 22 3. The setup screen will pop up and then click Next. 4. Click Next again to continue. 5. Click Next to confirm installation. Online Portal...
- Page 23 6. Then, the Swami Helper Application will start to install. 7. After the installation is complete, click Close. Online Portal...
-
Page 24: Uploading Rounds
8. During this process the driver installation window will pop up to install the driver and then disappear once the driver has been installed. Uploading Rounds 1. Click on the Upload Round Data tab at the top of the web page. 2. -
Page 25: Reviewing Rounds
4. Then Click UPLOAD again. 5. The round data on your Swami GT will begin to upload to the Portal. 6. After the upload has completed, close the upload window. Reviewing Round Data 1. Click the View Round Data tab at the top of the web page. - Page 26 In order to use the SWAMI GT correctly and safely, you must be aware of some specific knowledge; please read the following attentions in the manual prior to operating the device: •...
-
Page 27: Caution/About Gps
3 meters. Using Conditions As Swami GT uses GPS, it is available only in the places that can receive satellite signals, excluding places indoor or in water. About GPS / Using Conditions... - Page 28 QUESTIONS & ANSWERS Situations Possible Problems Solutions The device cannot A. Battery voltage is too low. A. Charge the battery. be started B. Press and hold the [ Power ] B. You didn’t press and hold the [ Power ] key for 3 seconds. key until the power is on.
- Page 29 Mail to: IZZO Golf 1635 Commons Parkway Macedon, NY 14502-9191 [ Please place inside envelope ]...
Need help?
Do you have a question about the swami and is the answer not in the manual?
Questions and answers
my swami 220208311 does not detect courses when I travel