Table of Contents
Advertisement
PIX 270i
Rack Mount Production Video Recorder
User Guide
Firmware rev. 2.10
interstage
Phistersvej 31, 2900 Hellerup, Danmark
Telefon 3946 0000, fax 3946 0040
www.interstage.dk
- pro audio with a smile
E7556 State Rd. 23 and 33, Reedsburg, WI, USA
www.sounddevices.com
+1 (608) 524-0625 • Toll-Free: (800) 505-0625 • fax: +1 (608) 524-0655
support@sounddevices.com
Advertisement
Table of Contents

Related Manuals for Video Devices PIX 270i

Summary of Contents for Video Devices PIX 270i
- Page 1 PIX 270i Rack Mount Production Video Recorder User Guide Firmware rev. 2.10 interstage Phistersvej 31, 2900 Hellerup, Danmark Telefon 3946 0000, fax 3946 0040 www.interstage.dk - pro audio with a smile E7556 State Rd. 23 and 33, Reedsburg, WI, USA www.sounddevices.com...
-
Page 3: Table Of Contents
PIX 270i User Guide and Technical Information Table of Contents Introduction Manual Conventions . . . . . . . . . . . . . . . . . . . . . . . . . . . . . 1 Video Mode and Audio Mode . - Page 4 PIX 270i User Guide and Technical Information Playback Rate of Audio Files . . . . . . . . . . . . . . . . . . . . . . 38 Playing Back Files on a Computer .
- Page 5 PIX 270i User Guide and Technical Information Specifications SDI . . . . . . . . . . . . . . . . . . . . . . . . . . . . . . . . . . . . . . . . . . . . 86 Analog Audio .
-
Page 6: Limitation Of Liability
Inc. DNxHD is a registered trademark of Avid, Inc. Other product and company names mentioned herein may be the trademarks of their respective owners. PIX 270i, and the sound waves logo are registered trademarks of Sound Devices, LLC. Limitation of Liability LIMITATION ON SOUND DEVICES’... -
Page 7: Introduction
.wav file (Audio Only Mode). The mode is determined by the Setup Menu option [System - Video/Audio Mode]. When set to [Video + Audio (QuickTime), the PIX 270i is in Video Mode. When set to Audio Only Poly (Wave) or Audio Only Mono (Wave) the PIX 270i is in Audio Mode. -
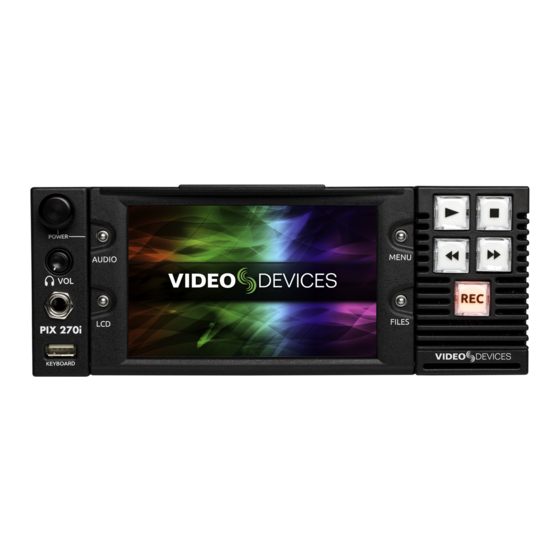
Page 8: Panel Descriptions
PIX 270i User Guide and Technical Information Panel Descriptions Front Panel Control Knob LCD Display The Control Knob can be both turned and Displays operating information when the pressed. Use the Control Knob to navi- On-Screen Display (OSD) is active(See gate between menu settings and to select “On-Screen Display”, page... -
Page 9: Rear Panel
PIX 270i User Guide and Technical Information Fast Forward Button Headphone Volume Knob When Stopped, press to cue up the next Adjusts the overall volume of the head- file for Playback. During Playback or phones. NOTE: the headphone output is Pause, press once to jump to the next Cue capable of ear-damaging levels. - Page 10 PIX 270i User Guide and Technical Information MADI I/O (BNC) Ethernet (RJ-45) Input (top) accepts up to 64 channels of Attaches to 1G or 100M Ethernet net- MADI (AES10) digital audio. Output works. Provides Dante connectivity (See (bottom) provides MADI (AES10) digital “Dante Audio Inputs”, page...
-
Page 11: Pix-Caddy 2 (Optional)
The PIX-CADDY 2 is an accessory to connect approved 2.5” drives to the front-panel drive bays. When removed from a PIX 270i, the PIX-CADDY 2 operates as a high-speed drive interface to Mac OS and Windows computers via the onboard FireWire800, USB 3.0, or the optional PIX-DOCK Thun- derbolt interface. -
Page 12: Menu And Navigation
PIX 270i User Guide and Technical Information Menu and Navigation Main View The Main View displays the live or playback video and the On-Screen Display. The Main View is the default view which appears when no other views or menus are selected. -
Page 13: Menu
Forward/Shuttle. Menu Press MENU (keyboard: F1) to enter the Setup Menu. Most settings of the PIX 270i are accessed and changed from the Setup Menu. Navigate between menu items by turning the Control Knob and pressing it to select. When in a menu, press MENU to go back to the previous screen. -
Page 14: Audio Screen
PIX 270i User Guide and Technical Information Audio Screen From any screen, press AUDIO (keyboard: F3) to view the Audio Screen. The Audio Screen displays all audio input levels and provides configuration of Track Arming, Track Naming, Input Source selection, Input Gain, and Input Delay. The Audio Screen by default displays 16 tracks at a time. This can be changed to 8, 16, or 32 track displays in [Audio - Audio Screen Meters]. -
Page 15: File List
PIX 270i User Guide and Technical Information Other audio related settings are accessible from the Setup Menu option Audio. File List Press FILES (keyboard: F2) to display the File List; A list of all of the recorded takes. Takes are ar- ranged chronologically and grouped by Reel. - Page 16 PIX 270i User Guide and Technical Information The selected drive is displayed on the top of the screen. To view the contents of other drives, scroll to the top of the list; A pop up box appears with a list of all available drives. Select the desired drive and press the Control Knob.
-
Page 17: Metadata Screen
PIX 270i User Guide and Technical Information • Remove from Play List: Removes the audio or video take from the Play List. (See “Play List”, page • Empty Play List: Empties the entire Play List. (See “Play List”, page Metadata Screen The Metadata screen gives you quick access to certain metadata for the previous, current, and next WAV recordings, letting you change the data in an instant. -
Page 18: Lcd
PIX 270i User Guide and Technical Information Phrase List The phrase list is a feature that lets you predefine a list of up to twenty most commonly used phras- es, which can be added to WAV files as part of the Notes metadata. This list, once defined, can be used via the Metadata screen or the Take Details screen. -
Page 19: Inputs And Outputs
Inputs and Outputs Video Inputs The PIX 270i accepts video input signals over HDMI, HD-SDI, and single link 3G-SDI Level A and B. The PIX 270i does not accept analog video signals. See the Specifications section for a complete list of supported frame rates. -
Page 20: Audio Inputs
PIX 270i: White = Stopped, Red = Record, Green = Playback. Audio Inputs The PIX 270i can record up to 64 tracks from a variety of audio input sources in both Video and Au- dio modes:... -
Page 21: Ethernet
MADI (AES10) The PIX 270i accepts 64 channels of digital audio with sampling rates from 32 kHz up to 96 kHz and bit depths up to 24-bits. MADI Inputs 1 to 64 are derived from the MADI Input BNC connector and the MADI Input SC (optical) connector on the rear panel. - Page 22 PIX 270i User Guide and Technical Information Dante Redundancy When [Network - Dante Redundancy Mode] is set to On, the PIX 270i’s Primary and Secondary Ethernet ports both transmit Dante Audio data over separate networks. This provides a fail safe of the Dante system if one of the networks should fail.
- Page 23 PIX 270i User Guide and Technical Information 5. Press the Control Knob to open the Audio Source options window. Select the general type of input to be used from Off, Line In, HDMI/AES In, MADI In, or SDI In and press the Control Knob again to open up all options for that input type.
-
Page 24: Audio Outputs
SDI Output. SDI Output routing is set in: [Audio - SDI Output]. Dante Audio Outputs Tracks 1-64 are permanently routed to Dante Outputs 1-64 respectively. Up to four PIX 270i units can be daisy-chained using their built-in internal Ethernet switches. If using five or more PIX 270i units, Sound Devices recommends using an external Ethernet Switch in a star configuration. -
Page 25: Ethernet
PIX 270i User Guide and Technical Information Ethernet The PRI and SEC Ethernet ports on the rear panel of the PIX 270i are used for a variety of PIX 270i functions/features: • Dante (64-Channel Audio I/O over network) (See “Dante Audio Inputs”, page •... -
Page 26: Video Monitoring Features
The following image is a luminance ramp signal displayed on a PIX 270i with no exposure assist en- abled. Screen shots in the following sections show the effect of the various Exposure Assist features on this test signal. - Page 27 PIX 270i User Guide and Technical Information 12-step False Color mode divides the monitor signal into 12 12-step luminance ranges and assigns a color to each. 100-108 Red 95-99 Orange 85-94 Yellow 79-84 Light Yellow 59-78 Light Grey 53-58 Pink...
-
Page 28: Focus Assist
PIX 270i User Guide and Technical Information Zebra 2 Zebra 1 70 IRE (+/- 5%) 85 IRE Focus Assist MENU Focus Assist features mark sharp edges in the video image to assist in focusing on the desired sub- ject. Focus assist is enabled pressing LCD + MENU. The word “FOCUS” is displayed in yellow text on the OSD when Focus Assist is enabled. - Page 29 PIX 270i User Guide and Technical Information Edge Enhance The Edge Enhance filter uses an algorithm which enhances the variation of the luminance of all edges present in the video image. The following image comparison demonstrates the effect of Edge Enhance on an image with a shallow depth-of-field and a short focal length (top) and a longer focal length (bottom).
-
Page 30: Zoom
Fast Forward buttons move left and right, respectively. Flip Display Some mounting situations require the PIX 270i (or camera) to be upside-down. The LCD output can be vertically inverted to facilitate upside-down operation with the Setup Menu option [LCD Monitor - Verical Flip Display]. The Setup Menu option [LCD Monitor - Horizontal Flip Display] option reverses the LCD output signal hoizontally (mirror image). -
Page 31: Sound Devices File Format
Time, and drives actively recording turn red. The PIX 270i is a record-priority device and will enter record any time the REC button is pressed. If the PIX 270i is not ready to record when a record com- mand is given, the PIX 270i will enter a Record Pending state. In this state the REC button will flash red. -
Page 32: File Splitting
Upon powering up, the PIX 270i will search for any .SDA or .SDV files on all drives and finalize them to their respective .WAV or .MOV formats. -
Page 33: Selecting A Video Codec
SDI stream or if it outputs PsF signal over HDMI, then the Setup Menu option [Video - Input PsF Detect] can be set to Interpret 1080i as PsF. This will force the PIX 270i to treat all 1080i signal as if it were PsF and deinterlace it accordingly. -
Page 34: Audio Track Arming
When Setup Menu option [System - Video/Audio Mode] is set to Audio Only Poly (Wave) or Audio Only Mono (Wave) the PIX 270i is in Audio Mode. In Audio Mode, the PIX 270i records only audio signal to uncompressed PCM .wav files. - Page 35 PIX 270i User Guide and Technical Information For example, if Reel=141001, Scene=101A, Take=001, Track=01, and the Track 1 Name is Boom, then the file’s name would be 14001-101A-001_01Boom.WAV Mono Wave files can be written to a maximum of 2 SSD’s. Recording Mono Wave files to a mechanical (spinning) hard drive is not supported.
-
Page 36: F Sampling Rate Modes
PIX 270i User Guide and Technical Information F Sampling Rate Modes 48.048k and 48.048kF The 48.048kF mode (F can stand for “fake”, “faux”, or “Fostex”) is a specific compatibility mode for use with the Fostex DV40 software (1.74 and previous), Avid, Final Cut Pro, and other post-produc- tion environments that do not recognize audio files written at 48.048 kHz. -
Page 37: Video Scaling And Frame Rate Conversion
[Video - File Resolution/Rate] contains entries with a combination of integer and non-integer frame rates (such as 1080p30/29.97). When any of these options are selected, the PIX 270i will record in the indicated integer frame rate if the input video is an integer frame rate or record in the indicated non- integer frame rate if the input video is a non-integer frame rate. -
Page 38: Up And Down Conversion
16:9 aspect ratio. Up-conversion is the process of fitting standard-definition video (with a 4:3 aspect ratio) into a high-definition, 16:9 frame. Down-conversion is the opposite process. The PIX 270i has various options for up and down conversion: Down-Conversion Letterbox: Maintains the same height and width ratio. - Page 39 PIX 270i User Guide and Technical Information Up-Conversion Anamorphic: Image is horizontally stretched to fit into 16:9. Results in a wide looking image. Pillarbox: Increases size and maintains same ratio. Results in blank bar at right and left of image and picture cropped at top and bottom.
-
Page 40: Playback Operation
85). Playback video is shown on the onboard LCD display and is sent to the video outputs. The PIX 270i’s video playback clock is determined by the setting in [Timecode/Sync - Sync Reference -Video Playback]. Audio Only playback clock is determined by the setting in [Timecode/Sync - Sync Ref -Audio Only Mode]. -
Page 41: Shuttle Playback Mode
Shuttle Playback Mode In Shuttle Playback Mode the PIX 270i is capable of playing back at various rates in forward and in reverse. To immediately enter Shuttle Playback Mode from the Main View, press the Control Knob. The cued file will begin playback at half speed (Fast Forward x1/2). -
Page 42: Looping Playback
To exit looping, hold down Play () for 1 second. Playback Mode By default, when a file is selected for playback, the PIX 270i will play the file immedi- ately and stop playback when the end of the file is reached. The Setup Menu options [System - Playback Start mode] and [System - Playback mode] alter this behavior. -
Page 43: Play List
Files can be added to a Play List to be played back in a specific order. Play List functions are accessed from the File Detail view of any file. By default, the PIX 270i will play files in the order that they are Playback Mode] arranged in the File List. -
Page 44: Playback Rate Of Audio Files
Playback Rate of Audio Files Audio files (WAV) are always played back at the sample rate of the PIX 270i. The sample rate that the file was originally recorded at (and that is stamped in the file’s header) will be ignored by PIX 270i during playback, and the PIX 270i will play the file at the current sample rate, as determined by Setup Menu option [Timecode/Sync - Sync Ref - Audio Only Mode]. -
Page 45: Synchronization And Timecode
In other words, the PIX 270i references this clock and synchro- nizes its own clock to it. The PIX 270i writes files based on this clock as well - each audio sample and video frame written out to the file is synchronized to the incoming video. This way, the PIX 270i is always completely in sync with the connected video source - there can never be any drift of audio or video between the camera and the PIX. -
Page 46: Sync Reference
In Video Mode the PIX 270i’s sync source is always the incoming video signal when stopped and while recording. This is to ensure that the PIX 270i is always in sync with the incoming video source. During Playback of QuickTime files, the PIX 270i can reference its own Internal clock, Video Input (SDI/HDMI), or Genlock signal at the SYNC IN BNC. -
Page 47: Timecode Reader
The setting of this is parameter is found in Setup Menu option [Timecode/Sync - Sync Out]. When the Sync Out of the PIX 270i is not needed, set this option to Off. When using the Lockit to gener- ate the Sync (genlock) for a camera, the frame rate and resolution must be set for the camera’s sync input. -
Page 48: Timecode Modes
Freerun Auto Mute Functions the same as Freerun mode except timecode signal is muted from the timecode output when the PIX 270i is in Stopped mode. This allows rec-run functionality when Rec Run mode is not suitable (e.g. Multi-camera shoots). -
Page 49: Timecode Input Sources
Genlock In this scenario, the PIX 270i is the master source of video sync. Set the output of the sync generator to a selected rate and connect the PIX 270i Sync Out (Genlock) to the same camera. Feed the time-... - Page 50 SDI/HDMI In this scenario, each camera is its own master video sync source , but the PIX 270i is the source of the timecode. The PIX 270i records its files based on the camera’s clock. The heads will match per- fectly, but the tails may drift depending on the cameras’...
- Page 51 MENU IN CF EX The wordclock output on the PIX 270i is synchronous with incoming video signal. The wordclock output can be used to sync external audio recorders to any camera. To enable wordclock output, set Setup Menu item [Timecode/Sync - Sync Out] to Wordclock, Follows Video In.
-
Page 52: Powering
The PIX 270i features an advanced powering system with 2 redundant DC Inputs (on rear XLR4M connections) and PowerSafe technology. Two power sources can be attached simultaneously. When multiple power sources are connected, the PIX 270i will use only one source at a time. The order of precedence for power sources is: 1. DC Input 1 (Primary power source) -
Page 53: Network Grouping
Setup Menu option [Network - Grouping - Network Group] assigns the PIX 270i to one of four available groups. In this section, the term “unit” refers to PIX 250i, PIX 260i, or PIX 270i Video Recorders, or the 970 Audio Recorder, unless otherwise specified. -
Page 54: Pushing Settings To Group
Transport control (Record, Play, Pause, Stop, Jog, Shuttle, Fast Forward, and Rewind) of grouped units is linked. Recording and playback is frame-synchronized among PIX 260i and PIX 270i units in a group. When a file is selected for playback, all units in the group will play the file of that same name if it exists. - Page 55 PIX 270i User Guide and Technical Information 5. Repeat step 4 for all units in the group. Now when jumping to a cue marker on one unit all units in the group will also jump to the cue point and remain in sync.
-
Page 56: External Control
Web Interface - PIXNET When either the primary (PRI) or secondary (SEC) Ethernet ports on the PIX 270i rear panel are con- nected to an Ethernet network (via switch or router), or direct to a computer (ad-hoc), the PIX 270i can be controlled remotely via PIXNET. - Page 57 The PIX 270i’s web IP address must be determined before accessing PIXNET: 1. Make sure that the PIX 270i is powered on and connected to a network or directly to a com- puter via one of the rear panel Ethernet connectors.
- Page 58 47). Click on the Name to open the Unit Page for that particular unit. Address Bar Video Input Details Type in PIX 270i IP Address to connect to Displays the resolution, frame rate, and PIXNET. source (SDI or HDMI) of incoming video signal.
- Page 59 PIX 270i User Guide and Technical Information PIXNET Unit Page The Unit page allows for near full remote control of the 970 via the web browser. All Units Page button File Format Click to return to All Units Page. Displays current file format (poly or mono WAV files).
-
Page 60: Pixnet Unit Page Main View And Menu Tabs
The Unit Page can display many different menus. The menus are accessed by clicking on the tabs of the Unit Page. Not all PIX 270i menu items or features are available from PIXNET. Main View The Main View is always the first to appear when a Unit Page is open and is displayed whenever no other tab is selected. - Page 61 PIX 270i Audio Setup Menu options are displayed and can be edited directly from the web browser. Audio Tracks The Audio Tracks screen allows all the same adjustments as the Audio Screen on the PIX 270i itself: Track Name Gain Controls Click to edit.
-
Page 62: Triggering Recording From External Timecode
The PIX 270i can be configured to start recordings when incoming timecode begins rolling and stop when it becomes stationary. This is generally referred to as Record Run timecode. The master time- code device should be setup in this manner. To configure the PIX 270i to follow Record Run com- mands: 1. Set Setup Menu option [Remote Control - Rec Start/Stop] to Timecode. -
Page 63: Triggering Recording From Sdi Flag Bits
Start and stop flags embedded in the SDI signal from some cameras can be used to start and stop recording of the PIX 270i. To enable this feature, set Setup Menu option [Remote Control - Rec Start/Stop] to the SDI Flag option that refers to the manufacturer of the connected camera. -
Page 64: Usb Keyboard
PIX 270i User Guide and Technical Information USB Keyboard The PIX 270i supports standard USB keyboards connected to the USB A connector on the front panel. The keyboard can be used to navigate menus, enter text, and control PIX 270i Transport functions. -
Page 65: Storage And File Management
Supported Storage Devices Sound Devices maintains a list of storage devices that are approved for use with the PIX 270i. An up- to-date list of supported storage devices can be found online: http://www.sounddevices.com/approved Approved mechanical drives are recommended for use only in stationary applications. Excessive vibration or motion may cause data corruption when using mechanical drives. - Page 66 PIX 270i User Guide and Technical Information Mac OSX 10.6.4 and below does not support exFAT volumes. Formatting To format a drive: 1. Make sure the drive to be formatted is connected to the recorder and note which drive num- ber it is.
-
Page 67: Metadata
The reel can be considered a container for all assets gener- ated during a recording session or day’s work. It is intended to indicate what reel the recording is part of. The PIX 270i will create a folder at the root level for each Reel. Recorded files are placed inside the current Reel folder. -
Page 68: Audio File Metadata
6. Use the Control Knob to select OK to save and exit back to the Audio Screen. Audio File Metadata PIX 270i Broadcast Wave Files include iXML (revision 1.5) data and bEXT chunk data. For bEXT and iXML-aware software applications this data is available. For applications that don’t recognize bEXT or iXML, this information is ignored. - Page 69 Editing Audio Metadata Audio metadata can be edited from the PIX 270i before, during, or after recording. Metadata edits to a take will ripple to that same take on all drives. To edit the Notes, Scene, Take, Track Names, or Circled field of any audio take: 1. Press FILES to access the File List.
-
Page 70: File Management
PIX 270i User Guide and Technical Information Next Take Current (recording)Take Previous (recorded) Takes 3. Press the Control Knob to access the Take Details screen. (For multi-file entries, hold the Control Knob) 4. Rotate the Control Knob to select the desired field for editing. - Page 71 File Size Limit To aid in maintaining manageable file sizes, the PIX 270i will automatically begin writing a new file after a set amount of minutes has elapsed in a recording (Video Mode) or after a file size limit has been reached (Audio Mode).
-
Page 72: Folder Structure
Do not copy unsupported files from a computer (or any other host device) to a drive that is intended to be used by the PIX 270i. If this occurs, it is advisable to format the drive with the PIX 270i before making new recordings. - Page 73 3. Select the drive to be mounted and set its mode to Ethernet File Transfer. This drive is now attached to the Network and unavailable to the PIX 270i for read or write actions. The Drive Status field on the OSD will read “Network” in this mode.
-
Page 74: Setup Management And Firmware Upgrades
PIX 270i User Guide and Technical Information Download the FileSafe utility from the Sound Devices website: http://www.sounddevices.com/products/filesafe/downloads/ Sound Reports Sound reports are comma-delineated CSV files based on WAV file metadata. The headers for these reports are customizable. You can create sound reports in a specific folder to a single drive only or in a current folder for all applicable drives. -
Page 75: Custom Defaults And Setup Menu Option Visibility
Formatting a storage device will also remove any setup files that are on the drive. Setup files can be stored on a computer and copied back to the root of a PIX 270i drive to be loaded on the PIX 270i. -
Page 76: Factory Restore
To fully restore the unit to its factory firmware state, hold Fast Forward and Stop while booting the PIX 270i up, until the Main View appears. This will load factory default settings and restore some settings that are normally not affected by performing [Quick Setup - Load Factory Settings], such as restoring the network user name and password to “guest”. -
Page 77: Setup Menu Options
PIX 270i User Guide and Technical Information Setup Menu Options The Setup Menu controls a wide range of parameters for the PIX 270i. The parameters are organized into categories, making the Setup Menu easy to navigate. The following tables show the parameter name, a description, options available, and the factory default setting where applicable. -
Page 78: Video
1080p30. If a differ- Codec • ProRes 4444 330Mb/s, 12bit ent resolution and frame rate is selected, the PIX 270i • ProRes 422HQ 220Mb/s, 10bit will use the corresponding DNxHD data rate. » ProRes 422 145Mb/s, 10bit •... -
Page 79: Audio
PIX 270i User Guide and Technical Information Parameter Name Description Options When set to “Auto”, the PIX will sense PsF signal based on a flag within the signal stream. Most devices » Auto with SDI output will provide this flag, however some... - Page 80 PIX 270i User Guide and Technical Information Parameter Name Description Options • 1,2 • 3,4 • 5,6 • 7,8 • 9,10 • 11,12 • 13,14 • 15,16 • 17,18 • 19,20 • 21,22 • 23,24 • 25,26 • 27,28 • 29,30 •...
-
Page 81: Timecode/Sync
PIX 270i User Guide and Technical Information Parameter Name Description Options » 1-8: Off • 9-16: Off • 17-24: Off • 25-32: Off • 33-40: Off • 41-48: Off • 49-56: Off • 57-64: Off • 1-32: Off • 33-64: Off •... - Page 82 • Freerun Auto Mute • Record Run Sets the running mode for the internal timecode gen- Timecode Mode erator and/or the method which the PIX 270i receives • 24h Run SMPTE timecode.. • 24h Run Auto Mute • Ext TC (LTC) •...
-
Page 83: Lcd Monitor
Sets the offset of the beginning timecode stamp of recorded files. Useful when there is a constant offset » 0 File Start TC Offset between camera and PIX 270i recorded files. The (numeric -10 to +10) applied offset does not affect timecode output of the PIX 270i. -
Page 84: On-Screen Display
PIX 270i User Guide and Technical Information On-Screen Display Parameter Name Description Options » On ABS Time Display of absolute record time. • Off » On File Codec Display of current file codec • Off » On File Name Display of current file name •... -
Page 85: Remote Control
» Active high When the function is true, the pin will be grounded. Network Parameter Name Description Options Sets name of PIX 270i. This must be unique within a This PIX’s Name » PIX270 network. Grouping Sub-menu for network grouping settings. -
Page 86: System
• Audio View (with expanded meters) Determines power on and off method. When set to Always on, the PIX 270i will turn on and off when • Always On Power external DC is applied. When Use Power Switch is »... -
Page 87: Quick Setup
PIX 270i User Guide and Technical Information Parameter Name Description Options Displays a dialog indicating firmware version and Version Info serial number. This is not a setting, but a helpful refer- ence. Searches attached drives for a .prg firmware file and Update Software begins the firmware update process. - Page 88 PIX 270i User Guide and Technical Information Connector Pin Assignments Connector Pin Assignments Notes 1 –ground Pins 2 and 3 unused. When using a XLR4M (2) 2 –float single power source, use Primary con- (Primary and Second- 3 –float nector (top).
- Page 89 PIX 270i User Guide and Technical Information USB-A (1) For use with USB Keyboards only. Data Standard USB-A receptacle Keyboard Input transfer is not supported 1 –Input 8 signal (+) 2 –Input 8 Ground 3 –Input 7 signal (-) 4 –Input 6 signal (+) 5 –Input 6 Ground...
- Page 90 PIX 270i User Guide and Technical Information 1 –Digital Out 4 signal (+) 2 –Digital Out 4 Ground 3 –Digital Out 3 signal (-) 4 –Digital Out 2 signal (+) 5 –Digital Out 2 Ground 6 –Digital Out 1 signal (-) 7 –Digital In 4 signal (+)
- Page 91 The PIX 270i supports up to 64 Tracks of audio in a QuickTime file. When exporting the QuickTime file for PIX 270i playback be certain to use only 2 audio streams (PIX 270i can handle up to 64 audio tracks over one QuickTime audio stream).
-
Page 92: Hdmi
PIX 270i User Guide and Technical Information Specifications Input • 4:4:4 or 4:2:2; 12, 10, or 8-bit • 3G-SDI (levels A and B), HD-SDI, or SDI Output • 4:4:4 or 4:2:2; 12, 10, or 8-bit • 3G-SDI (level A), HD-SDI, or SDI... -
Page 93: Audio Recording And Playback
PIX 270i User Guide and Technical Information Audio Recording and Playback Record/Playback • 64 channels record/playback @ 48.048 kHz sample rate and lower • 32 channels record/playback @ 88.2 kHz sample rate and higher (Audio Only Mode) • Simultaneous Analog, AES/EBU, HDMI, SDI, Dante, or MADI. Selectable per channel... -
Page 94: Timecode And Sync
PIX 270i User Guide and Technical Information See Sound Devices’ website for a list of approved media: www.sounddevices.com/approved Timecode and Sync Modes Supported Freerun, 24 Hour run, Record run, External (LTC or SDI/HDMI) Frame Rates 23.976, 24, 25, 29.97DF, 29.97ND, 30DF, 30ND Accuracy •... -
Page 95: Declaration Of Conformity
PIX 270i User Guide and Technical Information Declaration of Conformity According to EN ISO/IEC 17050-1:2004 Manufacturer’s Name: Sound Devices, LLC Manufacturer’s Address: E7556 State Rd. 23 and 33 Reedsburg, WI 53959 Declares under sole responsibility that the product as delivered... -
Page 96: Software License
PIX 270i User Guide and Technical Information Software License End-user license agreement for Sound Devices PIX 270i Embedded Software / Firmware Important Read carefully: This Sound Devices, LLC end-user license agreement (“EULA”) is a legal agreement between you (either an individual or a single entity) and Sound Devices, LLC for the Sound Devices, LLC software product identified above, which includes computer software, embedded software, and may include associated media, printed materials, and “online”... -
Page 97: Warranty And Technical Support
Sound Devices hosts a user support forum. The URL is: http://forum.sounddevices.com Sound Devices cannot guarantee that a given computer, software, or operating system configuration can be used satisfactorily with the PIX 270i Video Recorder based exclusively on the fact that it meets our minimum system requirements. - Page 99 Phistersvej 31, 2900 Hellerup, Danmark Telefon 3946 0000, fax 3946 0040 www.interstage.dk - pro audio with a smile PIX 270i, v 2.10 - Printed in U.S.A.
Need help?
Do you have a question about the PIX 270i and is the answer not in the manual?
Questions and answers