
Related Manuals for Mongoose R6174


Summary of Contents for Mongoose R6174
- Page 1 SCOOTER OWNER'S MANUAL THIS MANUAL CONTAINS IMPORTANT SAFETY, PERFORMANCE AND MAINTENANCE INFORMATION. READ THE MANUAL BEFORE TAKING YOUR FIRST RIDE ON YOUR NEW SCOOTER, AND KEEP THE MANUAL HANDY FOR FUTURE REFERENCE.
-
Page 2: Table Of Contents
Contents 1 Safety . . . . . . . . . . . . . . . . . . . . . . . . . . . . . . . . . . . . . . . . . . . . 4 5 Use . - Page 3 Congratulations About This Manual on your new scooter! Proper assembly and operation of your It is important for you to understand your new scooter . scooter is important for your safety and enjoyment. Our By reading this manual before you go out on your first ride, you’ll customer service department is dedicated to your satisfaction know how to get better performance, comfort, and enjoyment with Pacific Cycle and its products. If you have questions or need from your new scooter. It is also important that your first ride on advice regarding assembly, parts, performance, or returns, your new scooter is taken in a controlled environment, away please contact the experts at Pacific Cycle. Enjoy the ride! from cars, obstacles and cyclists .
- Page 4 Helmets Save Lives! Correct Fitting Make sure your helmet covers your forehead • ALWAYS WEAR A PROPERLY FITTED HELMET WHEN RIDING YOUR SCOOTER • DO NOT RIDE AT NIGHT • AVOID RIDING IN WET CONDITIONS Incorrect Fitting Forehead is exposed and vulnerable to serious injury...
-
Page 5: Safety
1 Safety Safety ❶ SAFETY SIGNAL WORDS USER RESPONSIBILITY The following safety signal words indicate a safety message. All persons assembling, using, and maintaining the scooter must The symbol alerts you to potential hazards. Failure to follow the read and understand the safety warnings and operating warning may result in damage to property, injury, or death. -
Page 6: Personal Safety
Safety 1 PERSONAL SAFETY WARNING! Riding a scooter without protective gear, clothing, or a helmet Properly fitted helmet may result in serious injury or death. Always wear protective gear, clothing, and helmet when riding the scooter. Ensure protective gear does not interfere with steering, braking, and pushing. - Page 7 1 Safety Helmet Use Important! Many states have passed helmet laws regarding children. Make sure you know your states helmet laws. It is your job to enforce these rules with your children. Even if your state does not have a children’s helmet law, it is recommended that everyone wear a helmet.
-
Page 8: Riding Safety
Safety 1 RIDING SAFETY • Use original spare parts only. Do Not make structural changes or modifications to the scooter. WARNING! • Wear proper riding attire, reflective if possible, and avoid open toe shoes. Riding the scooter in unsafe conditions (i.e.: at night), in an •... - Page 9 1 Safety Night Riding Safe Riding Rules for Children • Important! Riding a scooter at night is not recommended. • Many states require that children wear a helmet while riding. Check your local laws regarding night riding. Always wear a properly fitted helmet. •...
-
Page 10: Before You Ride Safety Checklist
Safety 1 BEFORE YOU RIDE SAFETY CHECKLIST Frame and Fork Before every ride, it is important to carry out the following □ safety checks. Do not ride a scooter that is not in proper The frame and fork are not bent or broken. working condition! Replace any worn or broken parts as Steering needed. -
Page 11: Parts Identification
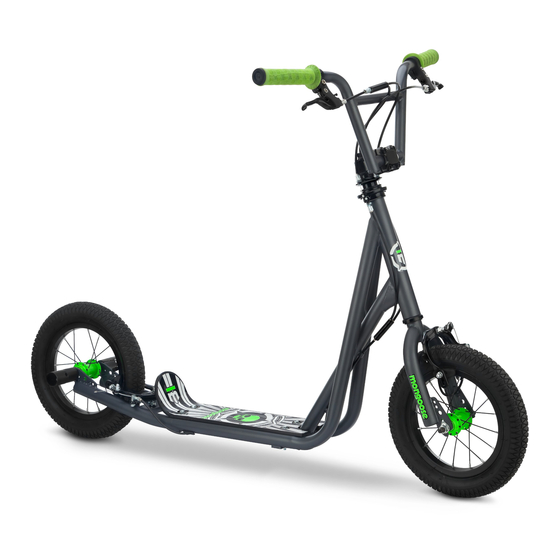
Parts Identification ❷ Expo Scooter Get to know the parts of your scooter. This will help with assembly, maintenance, and troubleshooting. Models vary in color and style. Part name Torque (ft-lb) Part name Torque (ft-lb) Handlebar grip Front fork Rear brake lever 55 - 70 Front caliper brake assembly 50 - 70... - Page 12 Parts Identification 2 23 24...
-
Page 13: Assembly
3 Assembly Assembly ❸ WARNING! If you need replacement parts or have questions pertaining to the assembly of your scooter, call the service line direct at: 1-800-626-2811. Monday - Friday 8:00 am to 5:00 pm Central • Improper assembly of this product may result in serious Standard Time (CST). -
Page 14: Getting Started
Assembly 3 GETTING STARTED ❶ Open the carton from the top and remove the scooter. Handlebar assembly Figure 3.2 ❷ Remove the straps and protective packaging from the scooter. Important! Do not discard packing materials until assembly is complete to ensure that no required parts are accidentally discarded. -
Page 15: Attach The Handlebar
3 Assembly ATTACH THE HANDLEBAR ❻ Look at all the cables to be sure they run in a smooth arc from the brake lever to the front brake or cable stop on the WARNING! frame. Important! If they are twisted or kinked, braking will not work. -
Page 16: Attach The Front Brake Cable
Assembly 3 ATTACH THE FRONT BRAKE CABLE WARNING! Cable adjustment Cable nut slot barrel slot Failure to properly set the brakes may result in the inability to stop the scooter movement and cause serious injury or death. Be sure the brakes are functioning properly before using the scooter. -
Page 17: Cable Detangler
3 Assembly CABLE DETANGLER Some scooters are equipped with a cable detangler for the rear c. Check to see if the bearing unit bottoms out on the brake. Follow these steps to attach the upper cable to the rear lower detangler plate. If so, unscrew the adjust barrel brake lever. - Page 18 Assembly 3 Front View of Scooter Cable Cable adjuster splitter Front brake cable Single cable Cable adjusting Front brake Rear brake casing barrel lever lever Upper cable Upper cable (short casing) (long casing) Upper cable adjusting barrels 1 mm Locknut (1/32") Upper plate Bearing unit...
-
Page 19: Attach The Front Wheel
3 Assembly ATTACH THE FRONT WHEEL ❶ Loosen the axle nuts on the front wheel. If there is a washer inside of the axle nut, it belongs outside of the fork dropouts. ❷ Position the front wheel between the front fork legs with the axle resting inside the fork drop out. -
Page 20: Attach The Rear Wheel
Assembly 3 ATTACH THE REAR WHEEL ❶ Loosen the axle nuts on the rear wheel. If there is a washer inside of the axle nut, it belongs outside of the fork dropouts. ❷ Position the rear wheel between the rear fork legs with the axle resting inside the fork drop out. -
Page 21: Attach The Pegs
3 Assembly ATTACH THE PEGS Important! Periodically check to make sure pegs are tight. Some models may come equipped with 2 or 4 pegs. To install pegs: Clip retaining washer ❶ Do not loosen or remove axle nuts. Axle nut ❷... -
Page 22: Adjustments
Adjustments 4 Adjustments ❹ TOOLS REQUIRED After your scooter is assembled you will need to make adjustments. If you need replacement parts or have questions • Phillips head screw driver pertaining to the assembly of your scooter, call the service line •... -
Page 23: Adjusting The Brakes
4 Adjustments ADJUSTING THE BRAKES Adjusting the Side-pull Caliper Brakes Brake cable at brake lever ❶ If the brake cable is disconnected at the caliper, thread the brake wire through the adjustment barrel. Figure 4.2 Brake wire Figure 4.3 ❷ Using a 10 mm open end wrench, loosen the cable anchor bolt until you can see a gap large enough for the cable wire. - Page 24 Adjustments 4 Adjusting the Brake Pads Center the Brake Pads Important! Before riding the scooter it is important to check the Rotate the wheel and look straight down at the gap between brakes. If you squeeze the brake lever and one brake arm moves the rim, brake pads, and fork.
- Page 25 4 Adjustments ❷ If the gap between the brake pad and wheel is uneven, ❸ Pull and release the brake lever a few times and check if the adjust the position of the brake pad. Figure 4.6 pads are centered. •...
- Page 26 Adjustments 4 Check the Brakes ❶ After adjusting the brake, squeeze the brake lever as hard as you can several times and re-inspect the brake pads, centering and brake lever travel. If the brake pads are no longer square to the rim, repeat brake pad adjustments. Figure 4.8 1/3 distance to handlebar...
-
Page 27: Adjusting The Handlebar
4 Adjustments ADJUSTING THE HANDLEBAR WARNING! • Improper adjustment of the handlebar may result in damage to the stem post, steering tube and result in loss of control, serious injury or death. Ensure the minimum Stem binder bolt insertion marks on the stem post are not visible above the Handlebar binder top of the headset. - Page 28 Adjustments 4 Adjusting the Handlebar Alignment ❶ Using a 14 mm open-end wrench loosen the stem binder bolt. Figure 4.11 ❷ Move the handlebar left or right until it is aligned with the front wheel. ❸ Tighten the stem binder bolt. Check the handlebar binder bolts to be sure they are properly tightened and the handlebar is clamped in place.
-
Page 29: Use
5 Use ❺ HAND OPERATED BRAKES To best avoid this: • Apply the front and rear brakes simultaneously, while shifting WARNING! your body weight back slightly to compensate for braking force. Failure to follow all local and state regulations and laws •... -
Page 30: Security
Use 5 SECURITY You just bought a new scooter! Don’t lose it. It is advisable that the following steps be taken to prepare for and help prevent possible theft: • Invest in a bicycle lock that will resist hacksaws and bolt cutters. -
Page 31: Maintenance
6 Maintenance Maintenance ❻ BASIC MAINTENANCE WARNING! • Failure to conduct maintenance on the scooter may result The following procedures will help you maintain your scooter for in malfunction of a critical part and serious injury or death. years of enjoyable riding. Proper maintenance is critical to the performance and safe •... -
Page 32: Lubrication Schedule
Maintenance 6 LUBRICATION SCHEDULE Component Lubricant Method Weekly Brake calipers Three drops from oil can Brake levers Two drops from oil can Brake cables Lithium based grease Remove cable from casing. Grease entire length. Wipe off excess lubrication from other surfaces. Brake lever and caliper pivot points Light oil Two to three drops from oil can Yearly... -
Page 33: Parts Maintenance
6 Maintenance PARTS MAINTENANCE Brakes Frequency: Inspect and maintain before each use Inspect Action Maintenance Levers Check the levers are securely fastened to the handlebar. Position the levers to fit the rider’s grip and screw tight to handlebar. Pads Check pad position, gap and pressure. See Section 4: Adjusting the Brakes Cables Check the outer casing for kinks, stretched coils and damage. - Page 34 Maintenance 6 Tires Frequency: Inspect and maintain at least each use. Inspect Action Maintenance Tire Inflation Check tire pressure. Inflate tire to the pressure indicated on the tire sidewall. See “Inflating a Tire Tube” for more detail. If the tire is flat see “Fixing a Flat Tire”...
-
Page 35: Hub Bearings
6 Maintenance HUB BEARINGS INFLATING THE TIRE TUBE WARNING! Hub bearings require special thin wrenches called cone wrenches. If you do not own these tools, do not attempt hub • An unseated tire can rupture unexpectedly and cause bearing adjustments. Have a qualified bicycle mechanic perform the adjustment if you have any doubts. -
Page 36: Repairing A Flat Tire
Maintenance 6 REPAIRING A FLAT TIRE WARNING! ❿ Start at the valve stem and install the first bead onto the rim. Repeat for the second bead. An unseated tire can rupture unexpectedly and cause serious injury or death. Be sure the tire is properly seated when ⓫... -
Page 37: Troubleshooting Guide
6 Maintenance TROUBLESHOOTING GUIDE Problem Possible Cause Remedy Brakes not working • Brake pads worn down • Replace brake pads effectively • Brake pads/rim greasy, wet or dirty • Clean pads and rim • Brake cables are binding/stretched/damaged • Clean/adjust/replace cables •... - Page 38 Maintenance 6 Problem Possible Cause Remedy Steering not • Wheels not aligned in frame • Align wheels correctly accurate • Headset loose or binding • Adjust/tighten headset • Front forks or frame bent • Take bike to a bike shop for possible frame realignment Frequent •...
-
Page 39: Warranty
7 Warranty Warranty ❼ LIMITED WARRANTY AND POLICY ON REPLACEMENT PROCEDURES & RESPONSIBILITIES Your purchase includes the following warranty which is in lieu of all other express warranties. This warranty is extended only to the initial consumer purchaser. No warranty registration is required. This warranty gives you specific legal rights and you may have other rights which vary from state to state. FRAME Steel frames are guaranteed against faulty materials and workmanship for as long as the initial consumer purchaser has the scooter, subject to the condition of the warranty listed below. -
Page 40: Purchase Record
Warranty 7 PURCHASE RECORD Fill in immediately and retain as a record of your purchase. Please retain your sales receipt for any possible warranty claims. Your Name: Address: City: State: Date Purchased: Place of Purchase: Model & Brand Information: Wheel Size: Color: Model Number: Model Number: Date Code:... - Page 41 4902 Hammersley Road Madison, WI 53711 Service: 1-800-626-2811 www.pacific-cycle.com ©2013...
Need help?
Do you have a question about the R6174 and is the answer not in the manual?
Questions and answers