
Summary of Contents for SKY KING DR775
- Page 1 Quadcopter Drone with Video Camera User’s Guide for Model DR775 v1396-01 For the most up-to-date version of this User’s Guide, go to www.gpx.com...
- Page 2 Warnings & Precautions Important Safety Instructions FCC Warnings • Read these instructions. Warning: Changes or modifications to this unit • Keep these instructions for future reference. not expressly approved by the party responsible • Heed all Warnings. for compliance could void the user’s authority •...
- Page 3 Additional Warnings & Precautions keep it away from children. • WARNING: To reduce the risk of fire or Gardez les piles neuves et d’occasion à partir electric shock, do not expose this apparatus to des enfants. Si le compartiment de la batterie rain, moisture, dripping, or splashing.
-
Page 4: Table Of Contents
Table of Contents Orientation � � � � � � � � � � � � � � � � � � � � � � � � � � � � � � � � � � � � � � � � � � � � � � � � � � � � � � � � � � � � � � � � � � 5 Includes Rear View Top View... -
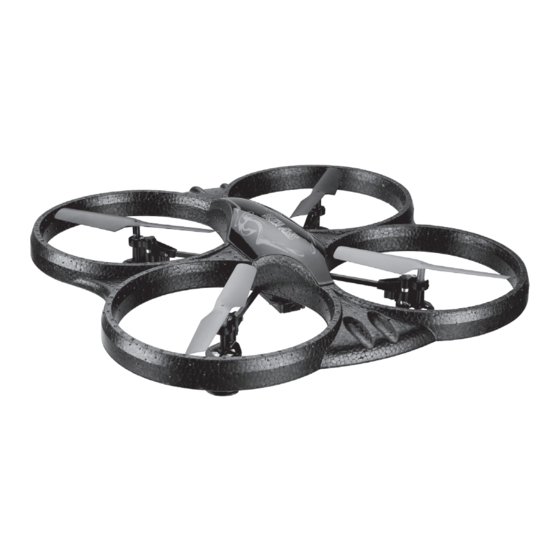
Page 5: Orientation
Orientation Includes • Remote control: requires 6 AA batteries (not included) • USB cable for battery recharge • 4 GB SD card and Card Reader • 4 replacement rotors Rear View Landing Feet Electric Motor/Gears Housing Battery/Receiver Board/Camera Housing (under side) Customer Support: 1-888-999-4215... -
Page 6: Top View
Orientation Top View Receiver Light (under side) Flashes red and blue to indicate remote and quadcopter are connected. Rotor B Rotor A Rotors Red rotors indicate Styrofoam Shell front of quadcopter, black indicates rear. Rotor A Rotor B Quadcopter Chassis... -
Page 7: Remote Control
Remote Control Antenna Power/Status Flight Control Indicator Reset Sensitivity Press to reset trim Adjusts the speed, to factory default. sensitivity, and Photo stunt controls of the Press to take a photo. quadcopter. Video Capture Stunt Press to begin Press to perform recording video. -
Page 8: Batteries & Charging
Batteries & Charging The quadcopter’s Lithium-Polymer battery must be charged before the unit can be flown. Before charging, be sure the quadcopter and remote control are powered off. Failure to do so may result in injury. Charging Procedure Step 1 To charge the battery, disconnect the plugs between the battery and the receiver board on the underside of the... -
Page 9: Remote Batteries
Remote Batteries Use a Phillips Head Screwdriver AA x6 Battery & Usage Info BATTERY SPECIFICATION DURATION CHARGE TIME TYPE Quadcopter 3.7V/650mAH 6 to 8 minutes 60 to 70 minutes Li-Po Battery flight time Remote AA 1.5V Approx. 18 hours Non-rechargeable Batteries Customer Support: 1-888-999-4215... -
Page 10: Pre-Flight Calibration
Pre-Flight Calibration Quadcopter/Remote Link Before flying, the quadcopter and the remote must be linked together, and the gyroscopes on the quadcopter must be allowed to calibrate to ensure smooth and level flight. Begin with the quadcopter and remote powered off. Step 1 - Power ON &... -
Page 11: Trim Adjustment
Trim Adjustment Countering Drift & Setting Trim Even after the quadcopter is calibrated, it may show a tendency to drift while airborne. Adjusting the trim will counter this effect and allow the unit to hover in place. Adjust the trim while flying as controlled and low to the ground as possible. Remember, the red propeller blades indicate the front of the quadcopter. - Page 12 Trim Adjustment Drift Type Solution Quadcopter pitches/moves Press Up/Down buttons to the left forward or backward. of the Right Control Stick. Front Quadcopter banks/rolls left or right. Press L/R buttons under the Right Control Stick. Front...
-
Page 13: Flying & Tips
Flying & Tips Flight Control Sensitivity The quadcopter has three settings for the responsiveness of the flight controls: 30%, 60%, and 100%. The higher settings allow faster and more precise control inputs. It is recommended to start with the lowest setting, and as you become more skilled at flying, increase the sensitivity as you see fit. -
Page 14: Stunts
Stunts Before attempting any stunts, be sure that there is ample clear space around the quadcopter, ideally 9 to 10 ft in every direction. It is not recommended to attempt to stunt around or through any obstacles, as this may result in unintended damage. There are two ways to perform aerial stunts: •... -
Page 15: On Board Camera
On Board Camera Using the Camera This unit is equipped with an on board camera and SD memory card that allows you to document your flights and view them later. The camera will record stills and video as JPEG and AVI files. The video files (AVI) can be viewed on a computer with any common video playing software, like Quicktime or Windows Media Player. - Page 16 On Board Camera Camera & Indicator SD Card & Slot • Press Left Trigger for video. • Use Photo button to the right of the left thumbstick for still shots or 3 shot burst.
-
Page 17: Troubleshooting
Troubleshooting If you are experiencing problems using or flying the quadcopter, consult this table. PROBLEM POSSIBLE CAUSES SOLUTION Quadcopter is • No power to remote • Check remote or quadcopter batteries. unresponsive • Poor contact between • Check quadcopter power plugs battery, be sure it is fully charged. -
Page 18: Repair
Repair In the event that the quadcopter absorbs light damage that renders flight difficult, but not impossible, the following repairs are easy to perform and should get the quadcopter back to a flyable condition. REMINDER: Pilots are responsible for any damage caused by improper use. Body Repair The styrofoam shell is designed to absorb damage from crashes and impacts, but in... -
Page 19: Parts
Parts Parts Replacement If any major components of the quadcopter are damaged beyond repair, you can order new parts by contacting the customer support number, or by following the web address below to the product page and clicking on the “Parts and Accessories” tab. Product web address: http://bit.ly/1Hl5ziY Parts Diagram Customer Support: 1-888-999-4215... - Page 20 Parts Parts Diagram...
-
Page 21: Parts List
Parts Parts List PART NAME QUANTITY Styrofoam Shell Receiver Board Chassis Lithium-Polymer Battery Rotor Blade A (Red/Black) Rotor Blade B (Red/Black) Electric Motor Block Engine Harness/ Landing Pad Electric Motor Electric Motor Cover Engine Harness Strut Electric Motor Pinion Gear Copper Gear Copper Set LED Receiver Light... -
Page 22: Company Information
Company Information Contact Information Warranty See included 30 Day Warranty for Website: www.gpx.com warranty information. Warranty and Email Support: prodinfo@dpiinc.com the most up-to-date version of this Email Parts: partsinfo@dpiinc.com User’s Guide can also be found at: www.gpx.com Phone Support: 1-888-999-4215 International Support To download this User’s Guide in English, Spanish, and French, or to get answers to frequently asked questions, visit the support section at: www.gpx.com...
Need help?
Do you have a question about the DR775 and is the answer not in the manual?
Questions and answers