Table of Contents
Advertisement
Available languages
Available languages
Quick Links
5-YEAR LIMITED wARRANTY
Valid in U.S.A. Only
If your Wahl product fails to operate satisfactorily within five
(5) years from the date of original purchase or receipt as a gift,
www.wahlshavers.com
Triple Play
Wahl will, at our option, repair or replace it and return it to you
FREE OF CHARGE. Do not return this product to store where
purchased. Products needing repair under this warranty should
be returned with postage prepaid to:
Lithium•Ion
wahl Clipper Corp.
Attn: Repair Department
No Compromise Shaver/Trimmer/Detailer
3001 Locust Street
Sterling, Illinois 61081
Afeitadora/Desbastadora/Pulidora
Include a note describing the defect and the date of original
purchase or receipt as a gift (if in warranty). Products out of
warranty will be repaired at our standard repair charges.
This warranty is void and no repair or replacement will be made
under this warranty or otherwise if: (1) The product is modified
in any manner or repaired by anyone other than Wahl Clipper
Corporation or Wahl authorized service center. (2) The product
has been used commercially or subjected to unreasonable use.
This warranty gives you specific legal rights and you may
also have other rights which may vary from state to state. No
other written express warranty is given. Any implied warranty,
including any warranty of merchantability which may arise from
purchase or use, is limited to the year period provided in this
express warranty. Some states may not allow such limitation,
so it may not apply to you. No responsibility is assumed for
incidental or consequential damages of any type, or for the use
of unauthorized attachments. Some states may not allow the
exclusion or limitation of incidental or consequential damages, so
the limitation or exclusion may not apply to you. Outside U.S.A.,
check with store for Wahl authorized distributor's warranty.
Operating Instructions for the
For more information or Product Registration, visit www.wahlshavers.com
Lithium Ion Grooming Kits
© 2011 Wahl Clipper Corporation
Part No. 94596
Instrucciones de operación
Printed in U.S.A.
de la recortadora recargable
2
ROTARY SHAVER USE
A 6-Position Trimming Guide makes
achieving a consistent trim easy every time.
For New Rotary Shaver User
The guide can be removed (providing a
seventh cutting position) and reattached
• Use your new razor exclusively for 3
without changing the preset cutting length,
weeks to fully enjoy the closeness of a
so once you have found the perfect length,
Wahl shave.
there's no guesswork in achieving it every trim.
• At first you may not get as close a shave as you
The trimming guide is a two-piece assembly,
expect, or your face may even become slightly
consisting of a base and a comb. It should
irritated. This is normal since your beard and skin
not be disassembled. To attach the guide,
will need time to adjust. Invest 3 weeks and you'll
simply slide it on at a slight angle and press
soon experience the full joy of your new razor.
the release tab down to secure in position.
• If you are still not convinced after 21 days, Wahl
To remove the guide, gently push up on the
will refund you the full purchase price as long as
release tab and slide the assembly away from
the request is received within 30 days of purchase
the trimmer. Adjust the trimming length by
accompanied with original receipt.
pressing on the thumb lever and moving the
comb forward or backward to the desired
How to shave with an electronic razor
setting.
• Use this razor for its intended household use as described in
A Rotating Head. The trimming head rotates 180 degrees,
this manual.
providing two trimming positions. This allows you to achieve the
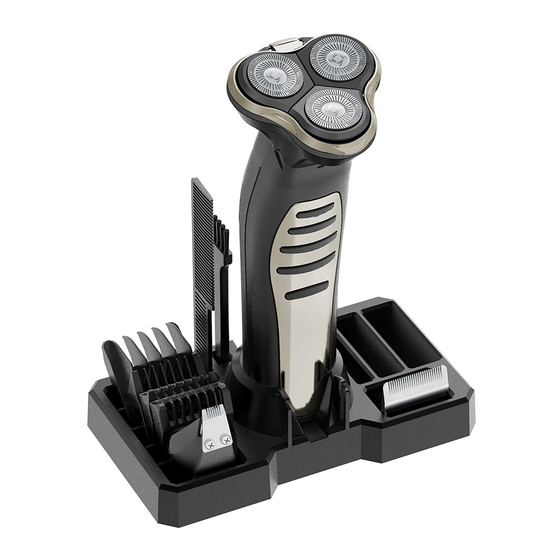
• DO NOT ROTATE HEAD WITH SHAVER HEAD ATTACHED. ONLY
optimum ergonomic relationship between the hand, the trimmer
USE SHAVER WITH HEAD POSITIONED ON BODY UNIT AS
and the face. Rotate the head
SHOWN IN ILLUSTRATION ABOVE OR DAMAGE MAY OCCUR.
to the desired position as
• Shaving with a clean, dry face gives the best results.
follows. With the switch in the
"OFF - 0" position, depress the
1. Turn razor ON with the on/off button. Shave against the
Lock Button
lock button and rotate the head
direction of the beard growth using both straight and circular
clockwise or counterclockwise 180 degrees.
movements.
DO NOT ROTATE HEAD DURING USE WITH SHAVER
2. Stretch your skin taut with your free hand so blades can more
ATTACHMENT.
clearly cut whiskers. Gently press razor to skin so the floating
heads can follow the contours of your face. DO NOT press too
hard as hair does not feed as well. Too much pressure can
pinch the skin into the blades.
3. Turn razor OFF with the on/off switch.
Cleaning Rotary Shaver
(Attachment Head Only)
• Regular cleaning guarantees better shaving results.
9
10
IMPORTANT SAFEGUARDS
wARNING
When using your electrical appliance, basic
To reduce the risk of burns, electrical shock or
precautions should always be followed,
injury to persons:
including the following:
1. Do Not Crush, Disassemble, Heat Above
READ ALL INSTRUCTIONS AND SAFEGUARDS
100°C (212°F), or Incinerate the appliance,
BEFORE USING THIS TRIMMER.
due to Risk of Fire, Explosion, or Burns.
2. This power unit is intended to be correctly
DANGER
orientated in a vertical or floor mount position.
To reduce the risk of death or injury by
3. Close supervision is necessary when this
electric shock:
appliance is used by, on, or near children or
disabled persons.
1. Do not reach for an appliance that has
fallen into water. Unplug immediately from
4. Use this appliance only for its intended
the outlet.
use as described in this manual. Do not
use attachments not recommended by the
2. Do not use while bathing or in a shower.
manufacturer.
3. Do not place or store appliance where it
5. Never operate this appliance if it has a
can fall or be pulled into a tub or sink. Do
damaged cord or plug, if it is not working
not place in or drop into water or other
properly, if it has been dropped or damaged,
liquid.
or if it has been dropped into water. Return
4. Except when charging, always unplug
the appliance to Wahl Clipper Corporation for
this appliance from the electrical outlet
examination and repair.
immediately after using.
6. Keep the cord away from heated surfaces.
5. Always unplug this appliance before
7. Do not use outdoors or operate where
cleaning.
aerosol (spray) products are being used or
6. (Rechargeable unit only.) Unplug the
where oxygen is being administered.
charger before using trimmer.
3
4
• Never clean, remove or replace attachment head assembly while
NECKLINES AND SIDEBURNS
motor is on.
USING TRIMMER HEAD
Detach shaver head as described earlier.
• Do not apply pressure to blade foils. Do not touch razor heads
Attach trimmer blade as described earlier.
with hard objects as this may dent or damage precision-made
Slowly move trimmer downward on
slotted blade foils.
desired areas to neatly trim and shape.
• Do not use razor if blade foils are damaged or broken.
TRIMMING AND EDGING YOUR FACIAL HAIR
• The Rotary Shaver may be opened up to simply discharge
The following are suggested trimming steps and trimmer positions.
whiskers.
You may find different procedures work
• Do not immerse razor unit in water.
better for you.
• Only get the shaver lid wet and NOT the shaver base
1. Comb your beard in the direction that
as shown in illustration at right. Water may get into the
it grows to help reveal stray hairs that
base and become trapped. Only brush or blow out the
may be longer than the others.
base if any whiskers remain.
2. Attach the 6-position trimming guide
• The quickest and easiest way to clean the razor heads
is
to trim and taper your beard. Begin
to rinse them after each use or at least once a week with water:
with the guide set at a long trimming
Water from the tap should be on a cold setting.
length. Trim toward your chin in
1. Always switch razor OFF, unplug and remove power cord
smooth, overlapping strokes, following
before cleaning.
the lay of your beard. If you trim
against the way your beard naturally
2. Before cleaning under tap water, first remove the rotary shaver
lays, the trimmer will cut the hair much shorter and the result
attachment head from body as described earlier.
may be patchy.
3. Pop open top razor foil from attachment head described earlier.
Adjust the trimming guide to progressively shorter settings until
4. Clean inside and outside the razor heads and hair chamber by
you reach the desired length of beard. You may wish to set the
running under cold water.
trimming guide attachment to cut closer near the ear and down
5. Leave razor head assembly open to air dry before next use.
under the chin, changing to a longer setting toward the front
of the face and point of your chin. When the trimming guide is
NOTE: Do not wipe or dry the shaving heads with a towel or
removed, it will remain at its last length setting until you change it.
tissue. This could damage the shaving heads.
Always be sure the trimming guide is
6. If the shaving assembly unit becomes detached from the
locked solidly into the desired position
shaver base, align pegs from razor LID with guide holes on shaver
before you start to trim.
base attachment.
3. To cut the outline of your beard,
7. You may also clean the hair chamber without water by using
remove the trimming guide. Starting
the supplied cleaning brush.
under your chin and working back
toward your jawbone and ears, cut the
11
12
8. Never drop or insert any object into any
7. Insert only recharging transformer plug supplied by the
manufacturer into charger receptacle.
opening.
TROUBLESHOOTING
9. Do not use this appliance with a damaged
or broken blade or trimming attachment, as
If your Trimmer does not seem to take a charge, check the following
before returning it for repair:
facial injury may occur.
1. Check outlet to make sure it is working by plugging in another
10. Always attach plug to appliance first, then
appliance.
to outlet.
2. Make sure the outlet simply is not connected to a light switch which
turns the power at the outlet off when lights are turned off.
To disconnect, turn unit "OFF - 0,"
3. Be sure the trimmer is properly connected to the recharging
then remove plug from outlet.
transformer, all connections are secure and the switch on the
SAVE THESE INSTRUCTIONS
trimmer is turned "OFF - 0."
4. If your electricity is connected to a master power switch, we
For Household Use Only
suggest the trimmer be disconnected from the charger anytime
the master switch is off. Leaving the unit plugged into a dead
RECHARGING
outlet or an unplugged charger will drain the battery.
5. If trimmer does not run and it is completely charged, turn the unit
1. This trimmer is conveniently designed for household use. It
"ON - I" and pinch or push the blades manually. (Oil may have
should be allowed to charge 1 hour before first use.
dried out between the blades, so they may be temporarily stuck
2. Remove the trimmer, recharging transformer and accessories
together.)
from the packing material.
LITHIUM-ION
3. Connect the transformer to the trimmer. BE SURE TRIMMER IS
BATTERY DISPOSAL
IN THE "OFF - 0" POSITION WHEN CHARGING.
4. Plug the recharging transformer into any convenient electrical
outlet at the correct voltage.
Do not attempt to remove the battery from unit. Lithium-Ion
batteries can explode, catch fire, and/or cause burns if disassembled,
5. When trimmer is low in power, it should be connected to the
damaged, or exposed to water or high temperatures. Do not attempt
transformer and plugged into an outlet to assure maximum
to remove the battery for disposal. Lithium-Ion batteries may
power is available when it is next used. This transformer
be subject to local disposal regulations. Many locations prohibit
is designed to completely charge the battery without
disposal in standard waste receptacles. Check your local laws and
overcharging. Do not use the trimmer while it is charging.
regulations. For recycling contact a government recycling agency,
6. The battery will take approximately 60 minutes to charge. The
waste disposal service, retailer, or visit online recycling sources, such
Lithium Ion Trimmer also has quick charge capability.
as www.batteryrecycling.com or www.rbrc.org.
5
outer perimeter of your beard underneath the jawbone. Continue
CAUTION:
the line all the way up to the ears and hairline.
the inner ear. For hair growing on the outside of the ear, simply move the
detailer slowly along the edges of the ear.
4. Accentuate your beard line by using the trimmer in a downward
motion. Start at the line you've created and, working from the chin
TRIMMING EYEBROwS wITH HAIR COMB
back toward the ears, trim the area right under your beard line.
Snap on eyebrow guide comb on detailer as shown.
Slowly move detailer to neatly trim stray hairs. Do
5. Define the upper part of your beard
not press hard against brow as it may remove too
using the same technique.
much hair.
6. For a neater finished look, replace
You may also use your trimmer blade with the #2 or
attachment blade to the detail blade
#3 guide combs. Move the trimmer with the direction of the hair flow (from
forward. Use this blade for fine, detail
the bridge of your nose to the temple). Be sure to mind your eyelashes as
trimming anywhere it is needed, such
you trim.
as at the sideburns near the ears, goatees, etc.
TRIMMING ARM & LEG HAIR USING TRIMMER
USING GUIDE COMBS:
HEAD.
To attach guide combs, hold comb with the teeth up.
Simply glide the trimmer over your arm or leg until desired hair length is
Snap guide comb attachment firmly to the bottom of
achieved. The first time you trim the hair, start by using a longer setting on
the trimmer blade.
#1 Stubble Length (2 mm)
the guide comb on the trimmer, then use progressively shorter settings if a
#2 Short
(4 mm)
TRIMMER GUIDE COMBS:
#3 Medium Short
(6 mm)
shorter length is preferred.
#4 Medium
(8 mm)
TRIMMING CHEST & STOMACH USING TRIMMER
#5 Medium Long (10 mm)
#6 Long
(12 mm)
HEAD.
Glide the trimmer over your torso region, in an upward motion until desired
hair length is achieved. For tight, scratch-free trimming, use the #1 guide
Stubble
Medium
Full
TRIMMING wITH GUIDE COMBS:
comb.
The stubble guide has 1 bar, the medium-cut attachment has two bars and
TRIMMING PRIVATE AREAS wITH THE TRIMMER
the long-cut attachment has three bars. These attachments are ideal for
& DETAILER HEAD.
blending, tapering and defining beards, as well as for achieving a "close
1. Volume reduction using trimmer head. Attach guide comb and select a
trim" stubble look around the face. To use the attachments, go with the hair
long trimming length. Begin trimming, starting at the top and working
direction. To achieve closer looks, go against the hair direction.
down. Use progressively closer settings to get the "look" and length you
TRIMMING NOSE HAIR
prefer.
Make sure the nasal passages are clean. Slowly move the detailer in and
2. For hard to reach or tight areas, use the detailer head. Always pull skin
out of each nostril, no more than 1/4-inch deep.
taut. Then slowly move the detailer through area to trim until desired look
TRIMMING EAR HAIR
is accomplished.
Make sure the outer areas of the ears do not contain any wax. Hold the ear
3. Shave in your private areas by gently shaving in the desired area and
flat with one hand and carefully insert detailer no more than 1/4-inch into
always keep the skin taut.
the outer ear.
13
SPECIAL FEATURES:
Rotary Shaver Attachment Head
Your shaver has been designed with several advanced
features to help you get perfect
results every time you groom.
Your shaver head detaches and
can be replaced by several other
grooming tools to achieve your no
compromise look.
• To remove shaver head,
pull the head in a downward
fashion and away from switch.
• To re-attach, position head
as shown. Locate small tab
and hook onto back (1) then
rock forward until it snaps
down (2). Before using, make sure
the head is fully attached with no gaps
between the shaver head and shaver body
as shown in the shaded area (3).
• Open shaver head LID to remove or clean unwanted hair from
chambers. Simply pull up the razor foil lid as shown below. To
re-attach it, align
Note: Additional LID with
pegs from razor LID
foils may be ordered
with guide holes
located on the last page.
on Shaver base
attachment shown
below right.
6
7
OILING BLADES
Do not insert the detailer or any other foreign object into
For best results, put one or two drops of Wahl Clipper Oil on
the blades only when necessary, or approximately once a month.
Motor bearings are permanently lubricated—do not attempt to oil.
When oiling your trimmer, turn the trimmer "ON - I," hold the unit
with the blades facing DOWN and squeeze one or two drops of oil
onto the blades. Wipe off excess oil with soft cloth.
NOTICE—DO NOT OVER OIL!
Excessive oiling or application of liquids will cause damage if
allowed to seep back into motor.
BLADE CARE
Trimmer blades have precision-hardened, ground and lapped
cutting teeth. Blades should be handled carefully and never bumped
or used to cut dirty or abrasive material. Never rinse the blades with
water, or the blades may rust. Clean with the included brush.
CLEANING/STORAGE
Before storing your trimmer, use the cleaning brush to whisk
any loose hairs from the unit and the blades. Store unit in such a
manner so that blades are protected from damage.
When the trimmer is not in use, the trimmer guide/blade guard
attachment should be in place to protect the blades.
Store rotary shaver with included head cover.
This appliance should be stored in a manner where it is not
subjected to Crushing, Heating above 100°C (212°F), or
Incineration.
14
15
A Detachable blade system enables you to quickly change
from a shaver to a precision trimmer to trim mustache, goatee,
or anywhere. To remove attachment, simply
pull top edge of blade away from body unit. To
attach, align back tab of attachment head to
cavity on the inner edge of trimmer unit and
push down on top of blade.
Should blades become damaged or dull or if
you want additional attachment heads for your
trimmer, you may purchase them from Wahl.
Be sure to ask for the following attachment with part number
from our service and repair department (see last page for contact
information):
Attachment Head: Wahl Part Number
Trimmer: #59300 Included
Detailer: #59301 Included
T-Blade: #59302
Rotary: #58067
Dual Shaver: #59303
Rotary Shaver: #07018 Included
www.wahlshavers.com
#59300 #59301 #59302 #58067 #59303
#07018
The trimmer you purchased may not have all of these heads, but
they will all work with your trimmer if you wish to purchase them.
8
REPLACEMENT LID wITH FOIL
It's recommended that the rotary
foil lid should be replaced at
least once a year for optimum
closeness. Should the foils
become damaged or dull or if
you want additional foils for long
trips, you may purchase just the LID
with foils from Wahl. Be sure to ask for the
following attachment with part number 07021 from our service
and repair department or online at:
www.wahl-store.com/products/accessories/shaver
SERVICE AND REPAIR
If you have problems with your trimmer, send complete unit
prepaid with a note explaining the problem to:
Wahl Clipper Corporation
Attn: Repair Department
3001 Locust Street
Sterling, IL 61081
Telephone (800) 767-9245
For products purchased outside the United States, contact your distributor.
30 Day Money Back Guarantee!
If for any reason within 30 days of purchase of your Wahl ®
trimmer you are not satisfied with your trimmer and would
like a refund, just return your trimmer, together with the sales
receipt, to the retailer from whom you purchased it. Wahl will
reimburse all retailers who accept trimmers within 30 days of
purchase. If you have any questions regarding this money-
back guarantee, please call 1-800-767-9245 in the United
States.
16
Advertisement
Table of Contents

Subscribe to Our Youtube Channel
Related Manuals for Wahl TRIPLE PLAY


Summary of Contents for Wahl TRIPLE PLAY
- Page 1 Wahl will, at our option, repair or replace it and return it to you If your Trimmer does not seem to take a charge, check the following including the following: 1.
- Page 2 Para quitar el • Si después de 21 días todavía no se convence; Wahl le baño o lavabo. No lo sumerja ni lo deje Solamente Para Uso Residencial de aplicaciones a las que haya sido Para conectar la guía, simplemente deslícela...
Need help?
Do you have a question about the TRIPLE PLAY and is the answer not in the manual?
Questions and answers