Sign In
Upload
Manuals
Brands
Sony Manuals
Camcorder
CineAlta HDCAM HDW-F900R
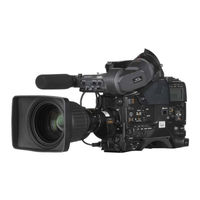
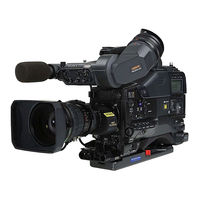
Sony CineAlta HDCAM HDW-F900R Manuals
Manuals and User Guides for Sony CineAlta HDCAM HDW-F900R. We have
6
Sony CineAlta HDCAM HDW-F900R manuals available for free PDF download: Maintenance Manual, Operation Manual, User Manual, Brochure & Specs, Technical Bulletin, Product Information
SONY CineAlta HDCAM HDW-F900R Maintenance Manual (546 pages)
DOWN CONVERTER BOARD
Brand:
SONY
| Category:
Camcorder
| Size: 8.26 MB
Table of Contents
Table of Contents
5
Parts Replacement
7
Manual Structure
10
1 Service Overview
11
Locations of Main Parts and Circuit Configuration
11
The Printed Wiring Boards
11
Locations of Main Mechanical Parts
14
Functions and Locations of Sensors
16
Matching Connectors
18
Signal Inputs and Outputs
18
Assembly
21
Opening and Closing the Inside Panel Assembly
22
Removing and Reinstalling the Connector Box
23
Removing and Reinstalling the Plug-In Boards
24
DCP Board Assembly
24
DVP Board Assembly
26
Card Wires
28
Compartment
29
On-Board Switch/Slit Land Description
32
AT-172 Board
32
EQ-88G Board
33
FP-152 Board
34
MDC-13G Board
35
SS-92G Board
36
RP-131 Board
37
AXM-33 Board
37
How to Eject a Cassette Tape Manually
38
Clogged
40
Panel Assembly Is Being Removed
40
List of Tools and Measuring Equipment
41
Tools
41
Measuring Equipment
44
Alignment Tapes
45
How to Extend the Circuit Board
46
Extending the AT-172 Board
46
HKDW-902R (DC-139 Board)
47
Extending the DCP Board Assembly
48
Extending the DVP Board Assembly
50
Extending the EQ-88G Board
52
Extending the HKDW-703 (MY-99 Board)
53
Extending the SS-92G Board
54
Extending the CCD Unit
56
Extending the Mechanical Deck Assembly
57
Description on Cassette Mechanism
59
Replaced
61
DR-614 Board
61
CN-2871 Board
61
PA-340 Board
61
RP-131 Board
61
TG-256 Board
62
CCD Unit
62
DCP-43 Board
62
MDC-13G Board
62
MDR-14G Board
62
CCM-45G Board
63
FP-152 Board
63
EQ-88G Board
63
IFA-19G Board
63
DC-110A Board (HKDW-702)
63
DC-139 Board (HKDW-902R)
63
PM-23 Board (HKDW-905R)
63
FRAM Data
64
Description on the CCD Block Number
65
Filter Knob Position Adjustment
66
Memory Backup Battery
67
Fuse and IC Link Replacement
67
Circuit Protection Element
68
Upgrading the ROM Version
69
Confirming the ROM Version
69
Upgrading (AT-172 Board)
71
Upgrading (SS-92G Board)
72
The MDC-13G Board
73
Circuit Description
74
Camera System (DCP-43 Board)
75
Video Signal System (DVP-41 Board)
76
RF System (EQ-88G Board)
85
Unleaded Solder
90
Notes on Repair Parts
90
Precautions for Use of Condensation Sensor
90
Cleaning
91
General Information for Cleaning
91
Surface and Video Heads
93
Surface and Rabbet Guide
94
Cleaning the Stationary Heads
95
Cleaning Blade
96
Slider Assemblies
97
Cares after Using under Special Environment
98
Periodic Inspection
99
Hours Meter
99
Periodic Inspection List
100
Applying Oil to Reel Drive Gear Assembly
101
Assembly
102
Notes on Repair Parts
104
Recommended Periodic Replacement Parts
105
Recommended Replacement Parts
107
When Does the Error Code Appear?
109
Description of Error Codes
110
Details of Error Codes
112
Device Check
116
Setup Menus
117
Basic Operations of Setup Menus
117
How to Display the SERVICE Menu
118
TOP Menu
119
USER Menu
120
OPERATION Menu
121
PAINT Menu
139
MAINTENANCE Menu
152
FILE Menu
168
DIAGNOSIS Menu
178
SERVICE Menu
182
Setup Menu List
194
Structure of File System
213
Data Structure
214
Operating the USER File
215
Operating the ALL File
218
Operating the SCENE File
222
Operating the REFERENCE File
225
Operating the LENS File
228
Special Saving Items
230
White Gain
230
Master Gain
231
Shutter
231
Procedure
233
CCD Unit Replacement
233
Removing the Filter Knob
234
Removing the CCD Unit
234
Installing the CCD Unit
235
Installing the Filter Knob
235
Attaching the Front Assembly
236
Filter Disk Unit Replacement
237
The CCD Unit
238
Volume Controls Replacement
240
MIC in Connector Replacement
242
Rotary Encoder Replacement
243
Connector Box Board Replacement
245
Removing the Connector Box Assembly
245
AL-43 Board
245
Removing the IO-202 Board
245
Removing the RM-201 Board
246
The AXM-33 Board
246
Removing the DC in Connector
247
Connectors
247
DC-DC Converter Replacement
248
Fan Replacement
250
Assembly
250
Replacing the Fan in the Unit
251
Camera SW Ornamental Plate (3) Replacement
252
P Fitting Bracket Assembly Replacement
253
MS Lid Assembly Replacement
254
VF Connector Replacement
257
POWER Switch Replacement
258
IFA-19G Board Replacement
259
Replacement
260
CCM-45G Board Replacement
261
PS-595 Board Replacement
262
RX-54G Board Replacement
263
SS-92G Board Replacement
266
LP-114 Board Replacement
267
SW-1312 Board Replacement
268
MB-1096 Board Replacement
269
Mechanical Deck Assembly Boards Replacement
270
MDR-13G Board Replacement
270
MDR-14G Board Replacement
270
SE-613 Board Replacement
271
Part Replacement
273
Index
273
Notes
274
End State
275
How to Eject a Cassette Tape Manually
276
About Oil and Grease
278
Screw Tightening Torque and Washer
279
Upper Drum Assembly Replacement
280
Drum Assembly Replacement
296
Replacement of Brush Assembly for Slip Ring
303
Slip Ring Assembly Replacement
306
Video Head
310
Pinch Roller Assembly Replacement
313
S-Tension Regulator Band Assembly Replacement
316
T-Tension Regulator Band Assembly Replacement
319
Timing Belt Replacement
322
Assembly Replacement
324
CTL Head Replacement
326
FE Head Replacement
329
Holder Assembly Sensor (REC) Replacement
332
End Sensor Assembly Replacement
334
Full Top Sensor Assembly Replacement
335
S1, T1, T3 Tape Guide Replacement
336
S) Soft Brake Assembly Replacement
338
T Soft Brake Replacement
340
Manual Eject Assembly Replacement
342
S-Tension Regulator Assembly Replacement
344
T-Tension Regulator Assembly Replacement
347
Cassette Stopper Replacement
350
Gear Block Assembly Replacement
352
Replacement
355
Reel Drive Gear Assembly Replacement
359
Holder Assembly Sensor (ID) Replacement
362
Top Sensor Assembly Replacement
364
Pinch Arm Assembly Replacement
366
Threading Arm Assembly Replacement
369
CUE/TC Head Assembly Replacement
373
S Slider Assembly Replacement
378
T Slider Assembly Replacement
383
Cam Gear Assembly Replacement
388
Installation
394
MDC-13G Board Replacement
398
Capstan Motor Replacement
403
Mechanical Adjustment
407
Reel Table Height Adjustment
409
Adjustment
411
FWD Back Tension Adjustment
413
REV Back Tension Adjustment
415
Timing Belt Tension Adjustment
417
Adjustment
418
S3 Guide Height Adjustment
420
Gear Chain Phase Adjustment
422
Tape Run System Adjustment
425
Tape Run Adjustment
427
Video Tracking Adjustment
433
CTL Head Height Adjustment
438
CTL Head Position Adjustment
440
CUE/TC Head Height Adjustment
442
CUE/TC Head Azimuth Adjustment
445
Adjustment
447
CUE/TC Head Position Adjustment
449
CUE/TC Output Level Check
452
General Information on Electrical Alignment
453
Initial Position of Switches During Adjustment
453
Notes on Electrical Alignment
453
Required Equipment, Fixtures and Tools
453
Gray-Scale Chart and Its Maintenance
454
VCO Frequency Adjustment
456
TEST out Level Adjustment
456
VF DC Level Adjustment
457
VA Gain Adjustment
458
Black Offset Adjustment
459
VSUB Adjustment
461
PA Gain Adjustment
462
Pre Knee Adjustment
463
DCC Pre Knee Adjustment
464
Black Shading Adjustment
465
White Shading Adjustment
466
Flare Adjustment
468
Gamma Correction Adjustment
469
Knee and White Clip Adjustment
470
DCC Knee Adjustment
471
Crispening Adjustment
472
Level Depend Adjustment
472
Detail Signal Frequency Adjustment
473
H/V Ratio Adjustment
474
Detail Signal Level Adjustment
474
Knee Aperture Adjustment
475
H. Detail Black Clip Adjustment
475
V. Detail Black Clip Adjustment
476
Skin Tone Adjustment
477
Zebra Adjustment
478
Auto Iris Adjustment
479
SD VCO Adjustment
480
SD y Level Adjustment
480
SD ZEBRA Clamp Level Adjustment
481
SD ZEBRA y Level Adjustment
482
VF 2-3 Pull down HD y Level Adjustment
482
RPN Concealment
483
Manual RPN Concealment
483
When RPN Concealment Does Not Succeed
484
Recognition
484
RPN Concealment Flowchart
485
10 Electrical Alignment of VTR System 11. VTR Maintenance Mode
487
Preparation
487
Audio System Alignment
488
Audio A/D Error Adjustment
488
Audio D/A Error Adjustment
489
CUE Audio Alignment
490
Bias Trap Adjustment
490
CUE Playback Level Adjustment
490
CUE Recording Bias Preset Adjustment
491
CUE Record Level Adjustment-1
492
CUE Record Level Adjustment-2
493
System Control Alignment
494
Battery Voltage Correction Adjustment
494
Servo System Alignment
495
Servo System Adjustment Data Initialization
495
Capstan FG Duty Ratio Adjustment
496
Capstan Add-On Recording Adjustment
496
Drum Phase Adjustment
497
RF System Alignment
497
Saving the RF System Adjustment Data
498
PB Channel Condition Check
499
REC Channel Condition Check
499
Introduction
501
Operation Procedure
502
Identifying Switches
502
How to Enter VTR Maintenance Mode
502
How to Exit VTR Maintenance Mode
503
Tips on Operations
503
Contents of Menus
504
Check Mode (C2 : AUDIO CHECK)
518
Advertisement
Sony CineAlta HDCAM HDW-F900R Operation Manual (171 pages)
Operation Manual
Brand:
Sony
| Category:
Camcorder
| Size: 11.11 MB
Table of Contents
Table of Contents
4
Setting the Frame Frequency
9
Chapter 1 Overview
11
Features
11
Camera Features
11
VTR Features
12
Other Features
12
Example of System Configuration
14
Precautions
15
Using the CD-ROM Manual
15
Preparations
15
Reading the CD-ROM Manual
15
Chapter 2 Locations and Functions of Parts and Controls
17
Power Supply
17
Accessory Attachments
18
Audio Functions
19
Shooting and Recording/Playback Functions
22
Gain Selector
24
Menu Operating Section
27
Time Code System
29
Warnings and Indications
31
Warnings and Indications on the Display Panel
32
Time Code Display
33
Indicators in the Viewfinder
34
Chapter 3 Recording and Playback
35
About Cassettes
35
Loading and Unloading a Cassette
35
Preventing Accidental Erasure
36
Recording
37
Basic Procedures
37
Continuous Recording
38
Recording Good Shot Marks
39
Recording a Recording Start Mark
40
Starting a Shoot with a few Seconds of Pre-Stored Picture Data (Picture Cache Function: with the HKDW-703)
41
The HKDW
41
Shooting Picture at Intervals (Interval Rec Function: with the HKDW-703)
43
The HKDW
43
Continuous Recording on Previous Cut
50
Recording Pause Mode (End Search Function)
51
Searching for the Last Recorded Portion and Turning on Recording Pause Mode (End Search Function)
51
Checking Recording and Playback
51
Checking the Last Two Seconds of the Recording - Recording Review
51
Checking the Recording on the Color Video Monitor
52
Playback in Color
52
Checking the Camera Picture on the Viewfinder And/Or Color Video Monitor
52
Recording the Recording Start Time Code Onto the Memory Label - Tele-File
53
Recording the Recording Start Time Code Onto the Memory Label
53
Recording a Tele-File Mark (OK/NG/KP) Onto the Memory Label
53
Warning/Error Messages in Memory Label Operation
55
Confirming the Remaining Capacity on the Memory Label
56
Clearing Recorded Data
56
Freezing a Picture During Playback
57
Setting the Stand-By off Timer During Rec-Pause
58
Chapter 4 Adjustments and Settings for Recording
59
Adjusting the Black Balance and the White Balance
59
Adjusting the Black Balance
59
Adjusting the White Balance
60
If the Automatic White Balance Adjustment Cannot be Made
61
Setting the Electronic Shutter
62
Shutter Modes
62
Selecting the Shutter Mode and Shutter Speed
63
Changing the Reference Value for Automatic Iris Adjustment
66
Adjusting the Audio Level
68
Manually Adjusting the Audio Input Level of the AUDIO
68
IN CH-1/CH-2 Connectors
68
Manually Adjusting the Audio Level of the Front
69
Microphone
69
Input Level of Audio Channels CH-3 and CH-4
70
Setting the Time Data
72
Setting the Time Code
72
Saving the Actual Time in the Time Code
72
Setting the User Bits
73
Synchronizing the Time Code
73
Procedure for Time Code Synchronization
74
Chapter 5 Menu Displays and Detailed Settings
75
Menu Organization and Operation
75
Menu Organization
75
Basic Menu Operations
76
Editing the USER Menu
78
Adding/Deleting/Replacing Pages
79
Status Display on the Viewfinder Screen
82
Layout of the Status Display on the Viewfinder Screen
82
Selecting Display Items
84
Display Modes and Setting Change Confirmation/Adjustment Progress Messages
85
Selecting the Items for Which the '!' LED Is to Light
85
Setting Marker Display
87
Setting the Viewfinder
88
Recording Shot Data Superimposed on the Color Bars
88
Setting the Shot ID
89
Displaying the Status Confirmation Windows
91
Confirming the Image of the Return Video Signal in the Viewfinder
92
Adjustments and Settings from Menus
93
Setting Gain Values for the GAIN Selector Positions
93
Selecting Output Signals
94
Setting the Color Temperature Manually
95
Specifying an Offset for the Auto White Balance Setting
95
Assigning Functions to Assignable Switches
96
Setting the Date/Time of the Internal Clock
98
Selecting a Lens File
99
Using UMID Data
100
Umid Menu Setup
101
Using the Hyper Gamma
102
Using the USER Gamma
103
Resetting USER Menu Settings to the Standard Settings
104
Chapter 6 Saving and Loading User Setting Data
106
Saving and Loading User Files
106
Handling the "Memory Stick
106
Stick
107
Saving USER Menu Data (User File) to the "Memory Stick
107
Loading Saved Data from a "Memory Stick
109
Saving and Loading Scene Files
110
Saving a Scene File
110
Loading a Scene File
112
Saved in the Reference File
113
Resetting the Camcorder Settings to the Standard Settings Saved in the Reference File
113
Jumping to a File-Related Menu Page When Inserting a "Memory Stick
114
Chapter 7 Setting up the Camcorder
116
Power Supply
116
Using a Battery Pack
116
Using an AC Adaptor
117
Using the Anton Bauer Ultralight System
117
Adjusting the Viewfinder
117
Adjusting the Viewfinder Position
117
Adjusting the Viewfinder Focus and Screen
118
Detaching the Viewfinder
118
Detaching the Eyepiece
119
Mounting the Lens
120
Adjusting the Flange Focal Length
120
Audio Input System
121
Using the Supplied Microphone
121
Using an External Microphone
122
Attaching a UHF Portable Tuner
123
Microphone System)
123
Connecting Line Input Audio Equipment
124
Tripod Mounting
125
Attaching/Detaching the Shoulder Strap
126
Adjusting the Shoulder Pad Position
126
Attaching the Rain Cover (Not Supplied)
127
Connecting the Remote Control Unit
127
Remote Control Unit
128
Chapter 8 Maintenance
130
Testing the Camcorder before Shooting
130
Preparations for Testing
130
Testing the Camera
130
Testing the VTR
132
Testing External Microphones
133
Maintenance
134
Cleaning the Video Heads
134
Cleaning the Viewfinder
134
Operation Warnings
135
Phenomena Specific to CCD Image Sensors
136
Appendixes
137
Specifications
137
General
137
Video Camera Section
137
VTR Section
138
Recommended Additional Equipment
138
Menu List
140
OPERATION Menu
140
PAINT Menu
147
MAINTENANCE Menu
152
FILE Menu
161
DIAGNOSIS Menu
164
About a "Memory Stick
165
Index
167
Sony CineAlta HDCAM HDW-F900R Brochure & Specs (20 pages)
Sony Digital Camcorder HDW-F900R User Guide
Brand:
Sony
| Category:
Camcorder
| Size: 1.72 MB
Table of Contents
Creative Versatility
4
Optional Accessories
14
Other Options
17
System Configuration
18
Advertisement
Sony CineAlta HDCAM HDW-F900R User Manual (22 pages)
Brand:
Sony
| Category:
Camcorder
| Size: 0.5 MB
Sony CineAlta HDCAM HDW-F900R Technical Bulletin (6 pages)
SOFTWARE UPGRADE—AT VERSION 1.30, SS VERSION 1.04, FP VERSION 1.03
Brand:
Sony
| Category:
Camcorder
| Size: 0.1 MB
Sony CineAlta HDCAM HDW-F900R Product Information (2 pages)
Product Information Document (DWX and WL800 Camcorder Combo Chart)
Brand:
Sony
| Category:
Camcorder
| Size: 0.49 MB
Advertisement
Related Products
Sony HDW-F900H
Sony HDCAM HDW-F900
Sony HDW F900R - CineAlta Camcorder - 1080p
Sony HDCAM HDW-730
Sony HDCAM HDW-750
Sony Digital HDVS HDCAM HDW-730S
Sony HDW-750CE
Sony HDCAM HDW-700A
Sony HDW-790P
Sony HDW 900
Sony Categories
Laptop
TV
Camcorder
CD Player
Digital Camera
More Sony Manuals
Login
Sign In
OR
Sign in with Facebook
Sign in with Google
Upload manual
Upload from disk
Upload from URL