Table of Contents
Advertisement
Available languages
Available languages
Quick Links
Advertisement
Chapters
Table of Contents

Related Manuals for Westinghouse 10KPRO


Summary of Contents for Westinghouse 10KPRO
-
Page 2: Proposition 65 Warning
California California Proposition 65 Warning Proposition 65 Warning The engine exhaust from this product Certain components in this product and its contains chemicals known to the state of related accessories contain chemicals California to cause cancer, birth defects known to the state of California to cause or other reproductive harm. -
Page 3: Congratulations On Owning A Westinghouse Generator
Purchase Receipt: (retain your purchase receipt to ensure trouble-free warranty coverage) Product Registration To ensure trouble-free warranty coverage, it is important you register your Westinghouse generator. You can register your generator by either: 1. Filling in the product registration form below and mailing to:... -
Page 5: Table Of Contents
Adding Engine Oil – 8KPRO ........................37 Changing Engine Oil – 10KPRO ........................37 Changing Engine Oil – 8KPRO ........................38 AIR FILTER MAINTENANCE ..........................39 Inspect and Replace the Air Filter – 10KPRO ....................39 Cleaning the Air Filter – 8KPRO .........................40 SPARK PLUG MAINTENANCE ........................42 BATTERY SERVICE ............................43... - Page 6 TABLE OF CONTENTS CLEANING THE ENGINE OIL COOLER – 10KPRO ..................45 TESTING THE GROUND FAULT SENSOR ......................46 CLEANING THE GENERATOR ........................46 QUICK DRAIN..............................48 STORAGE .................................49 TROUBLESHOOTING ............................50 TROUBLESHOOTING ............................50...
-
Page 7: Safety
SAFETY SAFETY DEFINITIONS SAFETY SYMBOL DEFINITIONS The words DANGER, WARNING, CAUTION and NOTICE are used throughout this manual to highlight important information. Be certain that the meanings of Symbol Description these alerts are known to all who work on or near the equipment. -
Page 8: General Safety Rules
SAFETY GENERAL SAFETY RULES WARNING Gasoline and gasoline vapors are DANGER extremely flammable and explosive Never use the generator in a location under certain conditions. that is wet or damp. Never expose the • Always refuel the generator outdoors, generator to rain, snow, water spray or in a well-ventilated area. - Page 9 SAFETY WARNING Never operate the generator if powered items overheat, electrical output drops, there is sparking, flames or smoke coming from the generator, or if the receptacles are damaged. Never use the generator to power medical support equipment. Always remove any tools or other service equipment used during maintenance from the generator before operating.
-
Page 10: Safety Labels And Decals - 10Kpro
SAFETY SAFETY LABELS AND DECALS – 10KPRO Figure 1... - Page 11 SAFETY Class F Figure 2...
-
Page 12: Safety Labels And Decals - 8Kpro
SAFETY SAFETY LABELS AND DECALS – 8KPRO Figure 3... - Page 13 SAFETY Figure 4...
-
Page 14: Unpacking
Westinghouse Generator dealer at www.westpropower. com or call 1-855-WHHELP1 (1-855-944-3571). Components: Wheels (2) 0.75 L Bottle of SAE 10W30 Oil – 10KPRO (2) Tool Bag (1) 1.0 L Bottle of SAE Spark Plug Socket 10W30 Oil – 8KPRO (1) Wrench (1) -
Page 15: Assembly
ASSEMBLY 3. Install the mounting foot to the frame using M8 ASSEMBLY flange bolts and nuts (see Figure 6). Before assembling the generator, review Safety on page 7 and the following safety messages. CAUTION Never lift the generator without assistance. The generator is heavy and lifting without assistance could result in personal injury. -
Page 16: Installing The Battery
ASSEMBLY Install the lifting bracket using the hex bolts, INSTALLING THE BATTERY spacers and locknuts (see Figure 8). WARNING To avoid electric shock: • ALWAYS connect the positive (+) battery cable (red boot) first when connecting battery cables. • ALWAYS disconnect the negative (-) battery cable (black boot) first when disconnecting battery cables. - Page 17 ASSEMBLY 4. Pull back the black boot and securely attach the negative (-) battery cable (black boot) to the negative (-) battery post as shown in Figure 9. Replace the black boot so it protects the cable lug and battery post. Figure 9 –...
-
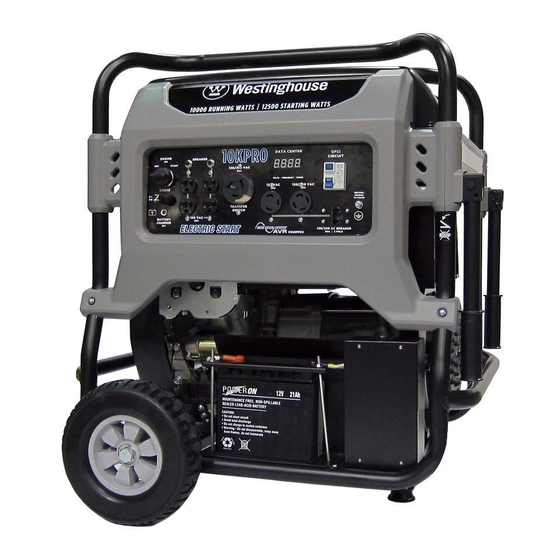
Page 18: Features
FEATURES GENERAL GENERATOR FEATURES – 10KPRO Figure 10 1 - Engine Control Switch: Turns the engine on 3 - Battery: Used for starting the generator. and off. 4 - Oil Dipstick: Remove the dipstick to check 2 - Control Panel: Contains the circuit breakers the engine oil. - Page 19 FEATURES Figure 11 1 - Fuel Gauge: Indicates fuel level. 5 - Oil Fill Cap: Remove to add engine oil. 2 - Fuel Shutoff Valve: Controls the flow of fuel 6 - Spark Plug Boot (Wire): Must be removed to the engine. when servicing the engine or the spark plug.
-
Page 20: Control Panel Features - 10Kpro
FEATURES CONTROL PANEL FEATURES – 10KPRO Figure 12 – Control Panel Features Battery Charger Port: Plug the 120-volt 120/240-Volt, 30-Amp Circuit Breakers: AC charger into this port to charge the The circuit breakers limit the current that can generator battery. -
Page 21: General Generator Features - 8Kpro
FEATURES GENERAL GENERATOR FEATURES – 8KPRO Figure 13 1 - Engine Control Switch: Turns the engine on 3 - Oil Fill Plug/Dipstick: Must be removed to and off. add and check oil. 2 - Control Panel: Contains the circuit breakers 4 - Fuel Gauge: Indicates fuel level. - Page 22 FEATURES Figure 14 1 - Muffler: Avoid contact until the engine is 4 - Recoil Handle: Used to start the generator cooled down. manually. 2 - Spark Plug Boot (Wire): Must be removed 5 - Air Cleaner Cover: Must remove to service when servicing the engine or the spark plug.
-
Page 23: Control Panel Features - 8Kpro
FEATURES CONTROL PANEL FEATURES – 8KPRO Figure 15 – Control Panel Features Battery Charger Port: Plug the 120-volt Ground Fault Sensor: The sensor will AC charger into this port to charge the scan all the outlets on the control panel for generator battery. -
Page 24: Operation
OPERATION No Connected Loads – Make sure the generator BEFORE STARTING THE has no connected loads before starting it. To ensure GENERATOR there are no connected loads, unplug any electrical extension cords that are plugged into the control panel receptacles. Before starting the generator, review NOTICE Safety on page 7. -
Page 25: Power Cord
OPERATION WARNING Be sure the generator is properly connected to earth ground before operating. The generator must be grounded to prevent electrical shock due to faulty appliances. POWER CORD Using Extension Cords Westpro Power Systems assumes no responsibility for the content within this table. The use of this table is the responsibility of the user only. -
Page 26: Transfer Switch Cord
It is used to connect the 50-amp The Westinghouse generator is wired with the neutral outlet on the 10KPRO and the 30-amp outlet on the bonded to ground. If you are connecting your generator 8KPRO of the generator to the transfer switch. If your to a transfer switch, the electrician must first determine... -
Page 27: Lifting Bracket
The anchor is 3. Connect a suitable lifting device to the chain or standard on 10KPRO and optional on 8KPRO. strap. 4. Lift the generator slightly to ensure it is lifting WARNING straight and level. -
Page 28: Adding / Checking Engine Fluids And Fuel
You must add engine oil before starting the generator for the first time. See Checking Engine Oil – 10KPRO on page 35, Checking Engine Oil – 8KPRO on page 36, Adding Engine Oil – 10KPRO on page 36 and Adding Engine Oil – 8KPRO on Figure 22 –... -
Page 29: Programming The Generator For Remote Start
Before attempting to start the generator, verify the following: The engine is filled with engine oil (see Checking Engine Oil – 10KPRO on page 35 and Checking Engine Oil – 8KPRO on page 36). The generator is situated in a proper location (see Location Selection on page 24). - Page 30 The engine is equipped with a low oil shutdown switch. If the oil level becomes low, the engine will Figure 25 – Circuit Breakers – 10KPRO shut down and will not start until the oil is filled to the 1 - 120V Circuit 3 - 120/240V proper level.
- Page 31 Figure 28 – Engine Control Switch carburetor adjustments. Tampering with the automatic choke system may void your warranty. NOTICE See an authorized Westinghouse service center for more information. Failure to release the engine control switch once the engine starts could result in damage to the generator.
-
Page 32: Stopping The Generator
Before attempting to start the generator, verify the following: The engine is filled with engine oil (see Checking Engine Oil – 10KPRO on page 35 and Checking Engine Oil – 8KPRO on page 36). The generator is situated in a proper location (see Location Selection on page 24). -
Page 33: Stopping The Generator Using Remote Start
This system is always on and cannot be turned off. Do not attempt to make adjustments to the automatic choke or any other carburetor adjustments. Tampering with the automatic choke system may void your warranty. See an authorized Westinghouse service center for more information. -
Page 34: Maintenance
MAINTENANCE MAINTENANCE CAUTION Before performing maintenance Avoid skin contact with engine oil or on the generator, review Safety on gasoline. Prolonged skin contact with page 7 and the following safety engine oil or gasoline can be harmful. messages. Frequent and prolonged contact with engine oil may cause skin cancer. -
Page 35: Engine Oil Maintenance
MAINTENANCE Table 2: Maintenance Schedule - Authorized Westinghouse Service Dealer Performed After First 20 After 50 Hours After 100 Hours After 300 Hours Maintenance Before Every Hours or First of Use or Every of Use or Every of Use or Every... -
Page 36: Checking Engine Oil - 8Kpro
4. With a damp rag, clean around the oil fill plug/ dipstick. 5. Remove oil fill plug/dipstick (see Figure 35). Figure 36 – Checking Oil Level Adding Engine Oil – 10KPRO 1. Always operate or maintain the generator on a flat surface. 2. Stop engine if running. -
Page 37: Adding Engine Oil - 8Kpro
Figure 38 – Adding Engine Oil drain plug and oil filter. 8. Continue to add oil until the oil is at the correct 5. Turn the oil filter counterclockwise and remove the level. See Checking Engine Oil – 10KPRO on page filter (see Figure 40). -
Page 38: Changing Engine Oil - 8Kpro
11. Fill crankcase with oil following the steps outlined in 6. Remove the oil fill plug so the oil can drain more Adding Engine Oil – 10KPRO on page 36. easily from the oil drain port. 7. Allow oil to completely drain. -
Page 39: Air Filter Maintenance
filter. Inspect and Replace the Air Filter – 10KPRO The air filter must be inspected after every 50 hours of use or 3 months (frequency should be increased if generator is operated in a dusty environment). -
Page 40: Cleaning The Air Filter - 8Kpro
MAINTENANCE 4. Remove the black coarse outside air filter (see Cleaning the Air Filter – 8KPRO Figure 47). The air filter must be cleaned after every 50 hours of use or 3 months (frequency should be increased if generator is operated in a dusty environment). 1. - Page 41 MAINTENANCE 6. Wash the foam air filter elements by submerging 11. Squeeze the filters to remove any excess oil (see the elements in a solution of household detergent Figure 50). soap and warm water. Slowly squeeze the foam to thoroughly clean. NOTICE NEVER twist or tear the foam air filter element during cleaning or drying.
-
Page 42: Spark Plug Maintenance
5. Using the 13/16" spark plug socket wrench provided, remove the spark plug from the cylinder head (see Figure 54 and Figure 55). Figure 52 – Removal of Spark Plug Boot – 10KPRO Figure 54 – Removing Spark Plug – 10KPRO... -
Page 43: Battery Service
MAINTENANCE 8. Install the spark plug by carefully following the steps outlined below: Carefully insert the spark plug back into the cylinder head. Hand-thread the spark plug until it bottoms out. Using the 13/16" spark plug socket wrench provided, turn the spark plug to ensure it is fully seated. -
Page 44: Battery Replacement
5. Disconnect the red positive (+) battery cable removed in step 2. second and remove the battery. 10. Install the spark plug wire onto spark plug. The battery for 10KPRO, Part No. 100170, is the same as a wheelchair battery. Type Sealed lead-acid... -
Page 45: Cleaning The Engine Oil Cooler - 10Kpro
Dimensions (L x H x W) 5.9 x 4.33 x 3.43 in. (15.0 x 11.0 x 8.7 cm) CLEANING THE ENGINE OIL COOLER – 10KPRO 1. Remove the screws for the oil cooler (see Figure 60). Figure 61 – Oil Cooler Fins 4. -
Page 46: Testing The Ground Fault Sensor
(see Figure 62). dirt and debris to ensure the engine does not run hot (see Figure 63 and Figure 64). Figure 63 – Engine Air Inlet and Outlet Ports – 10KPRO Figure 62 – Ground Fault Sensor Test 1 - Test Button... - Page 47 MAINTENANCE Figure 67 – Alternator Cooling Air Inlet and Outlet Port – 10KPRO Figure 65 – Engine Cooling Fins – 8KPRO Clean All Alternator Cooling Air Inlets and Exhaust Ports – Make sure the cooling air inlets and exhaust ports of the alternator are free of any debris and obstructions.
-
Page 48: Quick Drain
MAINTENANCE QUICK DRAIN WARNING Gasoline and gasoline vapors are extremely flammable and explosive under certain conditions. Wipe up any spills immediately. The generator is equipped with a quick-drain feature. This feature will prevent the harmful effects of phase- separated ethanol fuels. During the winter, the alcohol and water can separate from the gasoline in blended fuels. -
Page 49: Storage
4. Close the fuel shutoff valve. 5. Change the oil (see Changing Engine Oil – 10KPRO on page 37 and Changing Engine Oil – 8KPRO on page 38). 6. Remove the spark plug (see Spark Plug Maintenance on page 42) and place about 1 tablespoon of oil in the spark plug opening. -
Page 50: Troubleshooting
TROUBLESHOOTING TROUBLESHOOTING WARNING Before attempting to service or troubleshoot the generator, the owner or service technician must first read the owner’s manual and understand and follow all safety instructions. Failure to follow all instructions may result in conditions that can lead to voiding of the EPA certification or product warranty, serious personal injury, property damage or even death. - Page 51 TROUBLESHOOTING PROBLEM POTENTIAL CAUSE SOLUTION Low battery in remote start key Replace batteries in key fob. Remote start system not Exceeding the range of remote Move closer to generator. Must be no more than 109 working. start key fob yards (100 M) away. Remote start key fob not Program key fob to generator (see Programming the programmed to generator...
- Page 53 MANUAL DEL PROPIETARIO...
- Page 54 California California Proposition 65 Warning Proposition 65 Warning The engine exhaust from this product Certain components in this product and its contains chemicals known to the state of related accessories contain chemicals California to cause cancer, birth defects known to the state of California to cause or other reproductive harm.
-
Page 55: Felicitaciones Por Adquirir Un Generador Westinghouse
Recibo de compra: (conserve el recibo de compra para asegurar la cobertura sin problemas de la garantía) Registro del producto Para asegurar la cobertura sin problemas de la garantía es importante que registre el generador Westinghouse. Puede registralo haciendo lo siguiente: Complete el formulario de registro del producto que está... - Page 57 MANTENIMIENTO DEL ACEITE DEL MOTOR ....................35 Especificación del aceite del motor ......................35 Procedimiento para controlar el aceite del motor – 10KPRO ..............35 Procedimiento para controlar el aceite del motor – 8KPRO ...............36 Procedimiento para agregar el aceite del motor – 10KPRO ...............36 Procedimiento para agregar el aceite del motor –...
- Page 58 ÍNDICE LIMPIEZA DEL ENFRIADOR DE ACEITE DEL MOTOR – 10KPRO ...............45 PROBAR EL SENSOR DE FALLA A TIERRA ....................46 LIMPIEZA DEL GENERADOR .........................46 DRENAJE RÁPIDO ............................48 ALMACENAMIENTO ............................49 SOLUCIÓN DE PROBLEMAS ..........................50 SOLUCIÓN DE PROBLEMAS .........................50...
-
Page 59: Seguridad
SEGURIDAD DEFINICIONES DE DEFINICIONES DE LOS SEGURIDAD SÍMBOLOS DE SEGURIDAD Las palabras PELIGRO, ADVERTENCIA, PRECAUCIÓN y Símbolo Descripción AVISO se usan a lo largo de este manual para destacar la información importante. Asegúrese de que todo aquel que trabaje con el equipo o cerca de él conozca el significado de Símbolo de alerta de seguridad estas alertas. -
Page 60: Normas Generales De Seguridad
SEGURIDAD NORMAS GENERALES DE ADVERTENCIA SEGURIDAD La gasolina y los vapores de la gasolina son extremadamente inflamables y explosivos en determinadas condiciones. PELIGRO • Siempre debe hacer la recarga de Nunca use el generador en lugares combustible del generador en exteriores, mojados o húmedos. - Page 61 SEGURIDAD ADVERTENCIA Nunca opere el generador si se sobrecalientan los componentes eléctricos, si cae la salida de energía eléctrica, si salen chispas, llamas o humo del generador, o si los receptáculos están dañados. Nunca use el generador para alimentar equipos de asistencia médica. Siempre retire del generador las herramientas u otros equipos de servicio que se utilicen durante el mantenimiento...
-
Page 62: Etiquetas Y Calcomanías De Seguridad - 10Kpro
SEGURIDAD ETIQUETAS Y CALCOMANÍAS DE SEGURIDAD – 10KPRO Figura 1... - Page 63 SEGURIDAD Class F Figura 2...
-
Page 64: Etiquetas Y Calcomanías De Seguridad - 8Kpro
SEGURIDAD ETIQUETAS Y CALCOMANÍAS DE SEGURIDAD – 8KPRO Figura 3... - Page 65 SEGURIDAD Figura 4...
-
Page 66: Desembalar
Corte con cuidado dos costados de la caja para extraer el generador. ACCESORIOS DEL KIT DE RUEDAS Si falta alguna pieza, ubique a un distribuidor autorizado de Westinghouse Generator en www.westpropower.com o llame al 1-855-WHHELP1 (1-855-944-3571). Componentes: Ruedas (2) Botella de 0,75 L de aceite SAE 10W30 –... -
Page 67: Montaje
MONTAJE Instale la pata de montaje al bastidor con tuercas y MONTAJE pernos de brida M8 (vea la Figura 6). Antes de ensamblar el generador, analice Seguridad en la página 7 y los siguientes mensajes de seguridad. PRECAUCIÓN Nunca levante el generador sin ayuda. El generador es pesado y levantarlo sin ayuda podría causarle lesiones personales. -
Page 68: Instalación De La Batería
MONTAJE Instale el soporte de elevación usando los pernos INSTALACIÓN DE LA BATERÍA hexagonales, separadores y contratuerca (vea la Figura ADVERTENCIA Para evitar descargas eléctricas: • SIEMPRE conecte primero el cable positivo (+) (capuchón rojo) de la batería cuando conecte los cables de la batería. •... - Page 69 MONTAJE Tire hacia atrás el capuchón negro y sujete bien el cable negativo (-) de la batería (capuchón negro) al terminal negativo (-) de la batería como se indica en la Figura 9. Reponga el capuchón negro para que proteja la lengüeta del cable y el terminal de la batería.
-
Page 70: Características
CARACTERÍSTICAS CARACTERÍSTICAS GENERALES DEL GENERADOR – 10KPRO Figura 10 Batería: Se usa para arrancar el generador. Enciende y Interruptor de control del motor: apaga el motor. Varilla de medición de aceite: Retire la varilla Contiene los disyuntores y para comprobar el nivel de aceite del motor. - Page 71 CARACTERÍSTICAS Figura 11 Indicador de combustible: Indica el nivel de Tapón de llenado de aceite: Quítelo para combustible. agregar aceite del motor. Válvula de cierre de combustible: Controla el Capuchón (cable) de la bujía: Se debe quitar flujo de combustible al motor. cuando se realiza el mantenimiento del motor o de la bujía.
-
Page 72: Características Del Tablero De Control - 10Kpro
CARACTERÍSTICAS CARACTERÍSTICAS DEL TABLERO DE CONTROL – 10KPRO Figura 12 – Características del tablero de control Disyuntores de 30 amperios 120/240 voltios: Puerto del cargador de la batería: Enchufe el cargador de CA de 120 V a este terminal para El disyuntor limita la corriente que puede cargar la batería del generador. -
Page 73: Características Generales Del Generador - 8Kpro
CARACTERÍSTICAS CARACTERÍSTICAS GENERALES DEL GENERADOR – 8KPRO Figura 13 Interruptor de control del motor: Enciende y Tapón de llenado/varilla de medición del apaga el motor. aceite: Se deben extraer para agregar y controlar el aceite. Contiene los disyuntores y Panel de control: los tomacorrientes. - Page 74 CARACTERÍSTICAS Figura 14 Silenciador: Evite el contacto hasta que el Manija de retroceso: Se usa para arrancar el motor se enfríe. generador de forma manual. Capuchón (cable) de la bujía: Se debe quitar Cubierta del filtro de aire: Debe quitarse para cuando se realiza el mantenimiento del motor o realizar el mantenimiento del filtro de aire.
-
Page 75: Características Del Tablero De Control - 8Kpro
CARACTERÍSTICAS CARACTERÍSTICAS DEL TABLERO DE CONTROL – 8KPRO Figura 15 – Características del tablero de control Sensor de falla a tierra: El sensor escaneará Puerto del cargador de la batería: Enchufe el cargador de CA de 120 V a este terminal para todos los tomacorrientes en el panel de cargar la batería del generador. -
Page 76: Funcionamiento
FUNCIONAMIENTO No debe haber cargas conectadas – Compruebe que el ANTES DE ENCENDER EL generador no tenga cargas conectadas antes de encenderlo. GENERADOR Para asegurar que no haya cargas conectadas, desenchufe los prolongadores eléctricos que estén enchufados en los receptáculos del panel de control. Antes de arrancar el generador, analice AVISO Seguridad en página 7. -
Page 77: Cable De Suministro
FUNCIONAMIENTO ADVERTENCIA Asegúrese de que el generador esté correctamente conectado a tierra antes de usarlo. El generador se debe conectar a tierra para evitar descargas eléctricas causadas por artefactos defectuosos. CABLE DE SUMINISTRO Usar cables prolongadores Westpro Power Systems no asume responsabilidad alguna por el contenido de esta tabla. -
Page 78: Cable Interruptor De Transferencia
FUNCIONAMIENTO Cable interruptor de transferencia CONEXIONES DEL El cable interruptor de transferencia, 10KPRO N.° de pieza INTERRUPTOR DE 210051 y 8KPRO N.° de pieza 210075, es un accesorio opcional para el generador portátil. Se utiliza para conectar el TRANSFERENCIA tomacorriente de 50 amperios del 10KPRO y el tomacorriente de 30 amperios del 8KPRO del generador hasta el interruptor El generador Westinghouse está... -
Page 79: Soporte De Elevación
El anclaje es estándar en sujeto. el 10KPRO y opcional en el 8KPRO. Conecte un dispositivo de elevación adecuado a la cadena o cuerda. -
Page 80: Procedimiento Para Agregar/Controlar El Combustible Y Los Líquidos Del Motor
Debe agregar aceite del motor antes de encender el generador por primera vez. Vea Procedimiento para controlar el aceite del motor – 10KPRO en la página 35, Figura 22 – Nivel máximo de carga de gasolina Procedimiento para controlar el aceite del motor – 8KPRO en la página 36, Procedimiento para agregar el aceite... -
Page 81: Programación Del Generador Para Arranque Remoto
El motor está cargado con aceite del motor (consulte Procedimiento para controlar el aceite del motor – 10KPRO en la página 35 y Procedimiento para controlar el aceite del motor – 8KPRO en la página 36). El generador se ubica en un lugar adecuado (vea Elección de la ubicación en la página 24). - Page 82 El motor cuenta con un interruptor de desconexión por nivel bajo de aceite. Si el nivel del aceite es bajo, el motor Figura 25 – Disyuntores – 10KPRO se apagará y no arrancará hasta que se cargue aceite hasta el nivel adecuado.
- Page 83 La manipulación indebida del AVISO sistema de cebador automático puede anular la garantía. Consulte en un centro servicio Westinghouse autorizado Si no se suelta el interruptor de control del motor para obtener más información. después del encendido del motor, se podría dañar el generador.
-
Page 84: Detención Del Generador
El motor está cargado con aceite del motor (consulte Procedimiento para controlar el aceite del motor – 10KPRO en la página 35 y Procedimiento para controlar el aceite del motor – 8KPRO en la página 36). El generador se ubica en un lugar adecuado (vea Elección de la ubicación en la página 24). -
Page 85: Detención Del Generador Con El Arranque Remoto
No intente ajustar el cebador automático ni realizar ningún otro ajuste en el carburador. La manipulación indebida del sistema de cebador automático puede anular la garantía. Consulte a un centro de servicio Westinghouse autorizado para obtener más información. -
Page 86: Mantenimiento
MANTENIMIENTO MANTENIMIENTO PRECAUCIÓN Antes de realizar tareas de Evite que la piel esté en contacto con el mantenimiento del generador, analice aceite del motor o la gasolina. El contacto Seguridad en página 7 y los prolongado de la piel con el aceite del siguientes mensajes de seguridad. -
Page 87: Mantenimiento Del Aceite Del Motor
MANTENIMIENTO Tabla 2: Cronograma de mantenimiento - Realizado por el Distribuidor autorizado de servicio Westinghouse Después de las Después de 50 Después de 100 Después de 300 Tareas de Antes de primeras 20 horas o horas de uso o horas de uso o... -
Page 88: Procedimiento Para Controlar El Aceite Del Motor - 8Kpro
Extraiga el tapón de llenado/la varilla de medición del aceite (vea la Figura 35). Figura 36 – Control del nivel de aceite Procedimiento para agregar el aceite del motor – 10KPRO Siempre opere o mantenga el generador sobre una superficie plana. Detenga el motor si está en marcha. -
Page 89: Procedimiento Para Agregar El Aceite Del Motor - 8Kpro
Vea Procedimiento para controlar el aceite del debajo del filtro de aceite y tapón de drenaje de aceite. motor – 10KPRO en la página 35. Con una tela húmeda, limpie completamente alrededor del tapón de drenaje del aceite y el filtro de aceite. -
Page 90: Procedimiento Para Cambiar El Aceite Del Motor - 8Kpro
Retire el tapón de llenado del aceite para que el aceite se detallan en Procedimiento para agregar el aceite del pueda drenar más fácilmente del orificio de drenaje del motor – 10KPRO en la página 36. aceite. AVISO Deje que se drene totalmente el aceite. -
Page 91: Mantenimiento Del Filtro De Aire
Debe usar únicamente detergente para el hogar para limpiar el filtro de aire. Inspeccione y reemplace el filtro de aire – 10KPRO El filtro de aire debe inspeccionarse después de 50 horas de uso o cada 3 meses (se debe aumentar la frecuencia si el generador funciona en un entorno donde abunda el polvo). -
Page 92: Limpieza Del Filtro De Aire - 8Kpro
MANTENIMIENTO Extraiga el filtro de aire exterior negro para partículas Limpieza del filtro de aire – 8KPRO gruesas (vea la Figura 47). Se debe limpiar el filtro de aire cada 50 horas de uso o cada 3 meses (se debe aumentar la frecuencia si el generador funciona en un entorno donde abunda el polvo). - Page 93 MANTENIMIENTO Lave los elementos de espuma del filtro de aire 11. Se deben apretar los filtros para eliminar el aceite sumergiéndolos en una solución de detergente para el excedente (vea la Figura 50). hogar y agua caliente. Apriete lentamente la espuma hasta que quede completamente limpia.
-
Page 94: Mantenimiento De La Bujía De Encendido
(vea la Figura 54 y la Figura 55). Figura 52 – Extracción del capuchón de la bujía de encendido – 10KPRO Figura 54 – Extracción de la bujía de encendido – 10KPRO... -
Page 95: Mantenimiento De La Batería
MANTENIMIENTO Coloque la bujía de encendido siguiendo atentamente los pasos que se detallan a continuación: Inserte con cuidado la bujía nuevamente dentro de la cabeza del cilindro. Enrosque manualmente la bujía hasta que sobresalga la base. Con la llave de cubo de 13/16" para bujías suministrada, gire la bujía hasta asegurar que esté... -
Page 96: Reemplazo De La Batería
10. Instale el cable de la bujía de encendido a la bujía de extraiga la batería. encendido. La batería para el 10KPRO, N.° de pieza 100170, es la misma que la de la silla de ruedas. Tipo Sellada de plomo ácido... -
Page 97: Limpieza Del Enfriador De Aceite Del Motor - 10Kpro
(L x H x A) (15,0 x 11,0 x 8,7 cm) LIMPIEZA DEL ENFRIADOR DE ACEITE DEL MOTOR – 10KPRO Extraiga los tornillos del enfriador de aceite (vea la Figura 60). Figura 61 – Aletas del enfriador de aceite Use tornillos para instalar el enfriador de aceite y la protección. -
Page 98: Probar El Sensor De Falla A Tierra
(vea la Figura 63 y la Figura 64). Figura 63 – Orificios de entrada y salida de aire del motor – 10KPRO Figura 62 – Prueba del sensor de falla a tierra Botón de prueba Luz de falla Botón para Luz de energía... - Page 99 MANTENIMIENTO Figura 67 – Entrada y salida de aire de enfriamiento del alternador Orificio – 10KPRO Figura 65 – Aletas de enfriamiento del motor – 8KPRO Limpie todas las entradas de aire de refrigeración y todos los orificios de escape del alternador – Compruebe que las entradas de aire de refrigeración y los orificios de escape del...
-
Page 100: Drenaje Rápido
MANTENIMIENTO DRENAJE RÁPIDO ADVERTENCIA La gasolina y los vapores de la gasolina son extremadamente inflamables y explosivos en determinadas condiciones. Limpie todos los derrames de inmediato. El generador cuenta con una función de drenaje rápido. Esta función evitará los efectos dañinos de los combustibles de etanol de fases separadas. -
Page 101: Almacenamiento
Cierre la válvula de cierre del combustible. Cambie el aceite (consulte Procedimiento para cambiar el aceite del motor – 10KPRO en la página 37 y Procedimiento para cambiar el aceite del motor – 8KPRO en la página 38). Retire la bujía de encendido (vea Mantenimiento de la bujía de encendido en la página 42) y coloque... -
Page 102: Solución De Problemas
SOLUCIÓN DE PROBLEMAS SOLUCIÓN DE PROBLEMAS ADVERTENCIA Antes de intentar realizar el servicio o detectar los problemas del generador, el propietario o el técnico de servicios deben leer primero el manual del propietario y comprender y respetar todas las instrucciones de seguridad. Si no se respetan todas las instrucciones, se pueden generar condiciones que pueden provocar la anulación de la certificación de la EPA o de... - Page 103 SOLUCIÓN DE PROBLEMAS PROBLEMA CAUSA POSIBLE SOLUCIÓN Batería baja en el llavero de Reemplace las baterías del llavero. arranque remoto El sistema de arranque remoto Se excede el rango del llavero de Acérquese al generador. No debe estar a más de 109 no funciona.