
Related Manuals for Pride Jet 2


Summary of Contents for Pride Jet 2
- Page 1 Owner’s Manual ATTENTION: Please read the content of your owner’s manual before operating your power chair. Stylish Design and Premium Performance ® Exeter, PA St. Catharines, ON 1-800-800-8586 www.pridemobility.com...
- Page 2 Using your Pride product safely depends upon your diligence in following the warnings, cautions, and instructions in this owner’s manual. Using your Pride product safely also depends upon your own good judgement and/or common sense, as well as that of your provider, caregiver, and/or healthcare professional. Pride is not responsible for injuries and/or damage resulting from any person’s failure to follow the warnings, cautions, and instructions in...
-
Page 3: Table Of Contents
C O N T E N T S INTRODUCTION......................... 4 SAFETY ............................6 III. EMI/RFI ............................14 IV. YOUR JET 2 ..........................16 ASSEMBLY..........................20 VI. COMFORT ADJUSTMENTS....................22 VII. DISASSEMBLY ......................... 26 VIII. OPERATION ..........................27 IX. BATTERIES AND CHARGING .................... 29 CARE AND MAINTENANCE .................... -
Page 4: Introduction
Pride is not liable for damage to property or personal injury arising out of unsafe use of a power chair. Pride is also not liable for any property damage or personal injury arising out of the failure of any person and/or user to following the instructions and recommendations set forth in this manual or any other instructions or recommendations con- tained in other power chair related literature issued by Pride or contained on the power chair itself. - Page 5 Pride Owners Club As an owner of a Pride product, you are invited to register your product’s warranty and enroll in the Pride Owners Club. You may do so by filling out and returning your enclosed registration card or by visiting Pride’s web site at www.pridemobility.com.
-
Page 6: Safety
Pre-Ride Safety Check Get to know the feel of your power chair and its capabilities. Pride recommends that you perform a safety check before each use to make sure your power chair operates smoothly and safely. See X. “Care and Maintenance.”... -
Page 7: Weight Limitations
Your power chair is rated for a maximum weight capacity. Please refer to the specifications table for this limit. WARNING! Exceeding the weight capacity voids your warranty and may result in personal injury and/or damage to your power chair. Pride will not be held responsible for injuries and/or property damage resulting from failure to observe weight limitations. -
Page 8: Braking Information
In compliance with the Americans with Disabilities Act of 1990, all handicap public access ramps are required to have a maximum slope of 5°. Therefore, Pride recommends that the maximum slope of an incline you attempt to safely ascend or descend on your power chair does not exceed 5°. See figure 1. -
Page 9: Outdoor Driving Surfaces
Your power chair is designed to provide optimum stability under normal driving conditions—dry, level surfaces composed of concrete, blacktop, or asphalt. However, Pride recognizes that there will be times when you will encounter other surface types. For this reason, your power chair is designed to perform admirably on packed soil, grass, and gravel. - Page 10 If you will be traveling with your power chair, you may find it necessary to use a lift/elevation product to aid in transportation. Pride recommends that you closely review the instructions, specifications, and safety information set forth by the manufacturer of the lift/elevation product before using that product.
-
Page 11: Motor Vehicle Transport
Transferring onto and off of your power chair requires a good sense of balance. Always have an attendant or healthcare professional present while learning to properly transfer yourself. To eliminate the possibility of injury, Pride recommends that you or a trained attendant perform the following tasks before attempting a transfer: n Turn the power off. -
Page 12: Reaching And Bending
S A F E T Y Inclement Weather Precautions WARNING! Pride recommends that you do not operate your power chair in icy or slippery conditions or on salted surfaces (i.e., walks or roads). Such use may adversely affect the performance and safety of your power chair, resulting in an accident and personal injury. -
Page 13: Removable Parts
Removable Parts WARNING! Do not attempt to lift or move a power chair by any of its removable parts. Personal injury and/or damage to the power chair may result. Jet 2/Rev F/Feb03 www.pridemobility.com... -
Page 14: Emi/Rfi
Has anyone been hurt from erratic, unintended motion of electric mobility vehicles? The FDA has reports of injuries that may have resulted from the uncontrolled motion of electric mobility vehicles. However, it is unclear how many of these incidents were actually caused by radio wave interference. www.pridemobility.com Jet 2/Rev F/Feb03... - Page 15 What should I do if my power chair moves unexpectedly? If unintended motion or brake release occurs, turn the power chair off as soon as it is safe to do so. Call Pride at 800-424-8205 to report the incident.
-
Page 16: Your Jet 2
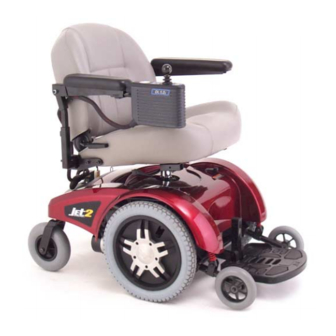
J E T Your Jet 2 has two main assemblies: the seat and the power base. See figures 3 and 4. Typically, the seating assembly includes the armrests, seatback, and a joystick/controller. Your Jet 2 seat may also have some optional accessories attached to it, such as a basket, a cane/crutch holder, or a cup holder. -
Page 17: Specifications
Battery Charger: 4-amp Onboard (standard) 4-amp Off-board Electronics: 50-amp Dynamic DL controller Weight Capacity: 300 lbs. Jet 2 Weights: Base: 96 lbs. Seat: 36.5 lbs. Batteries: 38 lbs. Warranty: Five-year limited warranty on frame One-year warranty on electronics One-year warranty on drive motors Jet 2/Rev F/Feb03 www.pridemobility.com... - Page 18 Charger Connector: This is where the charger connects to the controller. n Main Circuit Breaker: The main circuit breaker is a safety feature built into your Jet 2. When the batteries and the motors are heavily strained (e.g., from excessive loads), the main circuit breaker will trip to prevent damage to the motors and the electronics.
- Page 19 2. Turn the manual freewheel levers outward, to engage the drive motors. See figure 6. If a lever is difficult to move in either direction, rock your Jet 2 back and forth slightly. The lever should then move to the desired position.
-
Page 20: Assembly
Figure 8. Seat Installation JOYSTICK INSTALLATION Your Jet 2 is equipped with a Pilot joystick controller. It may have been shipped without the joystick installed in the armrest. To install the joystick controller: 1. - Page 21 A S S E M B L Y Figure 10. 9-pin Controller Connector SLIDE JOYSTICK MOUNTING ARM INTO BRACKET SETSCREW Figure 11. Joystick And Bracket Jet 2/Rev F/Feb03 www.pridemobility.com...
-
Page 22: Comfort Adjustments
C O M F O R T A D J U S T M E N T S After you have become familiar with your Jet 2’s opera- NUT AND BOLT tion, you may find the need to adjust the seat. There are... -
Page 23: Armrest Angle
5. Lock the adjusting screw into place by tightening the ANGLE. jam nut. ARMREST HEIGHT (OPTIONAL) Your Jet 2 may be equipped with height-adjustable arm- Figure 14. Armrest Angle Adjustment rests. To change the armrest height: 1. Locate the two setscrews under the rear of the arm- rests. - Page 24 12-19 in. To adjust the ELR angle: 1. Press the release lever. See figure 19. 2. Move the leg rest to the desired angle. Figure 18. Swing-away Footrests www.pridemobility.com Jet 2/Rev F/Feb03...
- Page 25 If you plan on using RELEASE LEVER your Jet 2 on rough surfaces, it may be necessary to adjust the anti-tip wheels to better suit your needs. The anti-tip wheels may need adjustment if either of the fol- lowing occur: n When coming to a stop, your Jet 2 tips forward excessively.
-
Page 26: Disassembly
BODY SHROUD REMOVAL The body shroud is a one-piece, molded plastic body that covers the power base frame. It helps protect the Jet 2 components from the environment. You must remove the body shroud in order to change the batteries and check the cable connections. -
Page 27: Operation
NOTE: We recommend that you turn the speed and response adjustment knob completely counterclockwise (to the slowest setting) the first few times you operate your Jet 2. This will allow you to become familiar with your new power chair. - Page 28 In addition to indicating the current state of battery charge, the battery condition meter can also indicate possible problems with your Jet 2. If the battery condition meter is flashing rapidly, the controller may be indicating a fault. The following is a list of the possible errors signified by the rapidly flashing meter.
-
Page 29: Batteries And Charging
CHARGING THE BATTERIES The onboard battery charger is essential in providing long life for your Jet 2 batteries. See figure 24. This charger is designed to optimize your Jet 2’s performance by charging the batteries safely, quickly, and easily. The charging system consists of the charger, the charger fuse, and the ammeter. - Page 30 C H A R G I N G 3. Remove the battery charger cord from the back pouch of your Jet 2 and plug it into the battery charger AC power cord receptacle located on the power base. See figure 4.
-
Page 31: Daily Use
DAILY USE If you use your Jet 2 on a daily basis, charge the batteries as soon as you are finished using you power chair. Your Jet 2 will be ready each morning to give you a full day’s service. It is recommended that you charge the batteries 8 to 14 hours after daily use. - Page 32 They do not have a “memory” like nickel-cadmium batteries. We work closely with our battery manufacturer to provide a battery that best suits your Jet 2’s specific demands. Fresh batteries arrive regularly at Pride and are promptly shipped with a full charge. During shipping, the batteries encounter temperature extremes that may influence initial performance.
- Page 33 What about shipping? If you wish to use a freight company to ship your Jet 2 to your final destination, repack your Jet 2 in the original shipping container and ship the batteries in separate boxes.
-
Page 34: Care And Maintenance
If you follow the maintenance checks in this section as scheduled, you can help ensure that your Jet 2 gives you years of trouble-free operation. If you have any doubt as to your Jet 2’s care or operation, contact your authorized Pride provider. - Page 35 MONTHLY CHECKS n Check that the anti-tip wheels are not rubbing the ground when you are operating the Jet 2. Adjust them as necessary. See VI. “Comfort Adjustments.”...
-
Page 36: Cleaning Instructions
CLEANING INSTRUCTIONS CAUTION! Never hose off your Jet 2 or place it in direct contact with water. Your Jet 2 has a clear- coated, ABS plastic body shroud that allows it to be easily wiped clean with a damp cloth. -
Page 37: Battery Replacement
Figure 25. Drive Wheel Hub Cap Removal Figure 26. Drive Wheel Nut Removal BATTERY REPLACEMENT Refer to the battery diagram that is printed on a label located on the Jet 2 frame near the battery tray. To replace the batteries: 1. Turn the power off. - Page 38 Disconnect both batteries before load testing and follow the directions that come with the load tester. If either one of the batteries fails the load test, replace both of them. If your Jet 2 still does not power up, contact your authorized Pride provider.
- Page 39 1. Remove the seat and body shroud. See VII. “Disassembly.” 2. Unscrew the motor brush caps. See figure 27. 3. Remove the brushes. 4. Inspect for wear. See figure 28. 5. Replace brushes, if necessary. Contact your authorized Pride provider for replacement brushes. Jet 2/Rev F/Feb03 www.pridemobility.com...
-
Page 40: Options And Accessories
A N D A C C E S S O R I E S The following options and accessories are available from your authorized Pride provider. OXYGEN TANK HOLDER The removable oxygen tank holder is mounted to the back of the seat by means of the accessory bracket. -
Page 41: Warranty
ONE-YEAR LIMITED WARRANTY For one (1) year from the date of purchase, Pride will repair or replace at our option to the original purchaser free of charge, any of the following parts found upon examination by an authorized representative of Pride to be... -
Page 42: Warranty Exclusions
This warranty gives you specific rights, and you may also have other rights which vary from state to state. Please fill out and return the product registration card to Pride. This will aid Pride in providing the best possible technical and customer service. - Page 43 Quality Control - Model Thank you for making the Jet 2 your choice in power chairs. We have thoroughly inspected your Jet 2. The following checkmarks indicate that it has been driven and inspected. Controller Model #______________ Controller Serial #...