Advertisement
MODEL DT300 Series
User Instructions
Instrucciones para el usuario / Directives pour l'utilisateur
WARNING – Risk of fire or electric shock
•
For indoor use only in dry locations.
•
Do not exceed capacity.
•
Do not use timer with devices that could have dangerous conse-
quences due to inaccurate timing, such as sun lamps, heaters, etc.
•
Plug directly into receptacle.
•
No user serviceable parts.
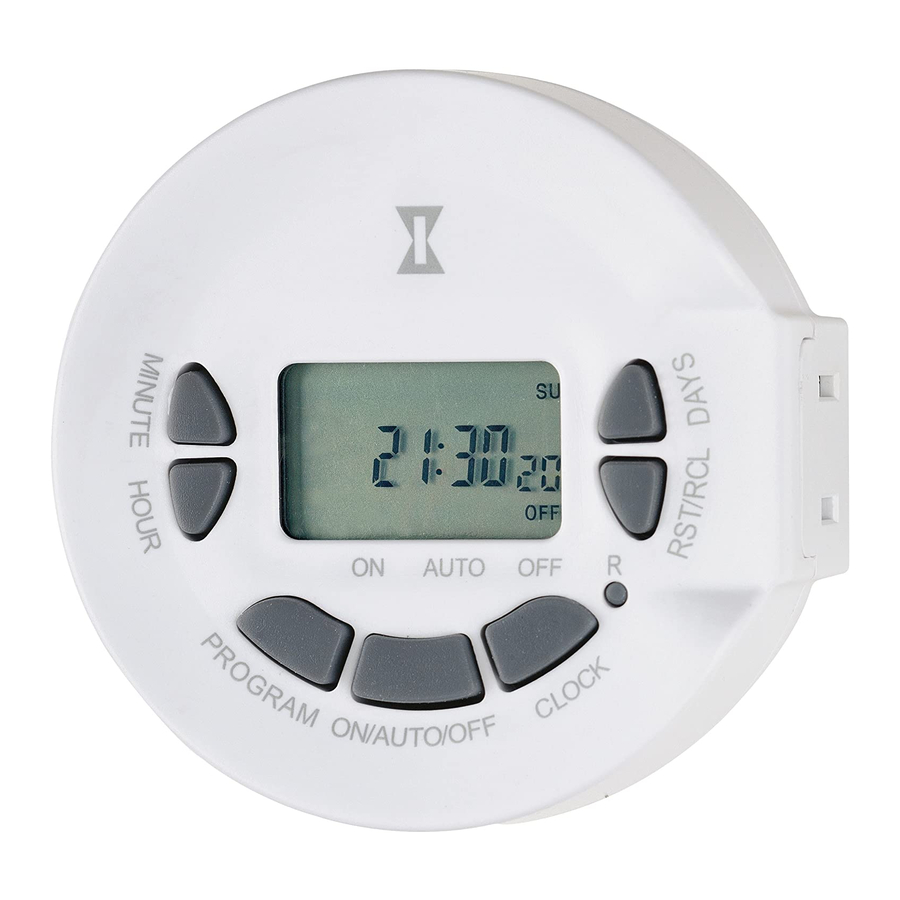
1—Charge the Battery
Plug timer into wall outlet for a few minutes to charge internal battery.
NOTE: If it would be easier, you can now unplug the timer to set it.
2—Clear the Memory
Press the RESET button with a pencil or paper clip to erase any previous settings.
3—Select AM/PM Format
1.
Press and hold the
CLOCK button for about 5 seconds until display shows 24H
or 12H, then release.
2.
Press the
HOUR button as many times as necessary to change display to
"12H".
3.
Press the
CLOCK button to restore the normal clock display. The letters "AM"
should show in upper left corner of the display.
4—Set Time of Day
1.
Press and hold the
CLOCK button.
2.
At the same time, press the
HOUR and MINUTE buttons as necessary to
advance the display to the correct time.
3.
Hold down the
DAYS button until the display shows the correct day.
5—Set ON/OFF Times
1.
Press the
PROGRAM button once to display the first ON/OFF setting—
"1 ON -- --:-- --".
MINUTE and HOUR buttons as necessary to set the ON time you
2.
Press the
want.
3.
Press the
DAYS button as necessary to choose the day or group of days you
want for the time setting.
4.
Press the
PROGRAM button again to display the second ON/OFF setting—"1
OFF -- --:-- --".
5.
Repeat the procedure to create the OFF setting.
6.
Repeat Steps 1 thru 5 for additional ON/OFF settings.
Press the
CLOCK button to exit from PROGRAM mode.
7.
ADVERTENCIA – Peligro de incendio o
descarga eléctrica
•
Sólo para uso en interiores y en lugares secos.
•
No se debe exceder la capacidad.
•
No use un temporizador para controlar dispositivos que podrían
tener consecuencias peligrosas debido a una temporización inex-
acta, como lámparas solares, calefactores, etc.
•
Conecte directamente al tomacorriente.
•
El producto no contiene piezas que se puedan reparar.
1—Cargue la batería
Enchufe el temporizador en el tomacorriente de pared durante algunos minu-
tos para cargar la batería interna.
NOTA: para hacerlo más fácil, ahora desenchufe el temporizador para
configurarlo.
2—Borre la memoria
Presione el botón RESET (Reinicio) con un lápiz u objeto puntiagudo para borrar
todas las configuraciones anteriores.
3—Seleccione el formato a.m./p.m.
1.
Mantenga presionado el botón
la pantalla muestre 24H ó 12H, luego suéltelo.
7-Day Digital Timer
NOTICE
AVISO
CLOCK (Reloj) durante 5 segundos hasta que
MINUTE
HOUR
PROGRAM
Things to know about ON/OFF times:
•
Repeatedly pressing the
PROGRAM button cycles through the possible 20 ON/
OFF pairs: 2 ON, 2 OFF, 3 ON, 3 OFF, etc.
•
The display panel automatically returns to time of day if you don't press any
buttons for 15 seconds.
•
If you are interrupted before completing a setting, simply press the
button until you reach the setting where you left off.
6—Review ON/OFF Settings
It is important to review all 20 settings, even if you only used a few, to make
sure there are no extra, unintended settings.
1.
Press the
PROGRAM button (hold down to scroll) until the display cycles
through all 20 ON/OFF pairs.
2.
Stop on any setting you want to remove or change.
To Revise a Setting
1.
Press the
PROGRAM button (hold down to scroll) until the display shows the
setting you want to revise.
2.
Press the
HOUR, MINUTE and WEEK buttons as necessary to revise the dis-
played ON or OFF time and day(s).
To Remove or Restore a Setting
1.
Press the
PROGRAM button (hold down to scroll) until the display shows the
setting you want to remove or restore.
2.
Press the
RST/RCL button.
-
If removing, the display will replace the setting with dashes.
-
If restoring, the display will show the previous setting.
To Operate the Timer
1.
After setting the timer, plug it in and connect the device to be controlled.
2.
Press the
ON/AUTO/OFF button as necessary to display:
ON—The timer remains ON and ignores your settings.
OFF—The timer remains OFF and ignores your settings.
AUTO—The timer follows your settings.
MINUTO
Panel de
visualización
HORA
PROGRAMA
ENCENDIDO/AUTOMÁTICO/APAGADO
2.
Presione el botón
HOUR (Hora) las veces que sea necesario para cambiar la
pantalla a "12H".
3.
Presione el botón
CLOCK (Reloj) para restablecer la pantalla del reloj normal. Las
letras "AM" deben aparecer en el extremo superior izquierdo de la pantalla.
4—Ajuste de la hora del día
Mantenga presionado el botón
1.
Al mismo tiempo, presione lo botones
2.
sea necesario para avanzar la pantalla hasta la hora correcta.
3.
Mantenga presionado el botón
día correcto.
DAYS
RST/RCL
Display
Panel
Reset
Button
CLOCK
ON/AUTO/OFF
DÍAS
RST/RCL
Tomacorriente
Botón de
reinicio
RELOJ
CLOCK (Reloj).
HOUR (Hora) y MINUTE (Minuto) según
DAYS (Días) hasta que la pantalla muestre el
Outlet
PROGRAM
Advertisement

Related Manuals for Intermatic DT300 Series


Summary of Contents for Intermatic DT300 Series
-
Page 1: Select Am/Pm Format
7-Day Digital Timer DAYS MODEL DT300 Series User Instructions MINUTE RST/RCL Instrucciones para el usuario / Directives pour l’utilisateur Display WARNING – Risk of fire or electric shock Outlet Panel • For indoor use only in dry locations. • Do not exceed capacity. -
Page 2: Ajuste Las Horas De Encendido Y Apagado
5—Ajuste las horas de encendido y apagado Para revisar una configuración Presione el botón PROGRAM (Programa) una vez para mostrar la primera con- Presione el botón PROGRAM (Programa) (manténgalo presionado para despla- figuración de encendido/apagado— “1 ON -- --:-- --” (1 Encendido -- --:-- --). zarse) hasta que la pantalla muestre la configuración que desea revisar.