Linksys Etherfast BEFSX41 User Manual
Instant broadband series etherfast cable/dsl firewall router with 4-port switch/vpn endpoint
Hide thumbs
Also See for Etherfast BEFSX41:
- User manual (89 pages) ,
- Product data (2 pages) ,
- Quick installation (2 pages)

Related Manuals for Linksys Etherfast BEFSX41


Summary of Contents for Linksys Etherfast BEFSX41
- Page 1 Instant Broadband ® Series EtherFast ® Cable/DSL Firewall Router with 4-Port Switch/VPN Endpoint Use this guide to install: BEFSX41 User Guide...
- Page 2 If the product proves defective during this warranty period, go to the Linksys website at www.linksys.com for complete RMA (Return Merchandise Authorization) assistance. You can also call Linksys Technical Support in order to obtain a RMA Number. BE SURE TO HAVE YOUR PROOF OF PURCHASE AND A BARCODE FROM THE PRODUCT'S PACK- AGING ON HAND WHEN CALLING.
-
Page 3: Table Of Contents
Table of Contents Chapter 1: Introduction The Linksys EtherFast Cable/DSL Firewall Router with 4-Port Switch/VPN Endpoint Features An Introduction to LANs and WANs IP Addresses Network Setup Overview Chapter 2: Your Virtual Private Network (VPN) Why Do I Need a VPN? -
Page 4: Chapter 1: Introduction
The Linksys EtherFast 4-Port Switch/VPN Endpoint The Linksys Instant Broadband EtherFast Cable/DSL Firewall Router with 4- Port Switch/VPN Endpoint is the perfect solution for connecting a small group of PCs to a high-speed broadband Internet connection or a 10/100 Ethernet backbone. -
Page 5: An Introduction To Lans And Wans
An Introduction to LANs and WANs Simply put, a router is a network device that connects two networks together. In this instance, the Router connects your Local Area Network (LAN), or the group of PCs in your home or office, to the Wide Area Network (WAN), that is, the Internet. -
Page 6: Network Setup Overview
By default, a DHCP server (LAN side) is enabled on the Router. If you already have a DHCP server running on your network, you must disable one of the two DHCP servers. If you run more than one DHCP server on your network, you will experience network errors, such as conflicting IP addresses. -
Page 7: What Is A Virtual Private Network
2) Data Sniffing Data “sniffing” is a method used by hackers to obtain network data as it trav- els through unsecured networks, such as the Internet. Tools for just this kind of activity, such as protocol analyzers and network diagnostic tools, are often built into operating systems and allow the data to be viewed in clear text. -
Page 8: Chapter 3: Getting To Know The Etherfast Cable/Dsl Firewall Router
Figure 2-2 For additional information and instructions about creating your own VPN, please visit Linksys’s website at www.linksys.com or refer to “Appendix C: Configuring IPSec between a Microsoft Windows 2000 or XP PC and the Firewall Router.” Instant Broadband... -
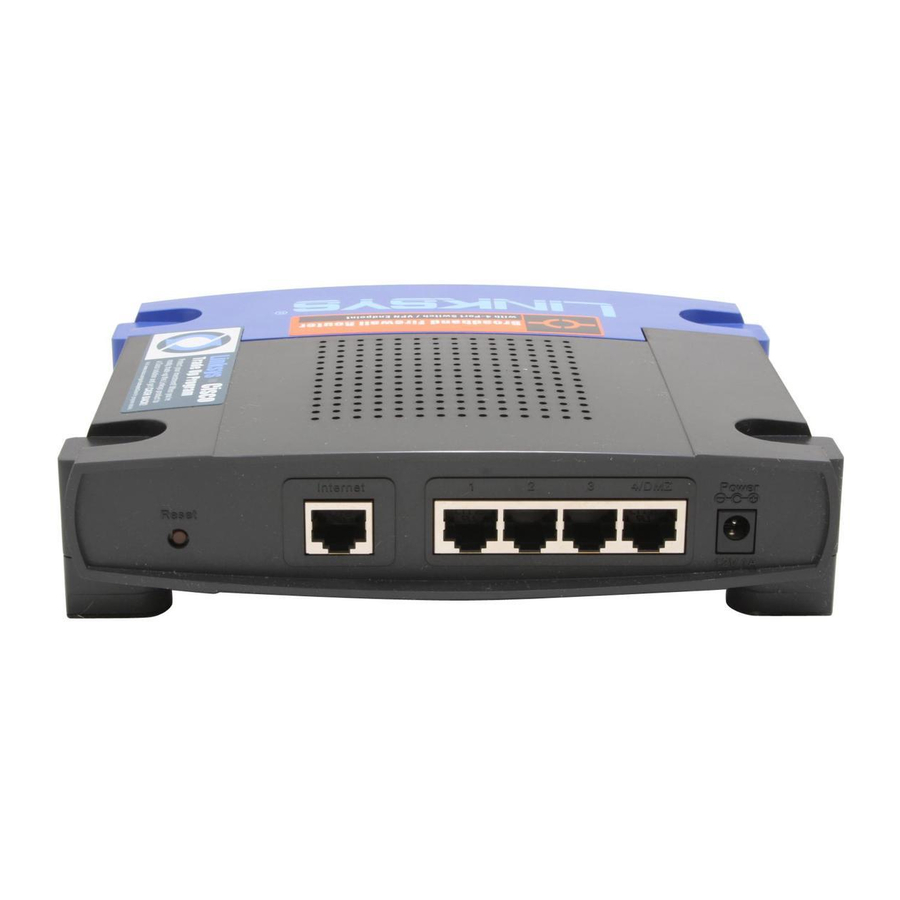
Page 9: The Router's Front Panel Leds
The Reset Button Briefly pressing the Reset Button will refresh the Cable/DSL Firewall Router’s connections, potentially clearing any jammed links. Pressing the Reset Button and holding it in for a few seconds will clear all of the Cable/DSL Firewall Router’s data. This should be done only if you are experiencing heavy routing problems, and only after you have exhausted all of the other troubleshooting options. -
Page 10: Chapter 4: Connect The Router
Chapter 4: Connect the Router Overview Unlike a hub or a switch, the Router’s setup consists of more than simply plug- ging hardware together. You will have to configure your networked PCs to accept the IP addresses that the Router assigns them (if applicable), and you will also have to configure the Router with setting(s) provided by your Internet Service Provider (ISP). -
Page 11: Chapter 5: Configure The Pcs
Chapter 5: Configure the PCs Overview The instructions in this chapter will help you configure each of your comput- ers to be able to communicate with the Router. To do this, you need to configure your PC’s network settings to obtain an IP (or TCP/IP) address automatically (called DHCP). -
Page 12: Configuring Windows 2000 Pcs
3. Click the IP Address tab and select Obtain an IP address automatically, as shown in Figure 5-2. Figure 5-2 4. Now click the Gateway tab to ensure that the Installed Gateway field is left blank. Click the OK button. 5. -
Page 13: Configuring Windows Xp Pcs
3. Select Internet Protocol (TCP/IP), shown in Figure 5-4, and click the Properties button. Figure 5-4 4. Select Obtain an IP address automatically in both places, as shown in Figure 5-5, and click the OK button. Click the OK button again to complete the PC configuration. -
Page 14: Chapter 6: Configure The Router
3. Select Internet Protocol (TCP/IP), as shown in Figure 5-7, and click the Properties button. Figure 5-7 4. Select Obtain an IP address automatically. Once the new window Select Obtain an IP address automatically in both places, as shown in Figure 5- 8, and click the OK button. - Page 15 3. The Router configuration screen will appear with the Setup tab selected. Based on the setup instructions from your ISP, you may need to provide the following information. Host Name and Domain Name: These fields allow you to provide a host name and domain name for the Router.
- Page 16 PPPoE If your DSL provider says that you are connecting through PPPoE or if you normally enter a user name and password to access the Internet, perform these steps: A. Select PPPoE as the WAN Connection Type. (Shown in Figure 6-6.) B.
-
Page 17: Chapter 7: The Cable/Dsl Firewall Router's Web-Based Utility
7. Restart your computers so that they can obtain the Router’s new settings. If you need advanced setting information, please refer to “Chapter 7: The Cable/DSL Firewall Router’s Web-based Utility” or the Linksys support website at support.linksys.com. Congratulations! You’ve suc-... -
Page 18: Setup
• Firmware Version This entry shows the version and date of the firmware you are using. Future versions of the Router’s firmware will be posted and available for download on the Linksys website at www.linksys.com. • Time Zone Set your local time zone here. - Page 19 Static IP required to use a permanent IP address, then select Static IP, as shown in Figure 7-5. Figure 7-5 Specify WAN IP Address This is the IP address that the Router has, when seen from the WAN, or the Internet. Your ISP will provide you with the IP Address you need to specify here.
- Page 20 Remote Access Service (RAS) is a service that applies to connections Singapore only (shown in Figure 7- users Singapore, check with Singtel information on RAS. User Name and Password Enter the User Name and Password supplied by Singtel. RAS Plan Select the type of plan you have. Connect on Demand and Max Idle Time You can configure the Router to cut your connection with your ISP after a specified period of time (Max Idle Time).
-
Page 21: Firewall
HeartBeat Signal (HBS) service that applies to connec- tions in Australia only. (Shown Figure 7-9.) users in Australia, check with your ISP for setup informa- tion. Figure 7-9 User Name and Password Enter the User Name and Password supplied by your ISP. - Page 22 Web Filter You can either enable or disable these four filtering methods by selecting Allow or Deny. • Proxy If local users have access to WAN proxy servers, they may be able to circumvent the Router’s content filters and access Internet sites blocked by the Router.
-
Page 23: Vpn
Figure 7-11 Instant Broadband Series EtherFast ® Virtual Private Networking (VPN) is a security measure that basically creates a secure connection between two remote locations. This connection is very specific as far as its settings are concerned; this is what creates the security. The VPN screen, shown in Figure 7-11, allows you to configure your VPN set- tings to make your network more secure. - Page 24 Local Secure Group and Remote Secure Group The Local Secure Group is the computer(s) on your LAN that can access the tunnel. The Remote Secure Group is the computer (s) on the remote end of the tunnel that can access the tunnel. Under Local Secure Group and Remote Secure Group, you may choose one of three options: Subnet, IP Address, and IP Range.
- Page 25 Under Remote Secure Group, you have two additional options: Host and Any. • Host - If you select Host for the Remote Secure Group, then the Remote Secure Group will be the same as the Remote Security Gateway setting: IP Address, FQDN (Fully Qualified Domain Name), or Any. (Remote Security Gateway settings are explained on the following page.) In the example shown in Figure 7-15, the Remote Secure Group is the same as the Remote Security Gateway, set to a specific IP Address.
- Page 26 • Any - If you select Any for the Remote Security Gateway, as shown in Figure 7-19, the VPN device at the other end of the tunnel will accept a request from any IP address. The remote VPN device can be another Firewall Router, a VPN Server, or a computer with VPN client software that supports IPSec.
- Page 27 The Inbound SPI and Outbound SPI fields are different, however. The Inbound SPI value set here must match the Outbound SPI value at the other end of the tunnel. The Outbound SPI here must match the Inbound SPI value at the other end of the tunnel.
- Page 28 To get more details concerning your tunnel connection, click the View Logs button. The screen in Figure 7-24 will appear: Figure 7-24 Select the log you wish to view: All (to view all logs), System Log, Access Log, Firewall Log, or VPN Log. The System Log screen displays a list of cold and warm starts, web login successes and failures, and packet filtering policies.
-
Page 29: Password
Phase 2 Group There are two Diffie-Hellman Groups to choose from: 768-bit and 1024-bit. Diffie-Hellman refers to a cryptographic technique that uses public and private keys for encryption and decryption. Key Lifetime In the Key Lifetime field, you may optionally select to have the key expire at the end of a time period of your choosing. -
Page 30: Status
Do not restore the factory defaults unless you are having difficulties with the Router and have exhausted all other troubleshooting measures. Once the Router is reset, you will have to re-enter all of your configuration data. UPnP Function Universal Plug and Play (UPnP) allows Windows XP to auto- matically configure the Router for various Internet applications, such as gam- ing and videoconferencing. -
Page 31: Dhcp
Firmware Version This field shows the installed version and date of the firmware. Version dates are slightly more accurate than version numbers. Current Time Based upon the time zone selection made on the Setup tab, this field will display the current time. Login This indicates if you are using a dial-up style connection like PPPoE, RAS, PPTP, or HBS. -
Page 32: Log
Internet sites that users on your network have accessed. For a permanent record of these logs, Logviewer software must be used. This software is downloadable from the Linksys website, www.linksys.com. The Logviewer saves all incoming and outgoing activity as a permanent file on your PC’s hard drive. -
Page 33: Help
Clicking on any of the topics in the bar on the left will give you help informa- tion about that topic. Clicking the Linksys Website link will take you to Linksys’s website, www.linksys.com, provided you are connected to the Internet. -
Page 34: Advanced
2. Click Upgrade Firmware to display the window shown in Figure 7-32. 3. Click the Browse but- find firmware upgrade file that you downloaded from Linksys website then extracted. 4. Double-click the firmware file you downloaded and extracted. Click the Upgrade button, and follow the instructions there. - Page 35 To see a summary of all Policies, click the Summary button. Figure 7-34 The Policies are listed on this screen with their names and settings (see Figure 7-34). To update the Internet Policy Summary screen with the most recent infor- mation, click the refresh button.
-
Page 36: Forwarding
b. To create a new service, enter the name of the service in the Service Name field. To edit a service’s settings, select the service from the box on the right of the screen. c. From the Protocol drop-down menu, select the protocol type for this serv- ice, such as TCP, UDP, or ICMP. - Page 37 If you need to forward all ports to one PC, see the “DMZ Host” section. To add a server using Forwarding: 1. Enter the name of the application in the appropriate Customized Applications field. 2. Next to the name of the application, enter the number or range of the exter- nal port(s) used by the server or Internet application in the Ext.
- Page 38 • HTTP (HyperText Transport Protocol) The communications protocol used to connect to servers on the World Wide Web. Its primary function is to establish a connection with a web server and transmit HTML pages to the client web browser. • POP3 (Post Office Protocol 3) A standard mail server commonly used on the Internet.
-
Page 39: Dynamic Routing
Dynamic Routing Figure 7-40 From the Dynamic Routing screen, shown on Figure 7-40, you can enable the Router to automatically adjust to physical changes in the network’s layout. The Router, using the RIP protocol, determines the network packets’ route based on the fewest number of hops between the source and the destination. -
Page 40: Dmz Host
2. Enter the following data to create a new static route. Destination LAN IP: The Destination LAN IP is the address of the remote network or host to which you want to assign a static route. Enter the IP address of the host for which you wish to create a static route here. If you are building a route to an entire network, be sure that the network portion of the IP address is set to 0. -
Page 41: Mac Address Clone
Specify an IP Address behind the DMZ Port: If you have multiple PCs connected to Port 4/DMZ via a hub or switch, you can specify which PC is the DMZ host. To expose a computer with a specific IP address, enter that computer’s IP address in this field. -
Page 42: Ddns
DDNS Figure 7-44 The Router offers a Dynamic Domain Name System (DDNS) feature. DDNS lets you assign a fixed host and domain name to a dynamic Internet IP address. It is useful when you are hosting your own website, FTP server, or other serv- er behind the Router. -
Page 43: Appendix A: Troubleshooting
Router. If your situation is described here, the problem should be solved by applying the corresponding solution. If you can’t find an answer here, check the Linksys website at www.linksys.com. 1. I need to set a static IP address on a PC. - Page 44 For Windows 2000: A. Click Start, Settings, and Control Panel. Double-click Network and Dial-Up Connections. B. Right-click the Local Area Connection that is associated with the Ethernet adapter you are using, and select the Properties option. C. In the Components checked are used by this connection box, highlight Internet Protocol (TCP/IP), and click the Properties button.
- Page 45 that Obtain an IP address automatically and Obtain DNS server address automatically are selected. • Click the OK button in the Internet Protocol (TCP/IP) Properties win- dow, and click the OK button in the Local Area Connection Properties window. • Restart the computer if asked. For Windows XP: The following instructions assume you are running Windows XP with the default interface.
- Page 46 IPSec server. Refer to “Problem #7, I need to set up online game hosting or use other Internet applications” for details. Check the Linksys website for more information at www.linksys.com. 6. I need to set up a server behind my Router.
- Page 47 7. I need to set up online game hosting or use other Internet applications. If you want to play online games or use Internet applications, most will work without doing any port forwarding or DMZ hosting. There may be cases when you want to host an online game or Internet application.
- Page 48 In order to upgrade the firmware with the latest features, you need to go to the Linksys website and download the latest firmware at www.linksys.com. Follow these steps: A. Go to the Linksys website at http://www.linksys.com and download the latest firmware. B. To upgrade the firmware, follow the steps in the Help section found in “Chapter 7: The Cable/DSL Firewall Router’s Web-based Utility.”...
- Page 49 15. I can't access my email, web, or VPN, or I am getting corrupted data from the Internet. The Maximum Transmission Unit (MTU) setting may need to be adjusted. By default, the MTU is set at 1500. For most DSL users, it is strongly recom- mended to use MTU 1492.
-
Page 50: Frequently Asked Questions
ISP. Does the Router support any operating system other than Windows 95, Windows 98, Windows 2000, Windows NT, or Windows XP? Yes, but Linksys does not, at this time, provide technical support for setup, configuration or troubleshoot- ing of any non-Windows operating systems. - Page 51 How will I be notified of new Router firmware upgrades? All Linksys firmware upgrades are posted on the Linksys website at www.linksys.com, where they can be downloaded for free. The Router’s firmware can be upgraded with TFTP programs. If the Router’s Internet connection is working well, there is no need to download a newer firmware version, unless that version contains new features that you would like to use.
-
Page 52: Appendix B: Maximizing Vpn Security
Appendix B: Maximizing VPN Security Just as you maximized your network security with a firewall, you should also maximize security for your data with the Firewall Router. IPSec is compatible with most VPN endpoints and ensures privacy and authen- tication for data, while authenticating user identification. With IPSec, authen- tication is based upon the PC's IP Address. -
Page 53: Appendix C: Configuring Ipsec Between A Windows 2000 Or Xp Pc And The Firewall Router
Appendix C: Configuring IPSec between a Windows 2000 or XP PC and the Firewall Router Introduction This document demonstrates how to establish a secure IPSec tunnel using pre- shared keys to join a private network inside the Firewall Router and a Microsoft Windows 2000 or XP PC. -
Page 54: Step Two: Build Filter Lists
Step Two: Build Filter Lists Filter List 1: win->router Note: The references in this section to “win” are references to Windows 2000 and XP. 1. In the new policy’s prop- erties screen, verify that the Rules tab is selected, as shown in Figure C-2. Deselect the Use Add Wizard check box, and click the Add button to... - Page 55 5. If you want to enter a description for your filter, click the Description tab and enter the description there. 6. Click the OK button. Then, click the OK (for Windows XP) or Close (for Windows 2000) button on the IP Filter List window. Filter List 2: router=>win 7.
-
Page 56: Step Three: Configure Individual Tunnel Rules
10. If you want to enter a description for your filter, click the Description tab and enter the description there. 11. Click the OK button and the New Rule Properties screen should appear with the IP Filer List tab selected, as shown in Figure C-9. There should now be a listing for “router ->... - Page 57 3. From Security Methods tab, shown in Figure C-12, verify that the Negotiate security option is enabled, and deselect Accept unsecured communica- tion, always respond using IPSec check box. Select Session Perfect Forward Secrecy, and click the OK button. 4. Select the Authentication Methods tab, shown in Figure C-13, and click the Edit button.
- Page 58 7. Select Tunnel Setting tab, shown in Figure C-16, and click The tunnel endpoint is specified by this IP Address radio button. Then, enter the Router’s WAN IP Address. 8. Select the Connection Type tab, as shown in Figure C-17, and click All network connec- tions.
- Page 59 11. Click the Filter Action tab, and select the filter action Require Security, as shown in Figure C-20. Then, click the Edit but- ton. 12. Click the Authentication Methods tab, and verify that the authentication method Kerberos selected, as shown in Figure C-21.
-
Page 60: Step Four: Assign New Ipsec Policy
15. From Tunnel Setting tab, shown in Figure C-24, click the radio button for The tunnel endpoint is specified by this IP Address, and enter Windows 2000/XP computer’s IP Address. 16. Click the Connection Type tab, shown in Figure C-25, select All network connections. -
Page 61: Step Five: Create A Tunnel Through The Web-Based Utility
Step Five: Create a Tunnel Through the Web-based Utility Note: Further details on this step can be found in the VPN Tab section in “Chapter 7: The Cable/DSL Firewall Router’s Web-based Utility”. 1. Open your web browser, and enter 192.168.1.1 in the Address field. Press the Enter key. -
Page 62: Appendix D: Snmp Functions
Internet. For example, www.linksys.com is actually 216.23.162.142. Type it into your web browser and you will wind up at the Linksys home page every time. There are servers that translate the URL to an IP address; this is called Domain Name System (DNS). - Page 63 Step One: Pinging an IP Address The first step to determining your ISP’s web and e-mail server address is to ping its IP address. 1. Power on the computer and the cable or DSL modem, and restore the network configuration set by your ISP if you have since changed it. 2.
-
Page 64: Appendix F: Installing The Tcp/Ip Protocol
Appendix F: Installing the TCP/IP Protocol Follow these instructions to install the TCP/IP protocol on one of your PCs only after a network card has been successfully installed inside the PC. These instructions are for Windows 95, Windows 98, and Windows Me. For TCP/IP setup under Windows NT, 2000, and XP, see your Windows documentation or the Help feature. -
Page 65: Appendix G: Finding The Mac Address And Ip Address For Your Ethernet Adapter
Appendix G: Finding the MAC Address and IP Address for Your Ethernet Adapter This section describes how to find the MAC address for your Ethernet adapter to do MAC Address Cloning for the Router and ISP. You can also find the IP address of your computer’s Ethernet adapter. - Page 66 2. In the command prompt, enter ipconfig /all. Then press the Enter key. Figure G-5 3. Write down the Physical Address as shown on your computer screen; it is the MAC address for your Ethernet adapter. This will appear as a series of letters and numbers.
-
Page 67: Appendix H: Glossary
Appendix H: Glossary 3DES - 3DES is a variation on DES that uses a 168-bit key. Adapter - Printed circuit board that plugs into a PC to add to capabilities or connectivity to a PC. AppleTalk - An Apple Computer networking system that supports Apple's pro- prietary local talk. - Page 68 Linksys DES encryption uses a 56-bit key. DHCP (Dynamic Host Configuration Protocol) - A protocol that lets network administrators manage centrally and automate the assignment of Internet Protocol (IP) addresses in an organization's network.
- Page 69 Firmware - Code that is written onto read-only memory (ROM) or program- mable read-only memory (PROM). Once firmware has been written onto the ROM or PROM, it is retained even when the device is turned off. FTP (File Transfer Protocol) - A protocol used to transfer files over a TCP/IP network (Internet, UNIX, etc.).
- Page 70 e-mail address you're sending a note to. At the other end, the recipient can see the IP address of the Web page requestor or the e-mail sender and can respond by sending another message using the IP address it received. IPSec (Internet Protocol Security) - A suite of protocols used to implement secure exchange of packets at the IP layer.
- Page 71 Packet - A unit of data routed between an origin and a destination in a network. Packet Filtering - Discarding unwanted network traffic based on its originat- ing address or range of addresses or its type (e-mail, file transfer, etc.). Ping (Packet INternet Groper) - An Internet utility used to determine whether a particular IP address is online.
- Page 72 et than just its source and destination information. It is called "stateful" because verifies that the stated destination computer has previously requested the cur- rent communication. In this way, it verifies that all communications are initiat- ed by the recipient computer and are taking place only with sources that are known and trusted from previous interactions.
-
Page 73: Appendix I: Specifications
phone (DSL) or cable systems, or through leased lines or satellites. In its most basic definition, the Internet could be considered a WAN. WINIPCFG - Configuration utility based on the Win32 API for querying, defining and managing IP addresses within a network. A commonly used util- ity for configuring networks with static IP addresses. -
Page 74: Appendix J: Warranty Information
EtherFast ® Appendix K: Contact Information For help with the installation or operation of the EtherFast Cable/DSL Firewall Router, contact Linksys Technical Support at one of the phone numbers or Internet addresses below. Sales Information Technical Support RMA (Return Merchandise... - Page 75 © Copyright 2003 Linksys, All Rights Reserved.