
Related Manuals for Miele KMR 1124 G


Summary of Contents for Miele KMR 1124 G
- Page 1 Operating and Installation Instructions 30", 36", 48" Rangetop To prevent accidents and damage to the range, you must read all in‐ structions supplied before installing or using the appliance. en-US M.-Nr. 10 004 330...
-
Page 2: Important Safety Instructions
IMPORTANT SAFETY INSTRUCTIONS WARNING: If the information in this manual is not followed exactly, a fire or explosion may result causing property damage, personal injury, or death. – Do not use or store gasoline or other combustible liquids or vapors in the vicini‐ ty of this or any other appliance. -
Page 3: Table Of Contents
Contents IMPORTANT SAFETY INSTRUCTIONS..............2 IMPORTANT SAFETY INSTRUCTIONS..............5 Guide to the Rangetop ..................15 KMR 1124 G/LP ..................... 15 KMR 1134 G/LP ..................... 16 KMR 1135 G/LP ..................... 17 KMR 1136 G/LP ..................... 18 KMR 1354 G/LP ..................... 19 KMR 1355 G/LP ..................... - Page 4 KMR 1134 G/LP ..................... 49 KMR 1135 G/LP ..................... 50 KMR 1136 G/LP ..................... 50 KMR 1354 G/LP ..................... 51 KMR 1355 G/LP ..................... 51 KMR 1356 G/LP ..................... 52 Miele service, data plate, warranty ..............53 Caring for the environment ................. 54...
-
Page 5: Important Safety Instructions
They contain important notes on installation, safety, use and maintenance. Miele cannot be held responsible for damage caused by the non- observance of these instructions. Keep these instructions in a safe place and pass them on to any... - Page 6 IMPORTANT SAFETY INSTRUCTIONS This rangetop is intended for residential use and use in other simi‐ lar environments. This appliance is not intended for outdoor use. The rangetop is intended for residential use only to prepare food and keep it warm. Any other use occurs at the owner's own risk and may be dangerous.
- Page 7 IMPORTANT SAFETY INSTRUCTIONS Children Do not leave children unattended: Children should not be alone or unsupervised in the area where the rangetop is installed. Do not al‐ low them to sit or stand on the appliance. All children must be kept away from the rangetop. ...
- Page 8 Technical safety Installation, repair and maintenance work should be performed by a Miele authorized service technician in accordance with national and local safety regulations and the provided installation instruc‐ tions. Contact Miele’s Technical Service Department for examina‐ tion, repair or adjustment. Repairs and other work by unauthorized persons could be dangerous and may void the warranty.
- Page 9 Do not open the appliance housing under any circumstances. Any repairs not performed by a Miele authorized service techni‐ cian will void the warranty. Defective components should be replaced by Miele original parts only.
- Page 10 IMPORTANT SAFETY INSTRUCTIONS Reaching over a hot stovetop to access the cabinets can result in burns. You can reduce the risk of burns by installing a range hood that extends at least 4³/₄" (12 cm) past the bottom of the cabinets.
- Page 11 IMPORTANT SAFETY INSTRUCTIONS Proper use Do not leave the rangetop unattended when cooking on high power. Spilled food will begin to smoke and cause grease splatter, which can ignite on the range. Oil and fat can catch fire if overheated. Never leave the appliance unattended when cooking with oil and fat.
- Page 12 IMPORTANT SAFETY INSTRUCTIONS The rangetop gets hot when in use and remains hot for some time after being turned off. Do not touch the appliance if there is a possi‐ bility that it could still be hot. You can burn yourself on a hot rangetop. When cooking on the appliance, protect your hands by using heat-resistant pot holders or oven mitts.
- Page 13 IMPORTANT SAFETY INSTRUCTIONS Remove all grease splatters and other flammable (food) residues on the rangetop. They are a fire hazard. Install the burner grates in an upright position to avoid scratching the cooktop. Do not use roasting dishes, pans, or grilling stones that are large enough to cover several burners.
- Page 14 IMPORTANT SAFETY INSTRUCTIONS The grates, burner cap, bottom parts of the burner, and any other parts located near the burner flame, can still be very hot after cook‐ ing and cause burns. Do not touch these components when using the rangetop.
-
Page 15: Guide To The Rangetop
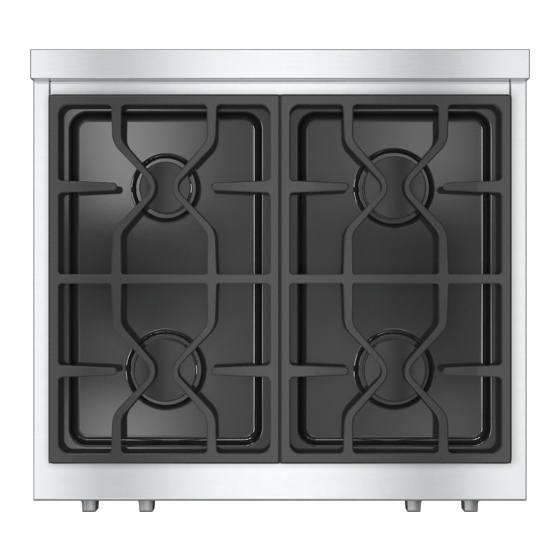
Guide to the Rangetop KMR 1124 G/LP a Backlit burner control knob for rear left burner b Backlit burner control knob for front left burner c Backlit burner control knob for front right burner d Backlit burner control knob for rear right burner... -
Page 16: Kmr 1134 G/Lp
Guide to the Rangetop KMR 1134 G/LP a Backlit burner control knob for rear left burner b Backlit burner control knob for front left burner c Backlit burner control knob for front center burner d Backlit burner control knob for rear center burner e Backlit burner control knob for front right burner f Backlit burner control knob for rear right burner g Power burners... -
Page 17: Kmr 1135 G/Lp
Guide to the Rangetop KMR 1135 G/LP a Backlit burner control knob for rear left burner b Backlit burner control knob for front left burner c Backlit grill control knob d Backlit burner control knob for front right burner e Backlit burner control knob for rear right burner f Power burners g Ceramic burner h ComfortClean Dishwasher-safe grilling grate... -
Page 18: Kmr 1136 G/Lp
Guide to the Rangetop KMR 1136 G/LP a Backlit burner control knob for rear left burner b Backlit burner control knob for front left burner c Backlit griddle control knob d Backlit burner control knob for front right burner e Backlit burner control knob for rear right burner f Power burners g Griddle plate h Thermostatically controlled ceramic infrared burner... -
Page 19: Kmr 1354 G/Lp
Guide to the Rangetop KMR 1354 G/LP a Backlit burner control knob for rear left burner b Backlit burner control knob for front left burner c Backlit burner control knob for rear left center burner d Backlit burner control knob for front left center burner e Backlit burner control knob for front right center burner f Backlit burner control knob for rear right center burner g Backlit burner control knob for front right burner... -
Page 20: Kmr 1355 G/Lp
Guide to the Rangetop KMR 1355 G/LP a Backlit burner control knob for rear left burner b Backlit burner control knob for front left burner c Backlit grill control knob d Backlit burner control knob for front center burner e Backlit burner control knob for rear center burner f Backlit burner control knob for front right burner g Backlit burner control knob for rear right burner h Power burners... -
Page 21: Kmr 1356 G/Lp
Guide to the Rangetop KMR 1356 G/LP a Backlit burner control knob for rear left burner b Backlit burner control knob for front left burner c Backlit griddle control knob d Backlit burner control knob for front center burner e Backlit burner control knob for rear center burner f Backlit burner control knob for front right burner g Backlit burner control knob for rear right burner h Power burners... -
Page 22: Operation Tips
Operation tips Fire hazard! Do not leave the appliance unattend‐ ed while cooking! To not turn the control knobs to the right beyond "Off." It can occur that a brief re-ignition oc‐ curs during activation (clicking 1–2 x), e.g., in case of a draft. Activating a control knob automatical‐... -
Page 23: Before Using For The First Time
Before using for the first time Cleaning the rangetop for the Seasoning the griddle plate first time You must season the griddle plate be‐ Remove any protective foil and stick‐ fore cooking food on it the first time. ers. This process prevents food from stick‐... -
Page 24: Operation Of The Burners
Operation of the burners Turning on Turning on during a power outage To ignite a burner, push the appropri‐ In case of a power failure, the flame ate control knob and turn it counter‐ can be ignited manually. clockwise to the "High" position. The ... -
Page 25: Adjusting The Flame
Adjust the flame so that it never ex‐ tends up the sides of the cookware. Visual characteristics gas flames Yellow flames Contact the Miele Service Depart‐ ment. Yellow tips on outer cones Normal for pro‐... -
Page 26: Cookware
Cookware – Select cookware that fits the size of – Do not use pots or pans that have the burner: bottoms with pronounced edges. Large diameter = large burner Small diameter = small burner – Using cookware that is too large can cause the flames to spread out and damage the surrounding countertop or other appliances. -
Page 27: Energy Saving Tips
Energy saving tips – Whenever possible, keep pots and pans covered while cooking. Doing so will prevent unnecessary heat loss. – Wide, shallow cookware heats up faster and is therefore preferable to tall, narrow cookware. – Cook with as little water as possible. –... -
Page 28: Operation Of The Grill
Operation of the grill The grill has a ceramic burner that Using a soft sponge, clean drip tray transfers intense heat to food, searing and grease tray with a solution the outside to seal the juices. Full flexi‐ of warm water and a small amount of bility, depending on the food, from liquid dish soap. -
Page 29: Turning On The Grill
Operation of the grill Turning on during a power outage Do not use cooking utensils on the grill. Danger of injury due to the man‐ ual ignition of the flat burner during a Turning on the grill power failure! Never operate the grill during a pow‐... -
Page 30: Tips For Grilling
Operation of the grill Tips for grilling Fire hazard! Do not leave the appliance unattend‐ ed while cooking! – Pat down wet food items with paper towel to prevent splatters during grill‐ ing. – Do not salt meat until after grilling, or it will be too dry. -
Page 31: Operation Of The Griddle
Operation of the griddle The griddle is thermostatically control‐ Turning on during a power outage led to maintain a consistent tempera‐ The griddle plate cannot be operated ture. To prevent food from sticking, it is in case of a power failure. necessary to "season"... -
Page 32: Settings
Operation of the griddle Settings Tips for frying Before each use, wipe the griddle Settings Food with a damp cloth to remove dust or Simmering Sauce other residue. Holding food tem‐ – Pre-heat the griddle plate thoroughly perature for 8–10 minutes at the power level Medium Eggs that you are going to be using for... -
Page 33: Cleaning And Care
Cleaning and care Always clean the rangetop after each Danger of burns! use. Allow it to cool down before clean‐ The burners must be turned off and ing. the rangetop must be cooled. To better maintain your appliance avoid the following: ... -
Page 34: Rangetop
Cleaning and care Rangetop Burner control knobs with stainless steel finish The surfaces of the burner compo‐ The burner control knobs may be‐ nents and grates will slightly lose their come discolored if they are not luster over time. This is completely cleaned regularly. -
Page 35: Cleaning The Dishwasher-Safe Grilling Grate
Remove any soiling and water with a sponge. You can clean stubborn soiling off the griddle plate with the rough side of a dish sponge and a few drops of Miele ceramic and stainless steel cleaner (see "Optional accessories"). Remove the grease catch pan and... -
Page 36: Frequently Asked Questions
Frequently asked questions The following faults can be corrected without contacting the Miele Service Depart‐ ment. If in doubt, please contact Miele. Danger of injury! Unauthorized installation work and repairs could cause personal injury or machine damage, for which Miele is not responsible. - Page 37 Frequently asked questions Problem Possible cause and solution The ignitor does not The fuse in the building's wiring system was tripped. function properly. If necessary, contact a qualified electrician or Cus‐ tomer Service for assistance. There is food debris stuck between the ignitor and the burner cap.
-
Page 38: Notes On Installation
Notes on installation Distance to the range hood The minimum clearance between the appliance and a range hood above will be listed by the hood manufacturer. If there is more than one appliance in‐ stalled below the range hood, each with a different safety clearance, the largest clearance must be used. -
Page 39: Weights
The net weight of the rangetop with accessories is as follows: Model Width Net weight incl. acces‐ sories: KMR 1124 G/LP 29 ¹⁵/₁₆" approx. 100 lbs / 45 kg KMR 1134 G/LP approx.120 lbs / 55 kg KMR 1135 G/LP 35 ¹⁵/₁₆"... -
Page 40: Dimensional Drawings
Dimensional drawings In case of the presence of combustible material an additional minimum clear‐ ance of 6“ (each side) is necessary. Ensure local codes are observed. Position Dimension Description 13" (330 mm) Maximum depth of top cabinet 18"... - Page 41 30" (762 mm) Minimum distance between the top of the cooking area and the bottom of the Miele Range Hood (DAR model with DRxB XL Blower). For all other Hoods, please consult with manufacturer's instructions for required distances.
- Page 42 36" (914 mm) Minimum distance between the top of the cooking area and the bottom of the Miele Range Hood (DAR model with DRxB XL Blower). 30" (762 mm) Minimum distance between the top of the cooking area and the bottom of the Miele Range Hood (DAR model with DRxB XXL Blower).
- Page 43 30" (762 mm) Minimum distance between the top of the cooking area and the bottom of the Miele Range Hood (DAR model with DRxB XL or DRxB XXL Blower). For all other Hoods, please consult with manufacturer's instructions for required distances.
- Page 44 36" (914 mm) Minimum distance between the top of the cooking area and the bottom of the Miele Range Hood (DAR model with DRxB XXL Blower). For all other Hoods, please consult with manufacturer's instructions for required distances. 12" (305 mm) minimum distance is necessary from back of range to combustible rear wall...
- Page 45 Dimensional drawings a Side view d Electrical connection b Front views e Gas connection c Rear view...
-
Page 46: Electrical Connection
ANSI National Electrical cause considerable danger to users. Code / NFPA 70 in the United States Miele cannot be held liable for any or the Canadian Electrical Code, Part damage arising as a result of such I in Canada (CSA standard C22.1). -
Page 47: Gas Connection
Gas connection The gas hose and power cord could Connection to the gas supply be damaged by hot spots on the and any switchover to a different gas rangetop. type may only be performed by a du‐ Make sure that the gas hose and ly authorized gas company techni‐... - Page 48 .2 Installation Codes for gas your household, contact your Miele burning appliances for Canada. dealer. Miele gas rangetops will function up to The gas pressure may not under‐ an altitude of 10,000' (3000 m). If the in‐ shoot or exceed certain values.
-
Page 49: Burner Ratings
Burner ratings KMR 1124 G/LP Gas type Btu/hr Simmer burner Natural gas 12,500 3.70 Propane gas 12,500 3.70 Power burners Natural gas 19,500 5.70 Propane gas 19,500 5.70 Total output Natural gas 71,000 20.80 Propane gas 71,000 20.80 KMR 1134 G/LP... -
Page 50: Kmr 1135 G/Lp
Burner ratings KMR 1135 G/LP Gas type Btu/hr Simmer burner Natural gas 12,500 3.70 Propane gas 12,500 3.70 Power burners Natural gas 19,500 5.70 Propane gas 19,500 5.70 Grill Natural gas 19,000 5.50 Propane gas 15,500 4.50 Total output Natural gas 90,000 26.30 Propane gas... -
Page 51: Kmr 1354 G/Lp
Burner ratings KMR 1354 G/LP Gas type Btu/hr Simmer burners Natural gas 12,500 3.70 Propane gas 12,500 3.70 Power burners Natural gas 19,500 5.70 Propane gas 19,500 5.70 Total output Natural gas 142,000 41.60 Propane gas 142,000 41.60 KMR 1355 G/LP Gas type Btu/hr Simmer burners... -
Page 52: Kmr 1356 G/Lp
Burner ratings KMR 1356 G/LP Gas type Btu/hr Simmer burners Natural gas 12,500 3.70 Propane gas 12,500 3.70 Power burners Natural gas 19,500 5.70 Propane gas 19,500 5.70 Griddle Natural gas 13,000 3.80 Propane gas 14,300 4.20 Total output Natural gas 116,000 34.00 Propane gas... -
Page 53: Miele Service, Data Plate, Warranty
In the event of a fault which you cannot easily correct yourself, please contact: – your Miele dealer, or – the Miele Technical Service Department. See back cover for contact details. Please quote the model and serial number of your appliance when contacting Miele. -
Page 54: Caring For The Environment
Caring for the environment Disposal of the packing mate‐ Disposal of your old appliance rial Old electrical and electronic appliances often still contain valuable materials. The cardboard box and packing materi‐ However, they also contain harmful als protect the appliance during ship‐ substances that were essential for the ping. - Page 55 Technical Service. U.S.A. Canada Miele, Inc. Importer Miele Limited National Headquarters 9 Independence Way Headquarters and Miele Centre Princeton, NJ 08540 161 Four Valley Drive Phone: 800-843-7231 Vaughan, ON L4K 4V8 609-419-9898 www.miele.ca 609-419-4298...
- Page 56 KMR 1124 / KM 1134 / KMR 1135 / KMR 1136 / KM 1354 / KMR 1355 / KMR 1356 en-US M.-Nr. 10 004 330 / 02...