Advertisement
Quick Links
Quick Guide
1. Safety Information
This device complies with Part 15 of the FCC Rules. Operation
is subject to the following two conditions: (1) This device may
not cause harmful interference, and (2) This device must
accept any interference received, including interferences that
may cause undesired operation.
2in1 Alert/Alarm System
Warning:
Protect your Home the Smart Way!
Changes or modifications to this unit not expressly approved by
the party responsible for compliance could void the user's
Model: M9
authority to operate the equipment.
CE Declaration of Conformity
This equipment complies with the requirements relating to
electromagnetic compatibility, EN 301489-1, EN301489-3,
EN300220-1, EN300220-2 and EN60950-1. This equipment
conforms to the essential requirement of the 1999/5/EC
R&TTE Directive.
www.skylinkhome.com
6. Testing Motion Sensor
7. Main Console Overview
NOTE: The Motion Sensors are factory preset in Zone 2.
LED
1. Slide the switch at the back of
2. Move in front of the motion
the Main Console to alert mode.
sensor to trigger the sensor.
The red LED on the sensor will
flash multiple times.
LED
3. The Main Console will continue
4. The Main Console will stop
beeping and the Zone 2 LED
beeping and flashing the LED
will flash if a motion is detected.
after 15 seconds.
* As an energy saving feature, the motion sensor will not be triggered again unless
there is no motion detected for 15 seconds. In this case, the red LED will only flash
once indicating the motion is detected, but no signal is sent to the Internet Hub.
2. Package Content
NOTE: 9 x AAA and 2 x AA-Batteries are required to setup the
Alert/Alarm System. (AA/AAA Batteries are not included.)
Main Console
4 x Door/
Window Sensor
2 x Motion Sensor
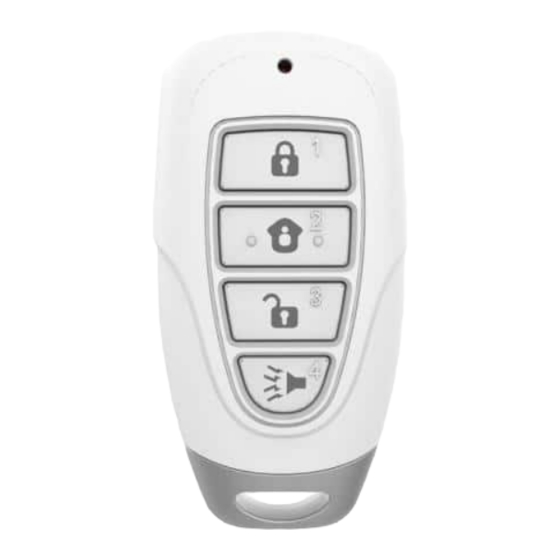
8. Keychain Remote Overview
Power LED
Steady green is normal and flashing green indicates
low backup battery status.
LED
LED Armed Indication
Shows if the Alarm System
is armed or disarmed.
Antenna
LED Zone Indication
Shows the status of the sensors in
that zone or the status when
programming.
(FRONT)
(BACK)
AC Adapter
Input Jack
Alert Notification Switch
Select the type of audio alert signal.
OFF | CHIME | ALERT
Mute Button
To disable the beep sound temporary .
Learn Button
To program and erase sensors.
3. Setup the Main Console
1. Plug in the power adapter to the Main Console and rotate the
antenna to the upright position for the best signal reception.
2. Insert 4 x AAA-Batteries in the Main Console for backup power
in case of power outage. (Optional)
Security Keypad
Security Keychain
Remote
Power Adapter
Mounting Accessories
9. Security Keypad Overview
NOTE: The backlight will turn on when pressing the buttons. The factory
default Pin is 0,0,0,0.
Arm Away / Exit Away
Select "Arm Away" to protect your
home when you're away. This mode
gives you 45 seconds exit delay to
leave the house. It will also give you
30 seconds entry delay to disarm the
system when you are back.
Arm Home
Select "Arm Home" to protect while
you're at home. This mode
deactivates motion sensors but
leaves other sensors activated
with instant alarm.
Disarm
Tap the Button to disarm
the alarm system.
Panic Button
Press and hold the Panic Button
Panic Button
for 3 sec. to activate the alarm.
Press the Panic Button to activate the alarm.
4. Insert Batteries in the Sensors
1. Push the both sides in and open the cover of the Door/Window Sensor
to insert an AAA Battery.
2. Use a coin to open the Motion Sensor and insert an AA Battery.
3. Undo the screw on the bottom side of the Security Keypad to remove the
back plate and insert an AAA Battery.
10. Change passcode and install the Keypad
NOTE: The factory default passcode is 0,0,0,0. The passcode can be 2-8 digits
long and with a combination of buttons from 0-6.
1. Input current PIN [factory default 0 0 0 0] and press
Disarm
Enter PIN number and tap the
2. Input the new PIN number followed by
button.
Button to disarm the alarm
system.
3. Input the new PIN again and press
button.
Arm Home
If the Keypad emits 2 beep, your pin has been successfully changed.
Enter PIN number and press
If it emits a long error beep, start from step 1 again.
"Arm Home" to protect
while you're at home. This
mode deactivates motion
sensors but leaves other
sensors activated.
Arm Away / Exit Away
Enter PIN number and press
the "Arm Away" to protect your
home when you're away. This
mode activates or triggers the
alarm after a default set of time,
giving you enough time to get
in and out of your house to
arm/disarm the alarm system.
Screw
1. Undo the screw on the bottom of the Keypad and remove the back plate.
2. Mount the back plate with the included Screws.
3. Attach the Keypad on the back plate and tighten the screw on the
bottom of the Keypad.
5. Testing the Door/Window Sensor
NOTE: The Door/Window Sensors are factory preset in Zone 1.
3. The Main Console will continue
beeping and the Zone LED
will flash if the door is open.
1. Slide the switch at the back of
2. Activate the Sensor by
the Main Console to alert mode.
separating the magnetic
contact of the sensor.
4. Move the magnetic contact
3. The main console will
back to the sensor and the
beep continuously and flash
alert sound will stop.
the Zone 1 LED if the
door is open.
11. Install the Door/Window Sensor
Place the sensor in the appropriate location:
button.
Back
Plate
Mount the Door/Window Sensor on your door or window
with double sided tape.
Advertisement

Related Manuals for SkyLink M9


Summary of Contents for SkyLink M9
- Page 1 2. Use a coin to open the Motion Sensor and insert an AA Battery. Main Console the party responsible for compliance could void the user’s Model: M9 authority to operate the equipment. 1. Slide the switch at the back of 2.
- Page 2 Security Keypad Console. beeping sound. When chime mode is enabled When alert mode is enabled and your Skylink Alarm System and your Skylink Alarm System is disarmed, the Main Console will is disarmed, the Main Console will 3. Press the “Disarm Button” on 3.